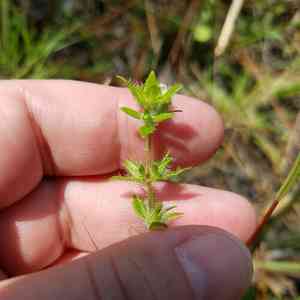
How to Transplant Shaggy hedgehyssop?
Shaggy hedgehyssop flourishes most effectively when relocated in the initial part of spring or the middle of autumn, thereby reducing transplant stress. Select a site featuring soil that drains efficiently and offers partial sun exposure. Ideal circumstances promote robust rooting and development.
What Preparations are Needed Before Transplanting Shaggy Hedgehyssop?
What is the Ideal Time for Transplanting Shaggy Hedgehyssop?
The best period to move shaggy hedgehyssop is during early spring or mid to late autumn. Relocating at these times allows the plant to develop roots before summer's heat or winter's cold. This timing ensures shaggy hedgehyssop receives sufficient moisture and experiences less stress, leading to stronger, healthier development.
How Much Space Should You Leave Between Shaggy Hedgehyssop Plants?
When relocating shaggy hedgehyssop, ensure each plant is positioned 12-18 inches (30-45 cm) apart. This spacing provides ample room for growth and air circulation, helping the plants flourish.
What is the Best Soil Mix for Shaggy Hedgehyssop Transplanting?
Prepare soil that drains well, using a blend of sand and loam for shaggy hedgehyssop. Mix in a balanced base fertilizer to supply essential nutrients. Aim for a pH level between 5.5 and 7.0.
Where Should You Relocate Your Shaggy Hedgehyssop?
Shaggy hedgehyssop prefers a sunny spot but can handle some shade. Select an area in your garden that gets at least 6 hours of direct sunlight daily for optimal growth.
What Equipments Should You Prepare Before Transplantation Shaggy Hedgehyssop?
Gardening Gloves
To shield your hands while handling soil and plants.
Spade or Shovel
To dig around the root ball and lift the plant from its original spot.
Trowel
For creating the hole in the new location.
Watering Can
To hydrate the plant before and after moving it.
Wheelbarrow
To move the plant if necessary.
Mulch
To cover the soil around the plant after relocation.
Plant Stakes and Ties (if needed)
To offer support if the plant requires it.
How Do You Remove Shaggy Hedgehyssop from the Soil?
How Do You Remove Shaggy Hedgehyssop from the Soil?
From Ground: First, water the shaggy hedgehyssop plant to moisten the soil. Then, dig a wide trench around the plant using a shovel or spade, making sure the plant's root ball stays intact. Carefully work the spade beneath the root ball to lift the plant from its initial position.From Pot: Lightly water the shaggy hedgehyssop plant to aid in its removal. Gently turn the pot on its side and tap the edges to loosen the soil. Carefully slide the root ball out, supporting the plant from its base.From Seedling Tray: Water the seedlings prior to transplanting. Use a small trowel or your fingers to gently lift each seedling from the tray, taking care to keep the root ball and surrounding soil intact.
Step-by-Step Guide for Transplanting Shaggy Hedgehyssop
Prepare the new site
Dig a hole in the new location that is slightly larger than the root ball of your shaggy hedgehyssop plant.
Acclimate the plant
If possible, allow your shaggy hedgehyssop plant to rest in a shaded area for an hour or two before transplanting to lessen shock.
Transfer the plant
Carefully place the shaggy hedgehyssop plant in the hole, ensuring the top of the root ball is level with the ground. Fill in around the root ball with soil, gently pressing it down to remove air pockets.
Water thoroughly
Immediately water the transplanted shaggy hedgehyssop plant generously, saturating the soil to settle it around the roots.
Apply mulch
Add a layer of mulch around the base of the plant to retain moisture and regulate soil temperature.
How Do You Care For Shaggy Hedgehyssop After Transplanting?
Watering
Keep the soil around the shaggy hedgehyssop consistently moist, but not waterlogged, for the first few weeks after transplanting to help establish strong roots.
Monitoring
Keep an eye on the shaggy hedgehyssop for signs of transplant shock such as wilting or discoloration and provide extra care as needed.
Mulching
Maintain the mulch layer to support moisture retention and prevent weeds.
Support
If your shaggy hedgehyssop plant is tall or tends to droop, consider using plant stakes and ties to provide additional support as it establishes itself in the new location.
Troubleshooting Common Issues with Shaggy Hedgehyssop Transplantation.
When is the best time to transplant shaggy hedgehyssop?
Transplant in early spring, mid-fall, or late fall for optimal results.
How much space should I leave between shaggy hedgehyssop plants?
Allow 12-18 inches (30-45 cm) of space between each plant.
Do I need to water shaggy hedgehyssop immediately after transplanting?
Yes, water thoroughly right after transplanting to help the roots settle.
What type of soil is best for transplanting shaggy hedgehyssop?
Well-draining, slightly acidic to neutral soil is ideal for shaggy hedgehyssop.
How deep should I dig the hole for shaggy hedgehyssop?
Dig a hole just deep enough to accommodate the root ball comfortably.
Should I prune shaggy hedgehyssop before transplanting?
Light pruning is beneficial to reduce transplant shock and encourage new growth.
Can transplanting shaggy hedgehyssop be done during a hot summer?
Avoid hot summer months; high temperatures can stress the plant during transplanting.
How do I handle shaggy hedgehyssop's roots while transplanting?
Gently loosen and spread out the roots to encourage outward growth.
What should I do if shaggy hedgehyssop looks wilted after transplanting?
Ensure it's watered and in a shady spot to recover from shock.
How long until shaggy hedgehyssop establishes after transplanting?
Shaggy hedgehyssop typically establishes within a few weeks to a few months, depending on care.


