How to Transplant Yellow gentian?
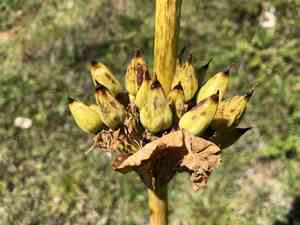
The most favorable time to move yellow gentian extends from early spring through mid-summer, promoting vigorous development. Choose a brightly lit location with soil that drains effectively. When transplanting established yellow gentian, minimize disturbance to its root system to facilitate an easy adjustment.
Necessary Preparations Before Relocating Yellow Gentian
Optimal Period for Moving Yellow Gentian
The ideal time for relocating yellow gentian is as spring transitions into summer. This period, nestled between growth spurts, ensures yellow gentian's roots establish well and thrive. Transplanting now provides yellow gentian with mild days and cool evenings, perfect for root development without intense sun exposure. Placing yellow gentian in its new spot at this time promises a season of vigorous growth and robust health.
Recommended Spacing Between Yellow Gentian Plants
When preparing a new home for your yellow gentian, remember to provide ample room! Placing them 12-24 inches (30-61 cm) apart will allow their roots to expand and leaves sufficient sunlight for flourishing.
Best Soil Blend for Yellow Gentian Relocation
Before settling your yellow gentian into its new bed, ensure the soil composition is just right! Aim for a well-draining, loamy soil enriched with compost to give your plant a nourishing start. Gently incorporate a balanced, slow-release fertilizer to feed your yellow gentian as it acclimates.
Choosing the New Location for Your Yellow Gentian
Your yellow gentian enjoys ample light but not excessive amounts! Select a site where it can receive partial sunlight, with some shade to shield it during the hottest part of the day. This will be the perfect bright spot for your yellow gentian to thrive.
Equipment Required Before Transplanting Yellow Gentian
Gardening Gloves
To safeguard your hands while handling soil and the plant.
Shovel or Spade
For excavating the plant and preparing a hole at the new site.
Garden Fork
To gently loosen soil around the plant's root system without causing significant harm.
Watering Can or Hose
For hydrating the plant before and after relocation.
Pruning Shears
To trim any damaged roots or excess foliage.
Burlap or Tarp
To transport the yellow gentian root ball and maintain root moisture during the move.
Measuring Tape
To confirm the new hole's dimensions are suitable for the root ball.
Wheelbarrow
For transporting soil and the plant, if needed.
Mulch
To aid in retaining soil moisture and regulating temperature post-transplant.
Soil Amendment
To enrich the soil at the new location, as required.
Method for Extracting Yellow Gentian from the Soil
Method for Extracting Yellow Gentian from the Soil?
From Ground: Hydrate the yellow gentian beforehand to facilitate soil removal. Dig a circular trench around the plant with a shovel or spade, wider than the anticipated root ball. Use a garden fork to carefully lift the roots, keeping the root ball intact.From Pot: Ensure the yellow gentian is adequately watered, then tilt the pot sideways and gently tap or squeeze it to dislodge the plant. Slide the plant out, preserving the root ball, and avoid pulling on the stems.From Seedling Tray: Water the yellow gentian to soften the soil. Use a spoon or a small implement to carefully scoop out individual plants, taking extra care not to harm the delicate roots and shoots.
Step-by-Step Guide for Relocating Yellow Gentian
Excavating The Hole
Dig a hole in the ground that is twice as wide and the same depth as the yellow gentian's root ball.
Inspecting Roots
Examine the root ball for any damaged or diseased roots and use pruning shears to remove them. If roots are circling, gently separate them.
Positioning The yellow gentian
Place the yellow gentian in the center of the hole at the same depth it was originally growing. Ensure that the yellow gentian is upright and straight.
Backfilling The Hole
Refill the hole with the excavated soil, gently compacting it around the roots to eliminate air pockets.
Thorough Watering
After planting, water the yellow gentian generously to settle the soil around the roots and aid in recovery from shock.
Applying Mulch
Spread mulch around the base of the yellow gentian, leaving some space around the stem to prevent rot.
Post-Transplant Care for Yellow Gentian
Consistent Watering
Maintain uniform moisture in the soil surrounding the yellow gentian, especially during the initial growing season, to encourage root establishment.
Growth Monitoring
Observe the yellow gentian for indications of stress or disease, and remove any dead or dying foliage.
Seasonal Maintenance
Apply mulch in spring and fall to safeguard the yellow gentian and help retain soil moisture.
Soil Upkeep
Topdress with compost or a recommended soil amendment annually to replenish nutrients.
Addressing Common Issues with Yellow Gentian Relocation.
When is the optimal time to transplant yellow gentian?
The best period to move yellow gentian is from mid-spring to mid-summer, ensuring ideal growth.
What distance should be maintained between yellow gentian when transplanting?
Aim for a comfortable distance of 12-24 inches (30-61 cm) between each yellow gentian to foster healthy growth.
My yellow gentian appears wilted after transplanting, what action should I take?
Don't worry! Ensure yellow gentian receives sufficient water; consistent moisture is crucial for recovery.
How deep should the hole be for transplanting yellow gentian?
For a proper fit, dig a hole as deep as the root ball and twice its width.
Can I apply fertilizer immediately after transplanting yellow gentian?
Refrain from fertilizing until yellow gentian has settled; it's best to wait a few weeks.
What if my yellow gentian isn't growing after being transplanted?
Be patient with yellow gentian; sometimes they need time to adjust. Verify adequate sunlight and water.
How should I water yellow gentian after transplanting?
Water your yellow gentian gently at the base to settle the soil and hydrate without causing erosion.
Is it necessary to prune yellow gentian when transplanting?
Not immediately. Allow yellow gentian to prioritize root development before considering any trimming.
What type of soil is most suitable for transplanting yellow gentian?
Utilize well-draining, loamy soil rich in organic matter to give yellow gentian the best start.
Why are the leaves of yellow gentian turning yellow post-transplant?
This could indicate stress or overwatering. Ensure proper drainage and adjust watering to suit yellow gentian's requirements.



