How to Transplant Resin spurge?
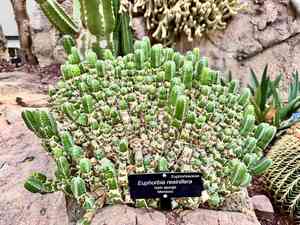
Relocate resin spurge as new growth commences in the mild temperatures of early to mid-spring to ensure the best root development. Select a bright spot with soil that drains effectively. Refrain from overwatering after transplanting to allow resin spurge to adjust without issue.
What Preparations are Needed Before Transplanting Resin Spurge?
What is the Ideal Time for Transplanting Resin Spurge?
The optimal period for relocating resin spurge is the onset of early to mid-spring. Moving resin spurge as spring invigorates the garden allows it to settle during the mild temperatures and increasing daylight hours characteristic of the season. This timeframe promotes strong root development and recovery from stress, ensuring resin spurge's success throughout the growing period. A friendly reminder: this effort enables resin spurge to flourish, embracing its fresh start with vitality and elegance!
How Much Space Should You Leave Between Resin Spurge Plants?
For resin spurge, prepare your garden by spacing each planting site approximately 2-3 feet (0.6-0.9 meters) apart. This will provide your plants with sufficient room to develop their natural form and size. Remember, thoughtful planning can yield significant benefits!
What is the Best Soil Mix for Resin Spurge Transplanting?
A combination of well-draining soil and a foundational fertilizer is excellent for resin spurge. Aim for a mix of loam or sandy soil and an all-purpose organic fertilizer. This setup supports robust root growth for consistent plant development.
Where Should You Relocate Your Resin Spurge?
Select a spot where resin spurge can receive full sunlight, as it thrives in bright conditions. Ensure the location isn't overly shaded, but also be cautious of intense midday sun that could cause damage.
What Equipments Should You Prepare Before Transplantation Resin Spurge?
Gardening Gloves
To safeguard your hands while handling the resin spurge plant and working with soil.
Hand Trowel
A convenient tool for digging up small plants, or for planting young plants and bulbs. Utilize them for effortlessly planting the resin spurge plant.
Shovel or Spade
For excavating a wide trench around the plant in its original spot and for preparing the new planting hole.
Garden Hoe
An equally crucial tool for blending garden soil and creating a hole for your resin spurge transplant.
Watering Can
Essential for hydrating the resin spurge throughout the transplanting process and afterward.
Wheelbarrow
Useful for transporting the resin spurge plant from its initial location to its new site.
How Do You Remove Resin Spurge from the Soil?
How Do You Remove Resin Spurge from the Soil?
From Ground: First, lightly moisten the resin spurge plant to dampen the surrounding soil. Using a shovel or spade, begin to dig a wide trench around the plant, going deep enough to keep the root ball intact. Carefully lift the resin spurge plant from its original position, ensuring the root ball is protected.From Pot: Slightly water the resin spurge plant, then turn the pot sideways, gently hold the plant by its stem and roots, and tap the bottom of its container until the plant slides out. Avoid pulling the plant as this can harm its roots.From Seedling Tray: Ensure the resin spurge seedlings are well-watered, then invert the tray or open its base and gently ease out the seedling. Handle seedlings with care as their roots are typically more delicate than those of larger plants.
Step-by-Step Guide for Transplanting Resin Spurge
Soil Preparation
Prepare the new area by loosening the existing soil. Incorporate garden soil and composted organic matter to enrich the soil for the resin spurge transplant.
Digging a Hole
The hole should be twice the width of the root ball and of equal depth. This will provide the root system ample space to establish itself.
Placing the Plant
Position the resin spurge into the hole. The top of the root ball should be level with the soil surface.
Backfilling
Fill the space around the resin spurge root ball with the enriched soil.
Water Thoroughly
Water generously to settle the soil around the roots and eliminate air pockets.
How Do You Care For Resin Spurge After Transplanting?
Initial Care
Water the resin spurge regularly until it becomes established. There might be initial transplant shock, so don't be alarmed if the plant doesn't immediately flourish.
Pruning
Trim any dead or damaged foliage to help the resin spurge direct its energy into new growth.
Monitor
Keep a close watch on the resin spurge as it settles in. Signs of pest infestations and diseases should be addressed promptly
Troubleshooting Common Issues with Resin Spurge Transplantation.
When is the optimal time to transplant resin spurge?
The best period for transplanting resin spurge is during S1-S2. This maximizes the plant's chances of thriving.
What's the ideal distance apart to plant resin spurge?
The optimal spacing when planting resin spurge is 2-3 feet (0.6-0.9 meter). This allows sufficient room for growth.
How do I prepare the new site for resin spurge transplantation?
Prepare a hole twice the size of resin spurge's root ball. Fill it with a mixture of soil and organic compost.
How to correctly extract resin spurge for transplantation?
Gently dig around the resin spurge, ensuring you extend far enough to avoid damaging the roots. Carefully lift it out.
What if the leaves of resin spurge turn yellow after transplantation?
Yellowing leaves may indicate water stress. Check the moisture level; resin spurge should not be over or under-watered.
How to care for resin spurge after transplantation?
Keep the soil moist but not waterlogged, and avoid excessive direct sunlight during the initial weeks.
Why is my transplanted resin spurge not showing new growth?
Resin spurge may require time to establish in a new location. Patience is necessary, and ensure proper watering and sunlight.
What to do if resin spurge wilts after transplantation?
Wilting may signal shock. Provide shade from direct sunlight and avoid overwatering. The plant should recover within a few weeks.
How deep should I plant resin spurge when transplanting?
The hole should be twice as wide and equal in depth to the root ball of resin spurge.
How long does it take for resin spurge to establish after transplanting?
Typically, resin spurge may take several weeks to become established. This can vary based on environmental conditions and care.



