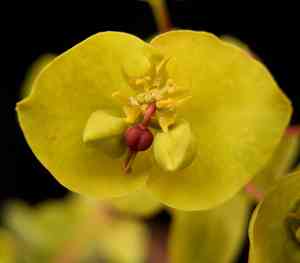
How to Transplant Seaside sandmat?
For seaside sandmat, the ideal period for relocating is from the onset of early spring to the peak of late spring, providing the best environment for development. Choose locations that receive ample sunlight and have good drainage. Careful management during the transfer guarantees strong rooting.
Necessary Preparations Before Relocating Seaside Sandmat?
Optimal Period for Moving Seaside Sandmat?
The best time to move seaside sandmat is during its spring revival, from the end of frost until flowering begins. Transplanting seaside sandmat then allows roots to establish in mild temperatures, crucial for strong growth. This timely relocation ensures seaside sandmat benefits from the full season, promoting vigorous development and beautiful blooms. Favorable weather conditions during this period help seaside sandmat settle into its new spot, giving it the best chance to flourish.
Recommended Spacing Between Seaside Sandmat Plants?
When preparing to rehome your seaside sandmat, remember to provide ample room for growth! A distance of approximately 12-18 inches (30-46 cm) between each plant is ideal for sufficient development and air circulation.
Ideal Soil Mixture for Seaside Sandmat Relocation?
To prepare the ground for your seaside sandmat, select a soil that drains well and is rich in organic material. Before moving the plant, incorporate a balanced, slow-release fertilizer to enrich the soil and give your plants an excellent start!
Where to Replant Your Seaside Sandmat?
Your seaside sandmat thrives in sunlight! Choose a bright location where it can receive at least 6 hours of direct sun daily. This will encourage robust and healthy growth. Happy gardening!
Equipment Required Before Transplanting Seaside Sandmat?
Gardening Gloves
To safeguard your hands while handling soil and plants.
Trowel
For gently excavating the plant if it's in a container or seedling tray.
Shovel or Spade
For digging around and beneath the root ball when the plant is in the ground.
Watering Can or Hose
To hydrate the plant before and after its relocation.
Shears or Pruning Snips
To remove any damaged roots or foliage.
Wheelbarrow
For moving the plant and soil if necessary.
Rooting Hormone
To apply to roots if transplanting from cuttings for improved establishment.
Garden Fork
To loosen the soil around the root area if moving from the ground.
How to Extract Seaside Sandmat from the Soil?
How to Extract Seaside Sandmat from the Soil?
From Ground: First, moisten the seaside sandmat plant to dampen the soil. Then, dig a wide trench around the plant using a shovel or spade, ensuring the plant's root ball remains intact. Carefully work the spade under the root ball to lift the plant from its original location.From Pot: Begin by watering the seaside sandmat in its current pot to moisten the root ball. Turn the pot sideways, hold the plant by the base, and gently tap the bottom of the pot to encourage the plant to slide out. If the plant is root-bound, gently tease the roots apart.From Seedling Tray: Moisten the soil of the seedling tray. Use a trowel or your fingers to gently pry the seaside sandmat seedling out, ensuring a good amount of soil adheres to the roots to protect them during the move.
Step-by-Step Guide for Relocating Seaside Sandmat
Preparation
Gather all necessary tools and thoroughly water the seaside sandmat plant before attempting to move it. This will help reduce transplant shock.
Root Ball Care
Carefully remove the seaside sandmat, keeping as much of the root ball intact as possible. For plants in containers or trays, gently untangle any circling roots.
Transplant Hole
Dig a new hole that is twice as wide but the same depth as the root ball. Loosen the soil at the bottom of the hole.
Planting Depth
Position the seaside sandmat in the center of the hole. Ensure the top of the root ball is level with the surrounding ground to encourage proper root development.
Fill In
Backfill around the root ball with soil, gently pressing down to eliminate any large air pockets.
Water Deeply
Water the seaside sandmat thoroughly after planting to help settle the soil and hydrate the roots.
Post-Transplant Care for Seaside Sandmat
Monitoring
Regularly inspect the seaside sandmat for indications of transplant shock, such as wilting or yellowing leaves. If symptoms appear, confirm you are not overwatering and that the plant is shielded from extreme weather.
Watering
Continue to provide the seaside sandmat with consistent moisture during its initial growing season, allowing the soil to dry slightly between waterings.
Mulching
Apply a layer of mulch around the base of the seaside sandmat to retain moisture and stabilize soil temperature.
Pruning
Trim any damaged or dead foliage to direct the seaside sandmat's energy towards root and new growth establishment.
Addressing Common Issues with Seaside Sandmat Relocation.
When is the optimal time to move seaside sandmat?
The best period to shift seaside sandmat is during the milder weather of early to late spring.
What spacing should I maintain between seaside sandmat when relocating?
Allow seaside sandmat ample room to flourish by placing them 12-18 inches (30-45 cm) apart.
Why are my relocated seaside sandmat wilting after planting?
Wilting may signal transplant shock. Ensure consistent soil moisture and initially protect from direct midday sun.
How deep should I plant seaside sandmat's roots?
Bury the roots of seaside sandmat just deep enough for the plant to stand upright, matching its previous soil line.
Is it advisable to move seaside sandmat during hot weather?
Relocating seaside sandmat in hot weather can cause stress. Aim for cooler, overcast days if possible.
What type of soil is best for transplanting seaside sandmat?
Well-draining soil with some organic matter is ideal for seaside sandmat to thrive post-transplant.
How much should I water seaside sandmat after relocation?
Immediately after transplanting, water seaside sandmat generously to help roots settle, then adjust to moderate watering.
Should I use fertilizer when moving seaside sandmat?
Refrain from using fertilizer until seaside sandmat has established. Apply a light dose if necessary.
My seaside sandmat isn't growing after transplant, what could be wrong?
Check for root-bound conditions, soil compatibility, and ensure you're not over or under watering.
How can I safeguard my newly transplanted seaside sandmat from pests?
Keep the area around seaside sandmat clear and monitor for pest signs, treating as needed with appropriate methods.


