How to Transplant Ashy sandmat?
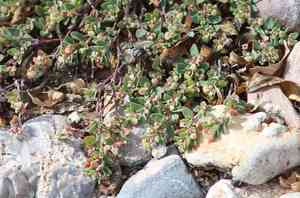
Ashy sandmat flourishes most effectively when relocated between early and late spring or from the beginning to the end of winter, thereby circumventing freezing temperatures. Opt for bright, well-drained sites to encourage peak development. Safeguard the root system during relocation to lessen stress.
What Preparations are Needed Before Transplanting Ashy Sandmat?
What is the Ideal Time for Transplanting Ashy Sandmat?
The prime period for relocating ashy sandmat, a perennial, spans from early to late spring or early to late winter. During these seasons, the plant is either emerging from or entering dormancy, which minimizes stress and promotes strong root establishment. Transplanting at this time boosts survival rates and vigorous development.
How Much Space Should You Leave Between Ashy Sandmat Plants?
When moving ashy sandmat, ensure each specimen is positioned 18-24 inches (45-60 cm) apart. This spacing provides ample room for individual plants to expand and flourish comfortably.
What is the Best Soil Mix for Ashy Sandmat Transplanting?
Prepare the soil for ashy sandmat by ensuring it drains well and has a sandy texture. Incorporate some compost or a foundational fertilizer, such as a slow-release granular type, to enrich the growing medium.
Where Should You Relocate Your Ashy Sandmat?
Ashy sandmat thrives in full sunlight, so select a spot that receives a minimum of 6-8 hours of direct sun daily. Avoid shaded areas to ensure optimal growth.
What Equipments Should You Prepare Before Transplantation Ashy Sandmat?
Gardening Gloves
To safeguard your hands while handling soil and plants.
Shovel or Spade
For digging and lifting the plant, along with its root system, from its original spot.
Trowel
Used for excavating smaller holes and aiding in the relocation process.
Bucket or Container
To move the plant from its initial location to the new site without harming the roots.
Watering Can or Hose
For hydrating the plant before removal and after its transfer to the new position.
Mulch
To assist in moisture retention and protect the roots of the newly transplanted plant.
How Do You Remove Ashy Sandmat from the Soil?
How Do You Remove Ashy Sandmat from the Soil?
From Ground: First, moisten the soil around the ashy sandmat plant by watering it. Next, use a shovel or spade to dig a wide trench around the plant, making sure the root ball stays intact. Carefully work the spade beneath the root ball to lift the plant from its original spot.From Pot: Start by thoroughly watering the ashy sandmat plant to moisten the soil. Gently tap the pot's sides to loosen the soil. Carefully hold the plant's base and tip the pot to slide the plant out, taking care not to damage the roots.From Seedling Tray: Lightly water the ashy sandmat plant seedlings to moisten the soil. Use a trowel or your fingers to gently lift each seedling by its leaves, not the stem, to prevent damage. Handle seedlings with care as their roots are very delicate.
Step-by-Step Guide for Transplanting Ashy Sandmat
Plant Preparation
Before extracting the ashy sandmat from its current location, ensure the soil is sufficiently damp to minimize root damage and simplify the removal process.
New Site Preparation
Excavate a hole at the new site that is twice as wide and equally as deep as the ashy sandmat's root ball. This additional space will allow the roots to spread comfortably.
Transferring the Plant
Carefully position the ashy sandmat into the prepared hole, ensuring the top of the root ball is level with or slightly above the surrounding ground. Gently backfill the hole with soil around the roots, making sure no air pockets remain.
Firming the Soil
Gently press the soil down around the plant to secure it in place. Be careful not to over-compact the soil, as this can hinder root development.
Watering
Thoroughly water the ashy sandmat after transplanting to settle the soil around the roots and provide immediate hydration.
How Do You Care For Ashy Sandmat After Transplanting?
Watering
Maintain consistent moisture in the soil around the ashy sandmat, avoiding sogginess, for the initial weeks post-transplant to encourage robust root development.
Mulching
Apply a thin layer of mulch around the plant's base to help retain moisture, stabilize soil temperature, and suppress weed growth.
Monitoring
Inspect the plant daily for indications of transplant shock, such as wilting or yellowing foliage. Remove any damaged leaves and ensure the plant is not exposed to harsh conditions during its recovery.
Pruning
Lightly trim any damaged or diseased sections of the plant to promote efficient resource allocation towards root establishment, and avoid stimulating new growth until the plant has settled.
Troubleshooting Common Issues with Ashy Sandmat Transplantation.
When is the best time to transplant ashy sandmat?
The optimal period for relocating ashy sandmat is from early spring through late spring or early winter through late winter.
How much space should I leave between ashy sandmat plants?
Maintain a distance of 18-24 inches (45-60 cm) between each ashy sandmat plant for ideal growth.
What type of soil is ideal for transplanting ashy sandmat?
Select well-draining, sandy or loamy soil to ensure successful transplanting and healthy growth of ashy sandmat.
How should I prepare ashy sandmat before transplanting?
Water the plant thoroughly and carefully dig around the root ball to minimize stress during the transplant process.
What is the ideal depth for planting ashy sandmat?
Plant ashy sandmat at the same depth it was previously growing to prevent root stress.
How can I minimize transplant shock for ashy sandmat?
Apply a root stimulator and keep the soil consistently moist, but not waterlogged, to lessen shock.
Should I fertilize ashy sandmat after transplanting?
Wait several weeks post-transplant before applying a balanced, slow-release fertilizer to ashy sandmat.
How much water does ashy sandmat need after transplanting?
Keep the soil uniformly moist, not saturated, especially during the initial weeks following ashy sandmat's transplant.
Can I transplant ashy sandmat in full sun?
Yes, ashy sandmat thrives in full sun; ensure it receives at least 6 hours of direct sunlight daily.
How can I support ashy sandmat during its initial growth after transplant?
Apply mulch around the base to retain moisture, suppress weeds, and regulate soil temperature.



