How to Transplant Tuart?
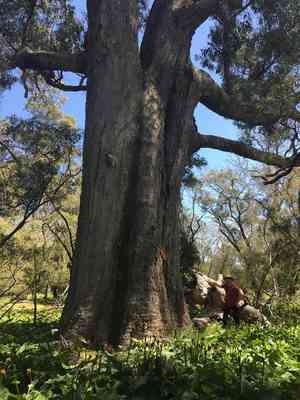
The optimal period for relocating tuart spans from early spring to the beginning of summer, facilitating strong root development. Select locations with ample sunlight and soil that drains effectively. Should it be necessary, carefully separate the roots to promote their outward expansion.
What Preparations are Needed Before Transplanting Tuart?
What is the Ideal Time for Transplanting Tuart?
For tuart, the period from early spring's awakening to its full bloom (March through May) is perfect for relocation. During this time, mild temperatures and increasing daylight encourage root development, while the soil is moist yet warm, aiding establishment before summer heat. Choosing this timeframe gives tuart a strong start, aligning with its natural growth cycle for the best chance of success.
How Much Space Should You Leave Between Tuart Plants?
Hello! To allow your tuart ample room to flourish, aim for a generous spacing of 20-35 feet (6-10.5 meters) between each specimen. This ensures sufficient growth area, preventing crowding and fostering healthy development.
What is the Best Soil Mix for Tuart Transplanting?
For your tuart, a well-drained sandy soil would be ideal, allowing its roots to breathe and expand. Incorporate a balanced, slow-release fertilizer for an initial boost, but ensure it's not overly rich â tuart prefers a less fertile environment!
Where Should You Relocate Your Tuart?
Your tuart thrives in sunlight! Select a location that receives full sun for most of the day to keep it content. A sunny spot will provide the radiant energy tuart requires for robust and healthy growth.
What Equipments Should You Prepare Before Transplantation Tuart?
Gardening Gloves
To safeguard your hands while handling soil and plants.
Shovel or Spade
For excavating and moving the plant.
Hand Trowel
For smaller digging tasks and refining the planting site.
Root Pruning Shears
To trim roots if needed.
Wheelbarrow
To transport the plant and soil materials.
Watering Can or Hose
For hydrating the plant before and after its move.
Mulch
To help retain soil moisture and regulate temperature after transplanting.
Stakes and Ties
To provide support for the plant in its new spot if necessary.
How Do You Remove Tuart from the Soil?
How Do You Remove Tuart from the Soil?
From Ground: First, moisten the soil around the tuart plant. Then, dig a wide trench around the plant with a shovel or spade, ensuring the root ball remains intact. Carefully work the spade beneath the root ball to lift the plant from its original position.From Pot: Water the tuart plant and gently tap the pot's sides to loosen the soil. Tilt the pot sideways and carefully slide the plant out, supporting the root ball with your hand.From Seedling Tray: Water the seedlings thoroughly. Use a hand trowel or fork to gently lift the tuart seedling from the tray by pushing up from the bottom, taking care not to harm the roots or stem.
Step-by-Step Guide for Transplanting Tuart
Timing
Aim to transplant in the early morning or on an overcast day to prevent excessive wilting.
Hole Preparation
Excavate a hole twice the width of the root ball and equally deep, allowing roots ample room to spread.
Plant Inspection
Examine the root ball, trim any broken or dead roots with pruning shears, and loosen any circling roots.
Placing the Plant
Carefully position the tuart plant in the hole, ensuring it stands upright and at its original growing depth.
Filling the Hole
Gently backfill the hole with soil, firming it down to eliminate air pockets without over-compacting.
Watering
Water the tuart plant generously to settle the soil and hydrate the roots. Avoid saturating the area.
Stabilizing
If the tuart plant is large or exposed to wind, secure it with stakes and ties to prevent it from falling over.
Mulching
Apply a layer of mulch around the plant's base, keeping it away from the stem, to conserve moisture.
How Do You Care For Tuart After Transplanting?
Monitoring
Inspect the tuart plant daily for signs of transplant shock, such as wilting or discolored foliage.
Watering
Establish a watering routine, keeping the soil consistently moist for the initial few months until the plant is established.
Staking
Adjust stakes and ties as the tuart plant grows to provide adequate support without constricting the stem.
Pruning
Remove any damaged or diseased branches to redirect energy towards root establishment.
Mulching
Replenish the mulch layer as needed to maintain its benefits.
Protection
Consider using a windbreak or shade cloth if severe weather is anticipated soon after transplanting.
Troubleshooting Common Issues with Tuart Transplantation.
What's the best time of year to transplant tuart?
Relocate tuart during early to late spring for optimal root establishment in milder temperatures.
How far apart should I space tuart when transplanting?
Position tuart at least 20-35 feet (6-10.7 meters) apart to ensure adequate room for growth.
Why is my tuart wilting after transplanting?
Wilting may be due to shock. Keep the soil moist and shield the plant from intense sun until it recovers.
How deep should the hole be for transplanting tuart?
Excavate a hole twice as wide and precisely as deep as the tuart's root ball.
How much water does tuart need after transplanting?
Water tuart generously immediately after transplanting, then regularly, allowing the soil to dry slightly between waterings.
Should I fertilize tuart when transplanting?
Wait until tuart exhibits new growth before applying a balanced, slow-release fertilizer to prevent root burn.
How do I handle the roots of tuart when transplanting?
Gently untangle circling roots before planting to encourage outward growth and prevent root girdling.
Why is tuart dropping leaves after transplanting?
Leaf shedding can indicate transplant shock. Maintain consistent watering and avoid disturbing the roots to aid recovery.
Can I prune tuart during transplanting?
Light pruning is acceptable to remove dead or damaged branches, but avoid heavy pruning which can stress tuart.
What should I do if tuart isn't growing after transplanting?
Patience is crucial. Ensure proper watering, lighting, and soil conditions. If no improvement, consult a local horticulturist.



