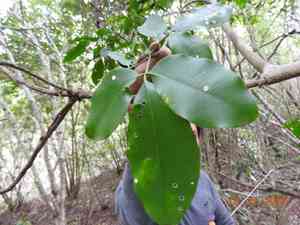
How to Transplant Berlandier's jopoy?
Berlandier's jopoy flourishes when transplanted from early spring through the middle of spring, coinciding with its inherent developmental phase. For best outcomes, select a location offering partial shade and soil that drains effectively. Avoid excessive density to foster robust root expansion.
Essential Preparations Before Relocating Berlandier's Jopoy?
Optimal Period for Transplanting Berlandier's Jopoy?
Berlandier's jopoy, a perennial, thrives when moved from early to late spring. This timeframe ensures the soil is warming and moisture is plentiful, aiding root establishment before summer heat. Transplanting then maximizes growth and resilience for a strong season.
Recommended Spacing Between Berlandier's Jopoy Plants?
Allocate 3 to 5 feet (0.9 to 1.5 meters) between each berlandier's jopoy plant. This spacing promotes adequate air circulation and development, preventing overcrowding and fostering a healthy garden.
Ideal Soil Blend for Berlandier's Jopoy Transplantation?
Prepare soil that drains well, enriched with compost or a balanced fertilizer. Berlandier's jopoy prefers slightly acidic to neutral soil (pH 6.0-7.0). This rich foundation supports robust root growth and vigorous plants.
Selecting a New Site for Your Berlandier's Jopoy?
Choose a location with full sun exposure, receiving at least 6-8 hours of sunlight daily. Ample light is crucial for berlandier's jopoy to thrive and produce vibrant foliage.
Tools Required for Berlandier's Jopoy Transplantation?
Gardening Gloves
To safeguard your hands while handling soil and the plant.
Shovel or Spade
For excavating around the plant and preparing its new spot.
Trowel
For more precise digging and backfilling soil around the transplanted plant.
Pruners
To trim any damaged roots or foliage during the relocation.
Watering Can
To hydrate the plant before and after the move.
Burlap Sack
To wrap the root ball, if needed, to prevent damage during transport.
Method for Extracting Berlandier's Jopoy from the Ground?
Method for Extracting Berlandier's Jopoy from the Ground?
From Ground: First, moisten the soil around the berlandier's jopoy plant. Then, dig a wide trench around it with a shovel or spade, keeping the root ball intact. Carefully work the spade beneath the root ball to lift the plant.From Pot: Water the berlandier's jopoy plant thoroughly. Gently tap the pot's sides to loosen the soil. Tilt the pot and carefully slide the plant out, holding the stem's base. If stuck, use a trowel to loosen edges.From Seedling Tray: Ensure the soil is damp by watering the berlandier's jopoy seedlings. Using a trowel or flat tool, gently lift each seedling, ensuring roots and surrounding soil remain a single unit.
Step-by-Step Guide for Relocating Berlandier's Jopoy
Digging the Hole
Excavate a hole at the new site that is twice as wide and as deep as the berlandier's jopoy plant's root ball. This facilitates easy root spread.
Initial Placement
Position the berlandier's jopoy plant in the hole so the top of its root ball is level with the surrounding soil. Adjust hole depth as needed.
Refilling
Backfill the hole around the root ball with soil, gently pressing to eliminate air pockets. Ensure the plant is upright and stable during this process.
Hydration
Water the berlandier's jopoy plant deeply to help the soil settle around its roots. Confirm water reaches the bottom of the planting hole.
Mulch Application
Apply a layer of mulch around the base of the berlandier's jopoy plant. This aids in moisture retention and weed suppression.
Post-Transplantation Care for Berlandier's Jopoy?
Watering
Maintain consistent moisture around the berlandier's jopoy, avoiding sogginess, for several weeks post-transplant to encourage strong root development.
Mulching
Periodically inspect the mulch layer to ensure it hasn't become too dense around the plant's stem, which could impede air and water flow.
Observation
Watch the berlandier's jopoy for signs of distress, such as wilting or yellowing leaves, and address issues promptly, like adjusting watering or checking for pests.
Pruning
Remove any damaged or dead leaves and stems to redirect energy towards new growth.
Resolving Common Issues with Berlandier's Jopoy Transplantation.
When is the best time to transplant berlandier's jopoy?
Transplant berlandier's jopoy between early spring and late spring for optimal outcomes.
How much space is needed between berlandier's jopoy plants?
Plant berlandier's jopoy with 3-5 feet (91-152 cm) of separation to allow for development.
How to prepare the soil for transplanting berlandier's jopoy?
Ensure soil is well-draining and rich in organic matter for berlandier's jopoy transplants.
How deep should I plant berlandier's jopoy in its new location?
Plant berlandier's jopoy at its original growing depth for best acclimation.
What should I do if berlandier's jopoy wilts after transplanting?
Water consistently and provide shade until berlandier's jopoy establishes in its new spot.
How soon should I water berlandier's jopoy after transplanting?
Water berlandier's jopoy immediately after transplanting to help settle the roots.
What can I do to reduce transplant shock in berlandier's jopoy?
Use a root stimulant and keep berlandier's jopoy well-hydrated, preventing stress.
How to handle berlandier's jopoy roots during transplanting?
Handle gently and try to retain as much soil as possible around berlandier's jopoy's roots.
What if the leaves of berlandier's jopoy turn yellow after transplanting?
Ensure proper watering and check for drainage issues if berlandier's jopoy's leaves yellow.
How can I keep pests away from newly transplanted berlandier's jopoy?
Monitor regularly and use organic pest deterrents to protect berlandier's jopoy after transplanting.


