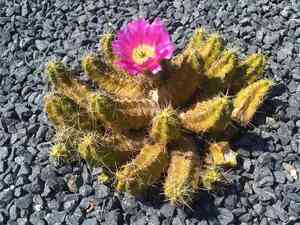
How to Transplant Ladyfinger cactus?
Relocate ladyfinger cactus during the pleasant temperatures of early to mid-summer for vigorous development. Select a brightly lit location that offers effective water runoff. During the repotting process, proceed gently to minimize disruption to the root system.
What Preparations are Needed Before Transplanting Ladyfinger Cactus?
What is the Ideal Time for Transplanting Ladyfinger Cactus?
The beginning of warm weather in early to mid-summer offers a perfect period for relocating ladyfinger cactus. This season provides consistent, predictable temperatures that ensure optimal root establishment for ladyfinger cactus, reducing transplant shock. Comfortable daytime temperatures without frost risk encourage rapid recovery and growth, making it an excellent time for this task. By transplanting ladyfinger cactus during this prime window, you'll give it the best conditions to flourish, ensuring a smooth transition to its new location.
How Much Space Should You Leave Between Ladyfinger Cactus Plants?
When planning to move your ladyfinger cactus, ensure each plant has ample room to develop. A spacing of approximately 1-2 feet (30-60 cm) between each plant should be optimal. This guarantees they have sufficient space to thrive without overcrowding.
What is the Best Soil Mix for Ladyfinger Cactus Transplanting?
Your ladyfinger cactus will flourish best in a well-draining cactus or succulent substrate. Preparing the soil with a foundational fertilizer, such as a slow-release granular or water-soluble type, will supply the essential nutrients needed for ladyfinger cactus to thrive.
Where Should You Relocate Your Ladyfinger Cactus?
Find a spot that receives partial to full sun exposure daily. Ladyfinger cactus, like other cacti, requires about 6-8 hours of sunlight each day. However, ensure it's not exposed to intense afternoon sun, as this can scorch the plant.
What Equipments Should You Prepare Before Transplantation Ladyfinger Cactus?
Gardening Gloves
To safeguard your hands from the spines of the ladyfinger cactus and assist in handling soil and rocks.
Garden Trowel
Useful for excavating a small ladyfinger cactus or creating an appropriate hole in the ground for it.
Pruning Shears
Helpful if any cleaning of the root system is required or to trim damaged sections of the ladyfinger cactus.
Sturdy Shovel
To dig out larger ladyfinger cactus or prepare the transplant area for bigger plants.
Wheelbarrow
This would be beneficial if the ladyfinger cactus is large or if you intend to transplant multiple plants.
Watering Can
Gently hydrating the ladyfinger cactus before and after the relocation.
How Do You Remove Ladyfinger Cactus from the Soil?
How Do You Remove Ladyfinger Cactus from the Soil?
From Ground: To extract the ladyfinger cactus from the ground, first moisten the soil around the plant by watering; this will facilitate removal and minimize root damage. The excavation should be larger than the root ball itself to avoid severing root extensions. Dig around the ladyfinger cactus, using a robust shovel or garden trowel depending on the plant's size. Carefully lift the ladyfinger cactus out of the hole and set it aside.From Pot: If the ladyfinger cactus is in a container, remove it by gently inverting the pot while supporting the soil surface with your hand, with the stem between your fingers. Lightly tap the bottom of the pot until the plant and its root ball come free. Handle the ladyfinger cactus carefully by its root ball, not by the stem or leaves.From Seedling Tray: To remove the ladyfinger cactus from a seedling tray, gently grasp the leaf base (never the stem) and softly push the bottom of the container until it releases.
Step-by-Step Guide for Transplanting Ladyfinger Cactus
Preparation
Before planting, thoroughly water the ladyfinger cactus to reduce its water stress. Prepare a transplant hole that is sufficiently wide and deep to accommodate the root ball of the ladyfinger cactus.
Placement
Lower the ladyfinger cactus into the hole, positioning it so its base is level with the ground surface, and spread the roots outwards within the hole. Backfill the hole with the original soil, gently firming it around the roots.
Watering
Once the ladyfinger cactus is planted, give it a good drink of water. Be sure to water gently to avoid washing away the soil or causing damage to the roots.
Staking (if necessary)
If the ladyfinger cactus is a large, mature plant, it can be helpful to stake the plant to provide some support while it establishes.
Mulching
To help conserve moisture and deter weed growth, apply organic mulch around the base of the ladyfinger cactus, but keep it away from the stem to prevent rot.
How Do You Care For Ladyfinger Cactus After Transplanting?
Watering
After transplanting, keep the ladyfinger cactus well-hydrated until it establishes. Following the initial few weeks, water it less frequently but deeply to encourage robust root growth.
Pruning
Prune any dead or damaged sections of the ladyfinger cactus after a few weeks to encourage new growth and maintain its appearance. Be sure to use clean pruners to prevent disease spread.
Pests and Disease Check
Closely monitor the ladyfinger cactus for pest infestations or indications of disease, and treat promptly if necessary.
Frost Protection
If cold weather or frost is anticipated, consider using a frost cloth or similar covering to protect the ladyfinger cactus, as it may be more vulnerable to cold damage immediately after transplanting.
Troubleshooting Common Issues with Ladyfinger Cactus Transplantation.
When is the best time of year for transplanting ladyfinger cactus?
Ideally, you should transplant ladyfinger cactus during the transitional or mid-seasons, which typically fall between S4-S5.
How much space should I give between each ladyfinger cactus when transplanting?
Providing each ladyfinger cactus with ample room to grow is crucial. Space them approximately 1-2 feet (30-60 cm) apart.
What size of container is ideal for ladyfinger cactus?
Choose a container that is 10-12 inches (25-30 cm) wide. This ensures sufficient space for ladyfinger cactus to extend its roots.
What type of soil should I use when transplanting ladyfinger cactus?
Ladyfinger cactus prefers well-draining soil. A commercially available cactus or succulent mix would be perfect.
Do I need to use fertilizer when transplanting ladyfinger cactus?
While not mandatory, you can apply a diluted cactus fertilizer during the growing season to encourage healthy development.
How often should I water ladyfinger cactus after transplanting?
After transplanting, water ladyfinger cactus thoroughly. Then, allow the soil to dry out completely between waterings to prevent root rot.
What is the ideal temperature for ladyfinger cactus after transplanting?
Ladyfinger cactus thrives in warm temperatures but can withstand lows of 50°F (10°C). Avoid temperatures below freezing.
How long does it take ladyfinger cactus to establish after transplanting and how to know it's successful?
Typically, it takes a few weeks for ladyfinger cactus to establish. New growth and blooming are good indicators of a successful transplantation.
Where should I place the ladyfinger cactus after transplanting?
Position ladyfinger cactus in a location that receives full sun to partial shade. Ensure it is protected from strong winds for better growth.
How to deal with ladyfinger cactus not blooming after transplantation?
Examine environmental factors such as light, temperature, and water. Closely adhering to ladyfinger cactus's specific requirements will usually help induce blooming.


