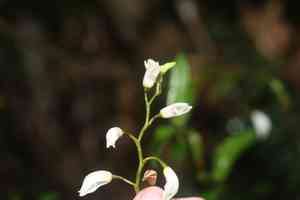
How to Transplant Parrotbeak orchid?
The optimal period for relocating parrotbeak orchid spans from early to mid-winter, which guarantees the plant's inactive state and reduces shock. Select a site that offers shade and good drainage to facilitate robust establishment and expansion. Sufficient irrigation after transplantation fosters vigorous root formation.
Essential Preparations Before Relocating Parrotbeak Orchid
Optimal Period for Relocating Parrotbeak Orchid?
Parrotbeak orchid, a perennial, is best moved from early to late winter. This timing capitalizes on the plant's dormant state, reducing stress and allowing root establishment prior to vigorous spring growth. Advantages include minimized transplant shock and enhanced root development, preparing for a strong flowering season.
Recommended Spacing Between Parrotbeak Orchid Plants?
When moving parrotbeak orchid, ensure a separation of 12-18 inches (30-45 cm). This distance provides ample room for growth and promotes air circulation to prevent disease.
Ideal Soil Mixture for Parrotbeak Orchid Relocation?
For parrotbeak orchid, prepare soil that drains well, such as a loamy type. Incorporate a foundational fertilizer rich in organic matter, like compost or a balanced 10-10-10 blend, to enrich the soil before the move.
Selecting a New Site for Your Parrotbeak Orchid?
Choose a spot for parrotbeak orchid that receives filtered sunlight or partial shade. Excessive direct sun can cause stress, while insufficient light may impede blooming.
Equipment Needed Before Transplanting Parrotbeak Orchid
Gardening Gloves
To safeguard your hands while handling soil and the plant.
Shovel or Spade
For digging around the plant and extracting it from its original spot.
Hand Trowel
Useful for working in confined areas and moving small plants.
Wheelbarrow
To move the plant from its initial location to the new planting site.
Watering Can or Hose
To maintain soil moisture during and after the relocation process.
Garden Fork
To loosen the soil in the designated new planting zone.
Rooting Hormone (optional)
To aid the plant in establishing roots more rapidly in its new environment.
Method for Extracting Parrotbeak Orchid from the Soil?
Method for Extracting Parrotbeak Orchid from the Soil?
From Ground: First, moisten the soil surrounding the parrotbeak orchid. Using a shovel or spade, dig a wide trench around the plant, ensuring the root ball remains intact. Carefully work the shovel beneath the root ball and gently lift the plant from the ground. If needed, use a garden fork to help loosen the soil.From Pot: Thoroughly water the parrotbeak orchid. Gently tap the pot's sides to loosen the plant. Tilt the pot and carefully slide the plant out, supporting the root ball with your other hand. If the plant is root-bound, gently separate the roots to encourage growth in the new location.From Seedling Tray: Water the seedlings and use a hand trowel to carefully lift each parrotbeak orchid, holding it by the leaves to prevent stem damage. Gently untangle any intertwined roots if necessary.
Detailed Steps for Relocating Parrotbeak Orchid
Preparation of Planting Hole
Excavate a hole in the new spot that is twice as wide and the same depth as the parrotbeak orchid's root ball. This provides ample space for root expansion.
Removal from Original Site
Refer to the specific removal instructions for ground, pot, or seedling tray as previously outlined.
Plant Positioning
Place the parrotbeak orchid in the center of the hole, ensuring it sits at the same depth as in its previous location. Gently spread the roots within the hole.
Backfilling the Hole
Fill the hole with soil, gently patting it down to eliminate air pockets. Confirm the plant is upright and stable.
Initial Watering
Thoroughly water the parrotbeak orchid after planting to help the soil settle around the roots and provide essential moisture.
Post-Transplant Care for Parrotbeak Orchid
Watering
Maintain consistent moisture in the soil around the parrotbeak orchid, avoiding saturation, for the initial weeks after transplanting to foster strong root development.
Mulching
Apply a layer of mulch around the base of the parrotbeak orchid to aid in moisture retention and soil temperature regulation.
Observation and Adjustment
Monitor the plant for any indications of stress, such as wilting or yellowing leaves, and modify care as necessary. Consider using a shade cloth if the plant appears to be struggling with excessive sunlight.
Resolving Common Issues with Parrotbeak Orchid Relocation.
When is the optimal period to move parrotbeak orchid?
Early to late winter is the prime time to relocate parrotbeak orchid for successful establishment.
What distance should be maintained between relocated parrotbeak orchid?
Allow a space of 12-18 inches (30-46 cm) between each parrotbeak orchid to ensure sufficient growth area.
Which soil type is best for parrotbeak orchid after relocation?
Parrotbeak orchid thrives in well-draining, slightly acidic to neutral soil for optimal results.
What should be the depth of the planting hole for parrotbeak orchid?
Dig a hole approximately twice the size of the root ball to accommodate parrotbeak orchid.
How much water is required after moving parrotbeak orchid?
Water parrotbeak orchid thoroughly post-transplant to settle the soil and hydrate the roots.
How to handle parrotbeak orchid roots during relocation?
Handle parrotbeak orchid roots with care, preventing damage, and spread them out in the planting hole.
What if parrotbeak orchid exhibits transplant shock?
Water regularly and shield from direct sun. Consider a root growth stimulant to aid parrotbeak orchid's recovery.
How much sunlight does parrotbeak orchid need after relocation?
Ensure parrotbeak orchid receives partial to full sunlight, ideally around 6 hours of indirect light daily.
Should I fertilize parrotbeak orchid immediately after relocation?
Wait at least one month before fertilizing parrotbeak orchid, allowing it to establish without added stress.
How can I mulch parrotbeak orchid after relocation?
Apply a 2-3 inch (5-8 cm) layer of organic mulch around parrotbeak orchid to retain moisture and regulate temperature.


