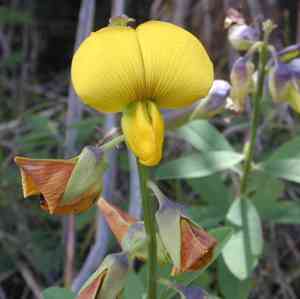
How to Transplant Salparni?
The optimal period for relocating salparni is at the transition from late spring to early summer, when temperatures begin to rise. Select a brightly lit spot with soil that drains effectively to encourage vigorous development. A delicate approach is crucial when re-establishing salparni; handle its root system with caution.
What Preparations are Needed Before Transplanting Salparni?
What is the Ideal Time for Transplanting Salparni?
The optimal period for moving salparni is at the juncture of late spring and early summer. This favorable window offers mild temperatures and stable conditions, promoting robust root development and minimizing transplant stress. Relocating salparni during this time ensures it benefits from the combination of spring moisture and summer warmth, crucial for root establishment. By selecting this timeframe, you'll give salparni the gentle boost it needs to flourish, adapting smoothly to its new location while absorbing the extended daylight that fuels vigorous growth. This helpful guidance should lead any salparni enthusiast to a successful gardening outcome!
How Much Space Should You Leave Between Salparni Plants?
When getting ready to rehome your salparni, remember to allow approximately 18-24 inches (45-60 cm) between each specimen. This provides ample room for their roots to expand and for them to thrive!
What is the Best Soil Mix for Salparni Transplanting?
Your salparni will flourish in well-draining soil that is rich in organic matter. Prior to transplanting, enrich the soil with a balanced, slow-release fertilizer to give your salparni a nourishing start in its new spot.
Where Should You Relocate Your Salparni?
Choose a sunny location for your salparni as it enjoys ample sunlight. Aim for a spot that receives at least 4-6 hours of direct sun daily to keep your salparni content and healthy!
What Equipments Should You Prepare Before Transplantation Salparni?
Gardening Gloves
To safeguard your hands while handling soil and plants.
Shovel or Spade
To carefully excavate the salparni plant for relocation.
Hand Trowel
For lifting small plants or working in confined areas.
Pruning Shears
To trim any dead or excessive parts of the plant or its roots.
Watering Can or Hose
To hydrate the plant before and after its move.
Wheelbarrow or Garden Cart
To transport the salparni plant and soil.
Garden Fork
To loosen the soil around the salparni plant's root zone.
Rooting Hormone (optional)
To stimulate root development in its new environment.
Mulch
To help retain soil moisture and regulate soil temperature after transplant.
How Do You Remove Salparni from the Soil?
How Do You Remove Salparni from the Soil?
From Ground: Start by watering the salparni plant to moisten the soil. Use a shovel or garden fork to gently dig a wide circle around the plant, being careful not to harm the root system. Gradually deepening the trench, carefully lift the root ball.From Pot: Ensure the soil is damp and gently tip the pot sideways. Support the salparni plant with one hand and use the other to tap the pot's edges and bottom to loosen the soil. Slide the salparni plant out while maintaining the root ball's shape.From Seedling Tray: Water the tray to facilitate removal. Carefully push the salparni seedling from the bottom of its cell or use a hand trowel to lift it out, keeping the soil and roots intact.
Step-by-Step Guide for Transplanting Salparni
Preparation
Confirm the plant's vitality, ensuring it is free from pests or diseases. Adequately hydrate the salparni plant before transplanting to minimize shock.
Digging New Hole
Excavate a hole in the ground where the salparni plant will be moved. The hole should be twice as wide as the root ball and of equal depth to allow for expansion without burying the plant too deeply.
Placing the Plant
Position the salparni plant in the center of the newly dug hole. Gently spread out the roots if they are clustered. The top of the root ball should be level with the surrounding soil surface.
Backfilling
Fill the hole around the root ball with soil, gently patting down around the base to eliminate any air pockets. Avoid compacting the soil too firmly, as this can hinder root growth.
Watering
Water thoroughly around the base of the salparni plant to settle the soil and remove air pockets. This also provides essential hydration for the roots to begin establishing.
Mulching
Apply a layer of mulch around the plant's base, keeping it a few inches away from the stem to prevent rot and maintain soil moisture.
How Do You Care For Salparni After Transplanting?
Regular Watering
Maintain consistent soil moisture, especially during the initial growing season, to help the salparni plant establish. Excessive watering can be detrimental, so allow the soil to dry slightly between irrigation events.
Monitoring
Observe the salparni plant closely for indications of transplant shock, such as wilting or yellowing foliage, and address any issues promptly. Remove any damaged leaves to encourage new growth.
Weeding
Keep the area around the salparni plant clear of weeds, which can compete for vital nutrients and water.
Protection
Safeguard the salparni plant from pests or physical harm using appropriate measures. Consider providing plant supports if necessary.
Troubleshooting Common Issues with Salparni Transplantation.
When's the best time to transplant salparni?
The optimal transplanting period for salparni is during the shift from late spring to early summer.
How far apart should I space salparni seedlings?
Place salparni seedlings so they have ample room to grow, ideally 18-24 inches (45-60 cm) apart.
What's the ideal soil for transplanting salparni?
Utilize well-draining soil enriched with organic matter to provide salparni a strong foundation for growth.
How deep should I plant salparni's roots?
The root ball should be positioned in a hole where its top surface is level with the surrounding soil.
Can I transplant salparni during rainy season?
Excessive moisture can pose a problem. Aim for a dry, overcast day within the recommended season.
Why are my transplanted salparni wilting?
Wilting may be due to transplant shock. Ensure adequate soil moisture and avoid direct sunlight initially.
How much water does salparni need after transplanting?
Keep the soil consistently moist but not waterlogged. Provide 1 inch (2.5 cm) of water weekly.
Should I fertilize salparni after transplanting?
Wait 4-6 weeks before applying fertilizer to allow salparni to establish its root system.
How do I protect salparni from transplant shock?
Gradually acclimatize salparni to outdoor conditions, offer shade, and maintain proper watering.
My salparni has yellow leaves after transplanting, why?
Yellow leaves might indicate over-watering or a nutrient deficiency. Adjust your watering schedule and check soil fertility.


