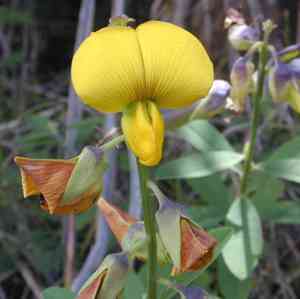
How to Transplant Elegant tick clover?
The ideal period for relocating elegant tick clover spans from mid-spring to late spring, offering a perfect opportunity for its root system to settle prior to the summer heat. Choose a location that drains effectively and receives abundant sunlight. Acclimating the soil is crucial; a gradual introduction aids elegant tick clover in flourishing after transplantation.
Preparations Required Before Relocating Elegant Tick Clover
Optimal Period for Relocating Elegant Tick Clover
The most favorable time for moving elegant tick clover is from mid-spring through early summer. This timeframe allows elegant tick clover to establish its root system prior to the peak summer heat. Providing elegant tick clover with this schedule supports its development, offering the advantage of moderate temperatures and the gentle start of the growing season's rainfall. This careful synchronization ensures elegant tick clover's robust growth, setting the stage for a vibrant, flourishing presence in your garden.
Recommended Spacing Between Elegant Tick Clover Plants
When arranging your elegant tick clover, aim for an optimal distance of approximately 18-24 inches (45-60 cm) between plants. This provides ample room for them to thrive without competing for resources, resulting in healthier, more vigorous plants!
Ideal Soil Mixture for Elegant Tick Clover Relocation
For elegant tick clover, a loamy soil rich in organic matter will be highly suitable. Before planting, incorporate a balanced, slow-release fertilizer to give your elegant tick clover a nutritional boost. Consider it their welcoming meal in their new environment!
Optimal Location for Relocating Your Elegant Tick Clover
Select a site for your elegant tick clover that receives full sun to partial shade. A location where they can enjoy at least 4-6 hours of sunlight daily will ensure their vigorous growth and lush appearance!
Equipment Needed Before Relocating Elegant Tick Clover
Gardening Gloves
To safeguard your hands while handling soil and plants.
Spade or Shovel
For excavating the plant from its original spot and preparing a new hole for relocation.
Garden Fork
Useful for loosening the soil around the plant's root system.
Pruning Shears
To trim any damaged or excessively long roots.
Watering Can or Hose
For hydrating the elegant tick clover before and after its relocation.
Wheelbarrow or Plant Dolly
To move the elegant tick clover if it is heavy or difficult to carry.
Mulch
To help maintain soil moisture and prevent weed growth around the newly relocated elegant tick clover.
Stakes or Plant Supports
If the elegant tick clover requires additional stability after relocation.
How to Extract Elegant Tick Clover from the Soil
How to Extract Elegant Tick Clover from the Soil?
From Ground: Hydrate the elegant tick clover to moisten the soil, facilitating its removal. Use a spade or shovel to dig a wide circle around the plant, ensuring the entire root ball is included. Gently work the tool beneath the root ball to carefully lift the plant from the ground.From Pot: Water the elegant tick clover thoroughly. Invert the pot onto its side and gently tap the edges to loosen the soil and roots. Slowly tilt the plant, supporting its base, and carefully slide it out of the pot.From Seedling Tray: Water the seedlings well. Use a fork or small implement to gently lift the seedling from the tray, taking care not to damage the root structure.
Step-by-Step Guide for Relocating Elegant Tick Clover
Preparation
Ensure all necessary tools are ready and that you are relocating during a cooler part of the day, ideally overcast, to minimize stress on the elegant tick clover.
Root Pruning
Examine the root system of the elegant tick clover and use pruning shears to remove any dead or excessively long roots, which will stimulate new growth.
Digging New Hole
Excavate a hole in the chosen location that is twice the width of the elegant tick clover's root ball and equally deep, to ensure ample space for root expansion.
Placing the Plant
Carefully position the elegant tick clover into the hole, gently spreading its roots. Ensure the plant is upright and at the same depth it was previously growing.
Filling the Hole
Backfill the soil around the roots of the elegant tick clover, gently patting it down to eliminate air pockets. Water the plant thoroughly to help settle the soil around the roots.
Mulching
Apply a layer of mulch around the base of the plant to help retain moisture and regulate soil temperature.
Supporting Plant
If the elegant tick clover is tall or top-heavy, provide stakes or plant supports to help it remain upright while its roots establish.
Post-Relocation Care for Elegant Tick Clover
Initial Watering
Water generously immediately after relocation to settle the soil and provide moisture for the elegant tick clover to recover from transplant shock.
Regular Care
Inspect the elegant tick clover daily to ensure the soil remains moist, and water as needed. Avoid excessive watering, which can lead to root rot.
Staking
If the elegant tick clover appears unstable, reinforce stakes or plant supports to help it withstand wind and weather as it establishes.
Mulch Monitoring
Maintain the mulch layer, but ensure it is not piled against the stem to prevent rot.
Monitoring for Stress
Observe for signs of relocation stress, such as wilting or discolored leaves, and address with appropriate care or adjustments.
Troubleshooting Common Issues with Elegant Tick Clover Relocation.
What's the best time to relocate elegant tick clover?
Optimal relocation for elegant tick clover is from mid to late spring, when stable warmer weather begins.
How far apart should I space elegant tick clover when relocating?
Space elegant tick clover about 18-24 inches (45-60 cm) apart to ensure proper growth and airflow.
Why is my elegant tick clover wilting after relocating?
Wilting post-relocation can indicate shock. Keep the soil consistently moist and protect from strong sunlight for a few days.
Should the soil be fertilized before relocating elegant tick clover?
Yes, enrich the soil with compost or a balanced fertilizer to give elegant tick clover a nutritious start.
How deep should the hole be for relocating elegant tick clover?
Dig a hole as deep as the root ball and twice as wide to encourage root expansion.
Can I relocate elegant tick clover in the fall?
While spring is ideal, fall relocation can be done if there's enough time for root establishment before frost.
What type of light should elegant tick clover have after relocating?
Elegant tick clover thrives in full sun to partial shade. Gradually acclimate it to its new light conditions.
What should I do if elegant tick clover's leaves turn yellow after relocating?
Yellow leaves can indicate stress or overwatering. Monitor water levels and consider a root stimulator to help recovery.
How often should elegant tick clover be watered after relocating?
Water elegant tick clover thoroughly at relocation, then maintain damp soil without waterlogging, especially during initial root development.
Is mulching beneficial for elegant tick clover after relocating?
Mulching helps retain soil moisture and regulate temperature, which is beneficial during the establishment of elegant tick clover.


