How to Transplant Wheel wingnut?
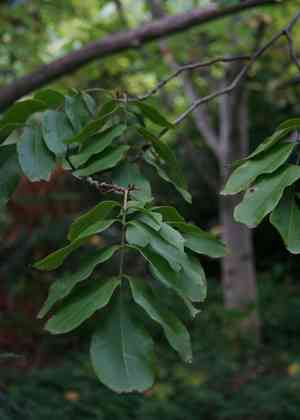
The most favorable period for relocating wheel wingnut is as spring commences, ideally from its initial stages through its most flourishing phase. Choose a location that receives abundant sunlight and possesses soil with good drainage. Should extra attention be required, carefully managing the root system aids in successful establishment.
Essential Preparations Before Relocating Wheel Wingnut?
Optimal Period for Transplanting Wheel Wingnut?
The prime window for moving wheel wingnut spans from the onset of early spring through the vigor of late spring. Shifting wheel wingnut during these months leverages moderate temperatures and ample rainfall, promoting strong root development before summer's heat. Transplanting wheel wingnut in alignment with spring's natural growth surge allows it to adapt smoothly, utilizing the season's gentle conditions for a successful start in its new spot.
Recommended Spacing Between Wheel Wingnut Plants?
When preparing to rehome your wheel wingnut, provide ample spacing. Aim for 20-30 feet (6-9 meters) between each plant. This ensures sufficient room for their foliage to expand and for them to develop robustly and healthily, much like individuals require personal space in a crowd.
Ideal Soil Blend for Wheel Wingnut Transplanting?
For your wheel wingnut, envision the soil as a comfortable resting place. Utilize well-draining soil rich in organic matter, such as a quality compost mix. Ensure it's snugly settled with a balanced slow-release fertilizer to provide a welcoming environment and an excellent beginning!
Optimal Location for Relocating Your Wheel Wingnut?
Select a site for your wheel wingnut where sunlight is plentiful but not overly intense. Full to partial sun, meaning approximately 4-6 hours of daily sunshine, will make your wheel wingnut most content. It's akin to discovering the perfect sunlit corner for reading a book.
Necessary Equipment Before Transplanting Wheel Wingnut?
Gardening Gloves
To safeguard your hands while handling soil and the plant.
Spade or Shovel
For excavating the plant and preparing the new planting site.
Watering Can or Hose
To hydrate the plant before and after its relocation.
Wheelbarrow or Garden Cart
For moving the plant and soil efficiently.
Pruning Shears
To trim any damaged roots or branches if required.
Garden Fork
To loosen and aerate the soil surrounding the root ball.
Mulch
To aid in retaining soil moisture and moderating temperature around the plant post-transplant.
Soil Amendment (as needed based on prior soil preparation advice)
To blend with the existing soil if deemed necessary.
Procedure for Removing Wheel Wingnut from the Soil?
Procedure for Removing Wheel Wingnut from the Soil?
From Ground: First, thoroughly water the wheel wingnut plant a day prior to moving it to make the soil more manageable. Next, use a spade or shovel to dig a wide trench around the plant, aiming to preserve as much of the root ball as possible. Gently work the tool beneath the root ball and carefully lift the plant from the ground.From Pot: Water the wheel wingnut in its container to moisten the soil and facilitate removal. Tilt the pot onto its side and gently tap or squeeze the sides to loosen the root ball. Carefully slide the plant out of the pot, ensuring to support both the stem and the root ball.From Seedling Tray: Carefully water the seedlings in the tray. Use a spoon or a small gardening tool to lift each wheel wingnut seedling from its cell, making sure to retain as much soil around the roots as possible to prevent root disturbance.
Step-by-Step Guide for Transplanting Wheel Wingnut
Preparation
Gather all necessary tools and materials for transplanting the wheel wingnut. Ensure the new planting site is prepared.
Removal
Using the appropriate method from the removal process, extract the wheel wingnut from its original spot, keeping the root ball as intact as possible.
Transportation
Carefully place the wheel wingnut onto a wheelbarrow or garden cart for transfer to the new location. Avoid dropping or jarring the plant to minimize stress.
Hole Preparation
Dig a hole at the transplant site that is twice the width of the root ball but no deeper. Loosen the surrounding soil with a garden fork.
Planting
Position the wheel wingnut in the center of the hole at the same depth it was previously growing. Fill in around the root ball with soil, gently firming to eliminate any air pockets.
Watering
Thoroughly water the wheel wingnut after planting to help settle the soil. This will also aid in reducing transplant shock and hydrating the roots.
Mulching
Apply a layer of mulch around the base of the wheel wingnut, leaving some space around the stem to prevent rot.
Post-Transplant Care for Wheel Wingnut?
Stabilization
Support the wheel wingnut with stakes if it is top-heavy or in a windy area to prevent leaning or uprooting while new roots establish. Use soft ties to avoid damaging the stem or branches. Remember to remove them once the plant is stable enough to stand independently.
Inspection
Regularly check the wheel wingnut for signs of stress, such as wilting or discolored leaves, and address any issues promptly. This includes removing any dead or damaged foliage to encourage healthy new growth.
Resolving Common Issues with Wheel Wingnut Transplantation.
What is the optimal time for successful wheel wingnut transplant?
Transplant wheel wingnut from the end of frost to the peak of late spring, typically early to mid-spring.
How far apart should wheel wingnut saplings be planted for best growth?
Space wheel wingnut saplings ideally 20-30 feet (6-9 meters) apart to ensure adequate room for growth and air circulation.
Why are my wheel wingnut leaves wilting after transplant?
Wilting may indicate stress. Ensure soil is moist, not waterlogged, and initially shield from strong winds.
Can I transplant wheel wingnut during summer or fall instead?
It's best to adhere to early to late spring. Roots establish better without summer heat or autumn chill.
What should be the depth of the hole when transplanting wheel wingnut?
Dig a hole twice as wide and just as deep as the root ball to promote proper root establishment.
Why is my wheel wingnut not thriving in its new location?
Consider sunlight exposure, soil quality, and water. Wheel wingnut requires well-draining soil and partial to full sunlight.
What if the wheel wingnut doesn't seem to take root?
Ensure you're not planting too deep or shallow and verify if the soil's pH meets wheel wingnut requirements.
How much water does wheel wingnut need after transplanting?
Water thoroughly after transplanting and then regularly, allowing the soil to dry slightly between waterings.
Is it necessary to fertilize wheel wingnut after transplanting?
Wait a few months before fertilizing to allow wheel wingnut to settle and prevent root burn.
How can I protect my newly transplanted wheel wingnut from pests?
Monitor for pests and consider gentle, natural pest control options as wheel wingnut establishes.



