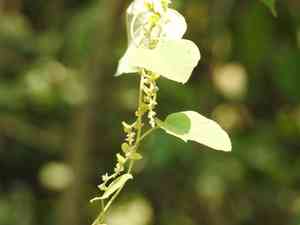
How to Transplant Velvetleaf?
Relocate velvetleaf once daylight hours extend and temperatures stabilize, generally from the latter part of spring into the initial phase of summer. Select a luminous, protected location to optimize development. A helpful tip: confirm the soil offers good drainage and is abundant in organic matter for velvetleaf to flourish initially.
What Preparations are Needed Before Transplanting Velvetleaf?
What is the Ideal Time for Transplanting Velvetleaf?
The perfect time for moving velvetleaf is as spring flowers fade and summer approaches. This timing ensures velvetleaf benefits from steady temperatures and gentle soil care. Replanting velvetleaf during this season allows its roots to establish in warmth, optimizing growth. Providing velvetleaf this timely shift promotes strong health and vigor, ensuring a smooth adjustment to its new home.
How Much Space Should You Leave Between Velvetleaf Plants?
For velvetleaf, you'll want to provide ample room for each plant to thrive. Aim to position them approximately 18-24 inches (45-60 cm) apart. This spacing will enable your velvetleaf to grow without competing for nutrients and sunlight.
What is the Best Soil Mix for Velvetleaf Transplanting?
Your velvetleaf will flourish in soil that drains well. Before transplanting, incorporate some organic compost to enrich the soil. A balanced, slow-release fertilizer will help your velvetleaf get a strong start. Remember, healthy soil leads to a happy plant!
Where Should You Relocate Your Velvetleaf?
Choose a sunny location for your velvetleaf as they prefer bright conditions! An area receiving partial to full sunlight would be perfect. Morning sun with some afternoon shade can also be effective to shield velvetleaf from the most intense heat of the day.
What Equipments Should You Prepare Before Transplantation Velvetleaf?
Gardening Gloves
To safeguard your hands while handling soil and plants.
Shovel or Spade
For digging and lifting the velvetleaf.
Garden Fork
To loosen the soil surrounding the plant's root system.
Pruning Shears
To trim any damaged roots or foliage.
Watering Can or Hose
For hydrating the velvetleaf before and after relocation.
Wheelbarrow or Garden Cart
To transport the velvetleaf and soil without causing harm.
Mulch
To help maintain soil moisture and prevent weeds around the velvetleaf post-transplant.
Stake or Plant Support
To offer stability to the velvetleaf if required.
How Do You Remove Velvetleaf from the Soil?
How Do You Remove Velvetleaf from the Soil?
From Ground: Start by thoroughly watering the velvetleaf to soften the soil. Next, carefully dig around the plant with a shovel or spade to create a perimeter, ensuring plenty of space around the root ball. Gently insert the spade beneath the root ball and lift the velvetleaf from its original spot with care to keep the root system intact.From Pot: Water the velvetleaf and let it drain. Turn the pot sideways, hold the plant by its base, and tap the bottom to loosen it. Gently pull the plant out while supporting the root ball. If the velvetleaf is stuck, use a garden fork to ease the root ball out.From Seedling Tray: Moisten the soil first. Carefully press from beneath the tray to pop the velvetleaf out while supporting the seedling and root ball to prevent any damage.
Step-by-Step Guide for Transplanting Velvetleaf
Preparation
Thoroughly water your velvetleaf before beginning the transplanting process.
Transplant Hole
Dig a hole in the new spot, ensuring it's twice as wide as the root ball and the same depth to avoid planting the velvetleaf too deep.
Root Ball
Gently place the velvetleaf in the center of the hole. Carefully spread out the roots if they are pot-bound or tangled.
Placement
Confirm that the velvetleaf is planted at the same depth as it was originally. The top of the root ball should be level with the surrounding ground.
Soil Enrichment
Backfill the hole with the original soil, tamping down lightly to remove air pockets, and water the velvetleaf to help settle the soil.
Support
If the velvetleaf appears unstable, gently insert a stake into the ground and tie the plant to it for support.
Mulching
Apply a layer of mulch around the base of the velvetleaf, being careful not to let it touch the stem, to help retain moisture.
Watering
Finally, give the velvetleaf a good watering, directing the flow at the base of the plant.
How Do You Care For Velvetleaf After Transplanting?
Regular Watering
Ensure the soil stays slightly moist for the initial few weeks, watering the velvetleaf deeply to encourage root development.
Mulching
Keep the mulch layer refreshed to conserve moisture and regulate soil temperature.
Staking
Monitor the staking, and adjust ties as the velvetleaf grows to prevent constriction.
Observation
Watch the velvetleaf for indications of transplant shock, such as wilting or yellowing leaves, and take appropriate measures if necessary.
Troubleshooting Common Issues with Velvetleaf Transplantation.
When is the best time to transplant velvetleaf?
Choose the period when spring transitions into summer; this ensures warm soil and mild weather, ideal for velvetleaf's roots to establish.
How far apart should I space velvetleaf when transplanting?
Allow each velvetleaf ample room to thrive by spacing them 18-24 inches (45-60 cm) apart. Proper spacing promotes vigorous growth.
Why are my transplanted velvetleaf plants wilting?
Wilting can signal root stress. Ensure the soil drains well and water sufficiently without over-saturating.
What is the ideal soil condition for transplanting velvetleaf?
Plant velvetleaf in moist, humus-rich soil. Aim for a balance that is neither waterlogged nor dry, to support strong root development.
Should I amend the soil when transplanting velvetleaf?
Yes, enrich the soil with compost or well-rotted manure to nourish the velvetleaf and encourage robust growth from the start.
How deep should the hole be for transplanting velvetleaf?
Dig a hole just deep enough to comfortably fit the root ball, allowing the topmost roots to be level with the soil surface.
Can I transplant velvetleaf on cloudy days?
Absolutely! Overcast conditions are perfect for transplanting velvetleaf, as they reduce stress and evaporation, giving the roots time to adapt.
How do I water velvetleaf after transplanting?
Water immediately after transplanting to settle the soil. Maintain consistent moisture but allow for proper drainage to prevent root rot.
What should I do if velvetleaf leaves turn yellow after transplanting?
Yellowing leaves might indicate shock. Keep the soil moist and provide shade if needed. Avoid fertilizers until the plant recovers.
How do I protect newly transplanted velvetleaf from pests?
Inspect regularly for pests. Use physical barriers or organic deterrents if necessary, avoiding harsh chemicals to give velvetleaf a healthy start.


