How to Transplant Chionochloa juncea?
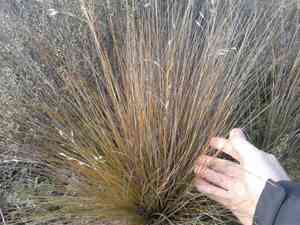
The ideal period for relocating chionochloa juncea spans from the beginning to the end of spring, allowing it to settle prior to the summer's warmth. Select a bright, adequately drained spot. Should it be required, ensure the root system remains hydrated and refrain from disrupting its development.
What Preparations are Needed Before Transplanting Chionochloa Juncea?
What is the Ideal Time for Transplanting Chionochloa Juncea?
The best time for moving chionochloa juncea, a perennial, is from the start to the end of spring. This period allows the plant to benefit from damp soil and milder temperatures, aiding root development and reducing stress. Proper preparation at this time can greatly improve chionochloa juncea's growth and hardiness in its new spot.
How Much Space Should You Leave Between Chionochloa Juncea Plants?
When relocating chionochloa juncea, ensure a spacing of 24-36 inches (60-90 cm) between plants. This provides ample room for growth without competition for nutrients and light.
What is the Best Soil Mix for Chionochloa Juncea Transplanting?
For chionochloa juncea, prepare soil that drains well. Incorporate organic compost to boost nutrient levels. A phosphorus-rich base fertilizer can encourage robust root growth.
Where Should You Relocate Your Chionochloa Juncea?
Chionochloa juncea thrives in full sun. Select a garden location that receives 6-8 hours of direct sunlight daily to ensure vigorous growth.
What Equipments Should You Prepare Before Transplantation Chionochloa Juncea?
Gardening Gloves
To safeguard your hands while handling soil and plants.
Shovel or Spade
To excavate the plant from its original spot and prepare the new planting hole.
Garden Trowel
For more precise digging and maneuvering around the root mass.
Pruning Shears
To trim any damaged or overgrown root structures.
Watering Can or Hose
For hydrating the plant before and after its relocation.
Mulch
To help maintain soil moisture and regulate temperature post-transplant.
Wheelbarrow or Bucket
To transport the plant if necessary.
How Do You Remove Chionochloa Juncea from the Soil?
How Do You Remove Chionochloa Juncea from the Soil?
From Ground: First, hydrate the chionochloa juncea plant to moisten the soil. Next, dig a wide trench around the plant using a shovel or spade, ensuring the plant's root ball remains intact. Carefully work the spade beneath the root ball to lift the plant from its initial position.From Pot: Water the chionochloa juncea plant thoroughly. Gently tap the pot's sides to loosen the soil. Carefully tip the pot and slide the plant out, supporting the root ball with your hand.From Seedling Tray: Gently water the seedlings to dampen the soil. Use a small garden trowel or your fingers to carefully lift each seedling, being especially cautious with the roots.
Step-by-Step Guide for Transplanting Chionochloa Juncea
Prepare the Planting Site
Choose a sunny spot that has been prepared with appropriate soil. Ensure the hole is twice as wide and as deep as the plant's root ball.
Condition the Root Ball
Inspect the root ball. Trim any damaged or excessively long roots using pruning shears. Gently untangle the roots if they are matted.
Place the Plant
Set the chionochloa juncea plant into the hole, ensuring it's upright and the top of the root ball is level with the ground surface.
Fill in the Hole
Backfill the hole with soil. Gently firm it around the plant's base to remove air pockets.
Water Thoroughly
Immediately water the plant thoroughly to settle the soil around the roots and provide essential hydration.
Apply Mulch
Spread mulch around the plant's base to help retain moisture and shield the roots from temperature changes.
How Do You Care For Chionochloa Juncea After Transplanting?
Watering
Keep the soil around the chionochloa juncea consistently moist, but not waterlogged, for the initial weeks post-transplant to aid strong root establishment.
Monitoring
Regularly check the plant for any signs of transplant shock like wilting or yellowing leaves. Provide protection if needed during harsh weather.
Fertilizing
Avoid fertilizing immediately after transplanting. Allow the plant to settle into its new location first.
Troubleshooting Common Issues with Chionochloa Juncea Transplantation.
When is the best time to transplant chionochloa juncea?
The optimal period is from early spring to late spring when the plant is most receptive.
What spacing should be maintained between transplanted chionochloa juncea plants?
Ensure each chionochloa juncea plant is spaced 24-36 inches (61-91 cm) apart for optimal growth.
How should I prepare the soil for transplanting chionochloa juncea?
Prepare a well-draining soil with organic matter mixed in to give chionochloa juncea the best start.
What steps should I take to minimize transplant shock in chionochloa juncea?
Water thoroughly before and after transplanting chionochloa juncea, and avoid disturbing the root ball.
How deep should I plant chionochloa juncea during transplanting?
Plant chionochloa juncea at the same depth it was originally growing to avoid stress.
How often should I water chionochloa juncea after transplanting?
Water chionochloa juncea regularly to keep the soil consistently moist but not waterlogged during the initial weeks.
Do I need to acclimate chionochloa juncea before transplanting outdoors?
Gradually expose chionochloa juncea to outdoor conditions over 7-10 days to acclimate it properly.
What type of mulch is suitable for chionochloa juncea after transplanting?
Use organic mulch like straw or wood chips around chionochloa juncea to retain soil moisture and minimize weeds.
Should I apply fertilizer when transplanting chionochloa juncea?
Apply a balanced, slow-release fertilizer to support chionochloa juncea's growth without overfeeding.
How can I ensure chionochloa juncea establishes well in its new location?
Provide chionochloa juncea with sufficient sunlight, water consistently, and protect it from strong wind and frost.



