How to Transplant Spreading chervil?
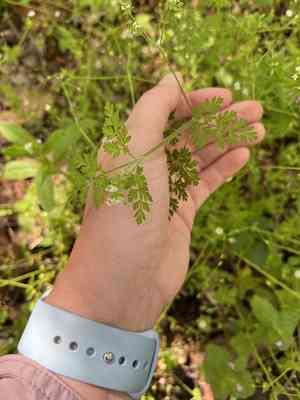
For relocating chervil, the ideal period for transplantation spans from the cessation of frost to the peak of spring. Choose a site that receives full sun to partial shade and possesses soil with good drainage. Gradually introduce spreading chervil to external environments to ensure its thriving.
What Preparations are Needed Before Transplanting Spreading Chervil?
What is the Ideal Time for Transplanting Spreading Chervil?
Relocate spreading chervil once the danger of frost has passed and the ground is ready for new plantings. This period, from early spring to the start of summer, supports robust root development and overall plant growth. This timing ensures spreading chervil flourishes in its new spot, benefiting from longer days and milder nights, which encourages vigorous growth. Utilizing this window for transplantation allows spreading chervil to enjoy the entire season, setting it up for a burst of health and flowering.
How Much Space Should You Leave Between Spreading Chervil Plants?
When preparing to rehome spreading chervil, aim for adequate yet comfortable spacing! Leaving approximately 4-6 inches (10-15 cm) between each spreading chervil will provide them with the necessary room to thrive without overcrowding adjacent plants.
What is the Best Soil Mix for Spreading Chervil Transplanting?
For spreading chervil, begin by preparing a welcoming bed with soil that drains well. It will flourish in a mixture abundant in organic material! Before planting, incorporate a balanced, slow-release fertilizer to jumpstart growth with all the essential nutrients spreading chervil needs.
Where Should You Relocate Your Spreading Chervil?
Find a location for your spreading chervil where the sun gently touches its leaves, ideally with partial shade to shield it during the warmest part of the day. This way, spreading chervil will receive the perfect amount of sunlight without experiencing sunburn!
What Equipments Should You Prepare Before Transplantation Spreading Chervil?
Gardening Gloves
To safeguard your hands while handling soil and plants.
Spade or Trowel
For digging up and moving the spreading chervil.
Watering Can or Hose
To hydrate the spreading chervil before and after its relocation.
Pruning Shears
To trim any dead or excessively grown foliage.
Measuring Tape
To accurately space out the planting locations.
Planting Labels
To identify the spreading chervil in its new position.
Wheelbarrow or Garden Cart
For transporting the spreading chervil and soil amendments if necessary.
How Do You Remove Spreading Chervil from the Soil?
How Do You Remove Spreading Chervil from the Soil?
From Ground: First, moisten the spreading chervil plant to hydrate the soil. Next, excavate a wide trench around the plant using a shovel or spade, ensuring the plant's root ball remains intact. Carefully maneuver the spade beneath the root ball to lift the plant from its original spot.From Pot: Hydrate the soil to make it damp, then turn the pot on its side and gently tap or squeeze it to dislodge the spreading chervil. Carefully extract the plant by the base of its stem, taking care not to pull roughly to avoid damaging the roots.From Seedling Tray: Dampen the soil before carefully loosening the soil around the seedlings using a stick or dibber. Gently lift the spreading chervil seedling by its leaves, not the delicate stem, to prevent harm.
Step-by-Step Guide for Transplanting Spreading Chervil
Digging the Right Hole
Excavate a hole in the ground that is twice as wide and of equal depth to the root ball of the spreading chervil. This provides ample room for the roots to expand.
Removing Alleviate Shock
Before extracting spreading chervil from its current location, ensure it is thoroughly watered. This will help lessen transplant shock and maintain root moisture.
Transplanting Timing
Select a cloudy day or an evening to transplant the spreading chervil, as cooler temperatures will reduce stress on the plant.
Ensuring Root Safety
Handle the root ball of the spreading chervil with care to prevent any breakage or damage, which could hinder its ability to establish in the new site.
Placement & Backfilling
Position the spreading chervil in the center of the hole. Carefully refill the hole with soil, gently firming it down without overly compacting it around the roots.
Immediate Watering
Water the spreading chervil generously immediately after transplanting to settle the soil around the roots and help mitigate transplant shock.
How Do You Care For Spreading Chervil After Transplanting?
Monitoring
Regularly check the spreading chervil to confirm it is adapting to its new environment. Look for indications of new growth as a sign of successful transplantation.
Watering
Keep the soil surrounding the spreading chervil consistently moist, but not waterlogged, for the initial few weeks post-transplant to aid in establishing strong roots.
Mulching
Apply a layer of organic mulch around the base of spreading chervil to retain moisture, stabilize soil temperature, and reduce weed competition.
Support Staking
If the spreading chervil is tall or susceptible to wind damage, provide a stake for support and loosely tie the plant to it with garden twine.
Observation for Pests
Inspect the spreading chervil for any signs of pests or disease. Early detection and intervention can prevent significant harm.
Gradual Sun Exposure
If the spreading chervil was previously in a more shaded spot, gradually acclimate it to the new light conditions to prevent stress.
Troubleshooting Common Issues with Spreading Chervil Transplantation.
Why is my spreading chervil not thriving after transplant?
Ensure spreading chervil is moved during early to late spring for optimal results. Keep its roots moist and undisturbed during the process, and provide ample sunlight.
How often should I water spreading chervil post transplant?
Spreading chervil benefits from consistent watering. Maintain the soil consistently moist but not saturated to encourage robust root development.
What spacing is needed when transplanting spreading chervil?
When relocating spreading chervil, space each plant approximately 4-6 inches (10-15 cm) apart. This allows for adequate air circulation and growth.
Can I transplant spreading chervil on a hot day?
Move spreading chervil on cooler, overcast days to minimize transplant shock and help the plants establish more quickly.
How deep should I plant spreading chervil during transplant?
Plant spreading chervil at the same depth it was in its previous container. This helps prevent stem rot and promotes proper root growth.
Should I add fertilizer when transplanting spreading chervil?
Introduce spreading chervil to its new location with a balanced, slow-release fertilizer to facilitate growth while avoiding nutrient burn from excessive concentration.
How do I know if spreading chervil has transplant shock?
Indicators of transplant shock in spreading chervil include wilting, yellowing leaves, and stunted growth. Provide shade and water to aid its recovery.
What kind of soil is best for transplanting spreading chervil?
Spreading chervil prefers well-draining soil rich in organic matter. Ensure proper soil preparation to promote healthy establishment.
Can I transplant spreading chervil in rainy weather?
Relocating spreading chervil in light rain can be advantageous as it ensures sufficient water for the roots. Avoid heavy downpours that can compact soil and damage roots.
What should I do if spreading chervil leaves turn brown after transplanting?
Browning leaves may indicate over or under-watering, or damage from excessive sun. Adjust water levels and provide some shade while spreading chervil acclimates.



