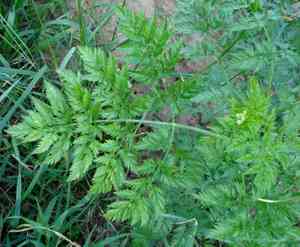
How to Transplant Turnip-root chervil?
To ensure a flourishing turnip-root chervil, the ideal period for relocation is from the close of winter to the onset of spring, once the ground becomes pliable. Select a brightly lit location featuring soil that drains effectively. Careful manipulation is crucial to prevent harm to the taproot.
What Preparations are Needed Before Transplanting Turnip-root Chervil?
What is the Ideal Time for Transplanting Turnip-root Chervil?
The optimal period to move turnip-root chervil is from early spring's onset until the garden fully warms. During this timeframe, turnip-root chervil's root systems establish more firmly, benefiting from moist soil and cooler temperatures, which are less stressful for young plants. This crucial foundation ensures your turnip-root chervil flourishes, providing an abundance of its distinct flavor for your kitchen or garden haven. Remember, a successful start in the gentle embrace of early to mid-spring gives your turnip-root chervil the best beginning for a productive life ahead.
How Much Space Should You Leave Between Turnip-root Chervil Plants?
Carefully space your turnip-root chervil seedlings approximately 6â8 inches (15-20 cm) apart. This allows their roots ample room to develop and ensures each plant receives sufficient nutrients without competing with adjacent ones.
What is the Best Soil Mix for Turnip-root Chervil Transplanting?
Select a well-draining soil rich in organic matter for your turnip-root chervil. Prior to planting, incorporate a balanced, slow-release fertilizer to give your seedlings an excellent start. A pH level between 6.5 and 7.0 is perfect for these plants.
Where Should You Relocate Your Turnip-root Chervil?
Locate a sunny spot in your garden for turnip-root chervil, where they will receive at least 6 hours of daily sunlight. If you reside in a particularly hot climate, choose a site that offers some afternoon shade to safeguard the plants.
What Equipments Should You Prepare Before Transplantation Turnip-root Chervil?
Gardening Gloves
To safeguard your hands while handling soil and plants.
Trowel
For excavating small holes and gently removing plants from containers or trays.
Shovel or Spade
For digging larger holes in the ground and extracting the turnip-root chervil from its original spot.
Watering Can or Hose
To hydrate the plant before and after its relocation.
Pruning Shears
To trim any damaged or excessively long roots.
Wheelbarrow
For moving the turnip-root chervil and any accompanying soil without causing harm.
How Do You Remove Turnip-root Chervil from the Soil?
How Do You Remove Turnip-root Chervil from the Soil?
From Ground: First, irrigate the turnip-root chervil plant to moisten the soil. Next, dig a wide trench around the plant using a shovel or spade, ensuring the plant's root ball remains intact. Carefully work the spade beneath the root ball to lift the plant from its initial position.From Pot: Water the turnip-root chervil thoroughly beforehand to facilitate root ball removal. Turn the pot on its side, gently tap the exterior, and carefully slide the plant out while supporting its base.From Seedling Tray: Dampen the soil in the tray. Use a trowel or your fingers to carefully lift the seedling by cradling the leaves and easing the root ball out with minimal disruption.
Step-by-Step Guide for Transplanting Turnip-root Chervil
Preparation
Gather all your tools as listed previously. Ensure the new site for the turnip-root chervil has been prepared according to prior instructions, avoiding redundant information.
Root Ball Maintenance
Once the turnip-root chervil is extracted from its initial location, examine the root ball. Trim any damaged roots with pruning shears, and gently untangle if necessary.
Planting Hole
Excavate a hole in the new location that is twice the width of the root ball and of equal depth. Loosen the soil around the hole to encourage easier root growth.
Placement
Position the turnip-root chervil in the center of the hole. Spread the roots out evenly and backfill the hole with soil, gently firming around the plant to eliminate air pockets.
Watering
Thoroughly water the turnip-root chervil after transplanting to settle the soil and hydrate the roots.
Mulching
Apply a layer of mulch around the base of the plant to help retain moisture and stabilize soil temperature.
How Do You Care For Turnip-root Chervil After Transplanting?
Initial Watering
Provide ample water to the turnip-root chervil during the first two weeks to ensure establishment. Avoid excessive watering; the aim is to keep the soil consistently moist.
Mulch Refreshing
Periodically check the mulch and replenish it as needed to maintain a protective layer over the root zone.
Observing Growth
Monitor your turnip-root chervil for signs of recovery and new growth. Fresh foliage indicates successful transplanting.
Support Structures
If the turnip-root chervil grows tall or becomes top-heavy, consider staking or adding support structures to keep it stable.
Pruning
Remove any dead or diseased leaves to direct energy towards healthy growth. Pruning also improves airflow, which is crucial post-transplant.
Troubleshooting Common Issues with Turnip-root Chervil Transplantation.
What's the best timing for transplanting turnip-root chervil?
Relocate turnip-root chervil once frost subsides and consistent warmth arrives, typically in early to mid-spring.
How far apart should I space turnip-root chervil when transplanting?
Allow each turnip-root chervil approximately 6-8 inches (15-20 cm) of space to ensure adequate room for development.
Can I transplant turnip-root chervil in full sunlight?
Yes, turnip-root chervil flourishes in full sunlight to partial shade. Choose a location that receives sufficient light.
What soil type is best for transplanting turnip-root chervil?
Opt for well-draining soil rich in organic matter to maintain a thriving turnip-root chervil.
How deep should the holes be for transplanting turnip-root chervil?
Dig holes deep enough so the rootball sits level with the surrounding soil for optimal growth.
Should I water turnip-root chervil immediately after transplanting?
Absolutely! Water turnip-root chervil gently but thoroughly to help alleviate shock and settle the soil.
How do I protect transplanted turnip-root chervil from frost?
Utilize cloches or frost blankets if unexpected cold snaps threaten your newly transplanted turnip-root chervil.
Is it necessary to fertilize turnip-root chervil after transplanting?
Wait until turnip-root chervil exhibits new growth before applying a balanced fertilizer to prevent root burn.
Can I transplant turnip-root chervil during a hot day?
Transplant turnip-root chervil on an overcast day or in the evening to avoid stress from intense sunlight.
What should I do if my transplanted turnip-root chervil wilts?
Ensure sufficient watering without over-saturation and provide shade if needed until turnip-root chervil recovers.


