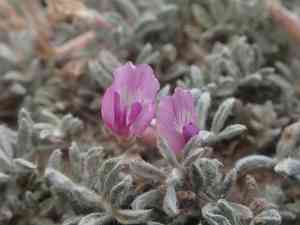
How to Transplant Woollypod milkvetch?
Relocate Astragalus purshii as its growth cycle commences, spanning from the onset of spring through the gentle warmth of early summer. Select a location bathed in sunlight with soil that drains effectively, and handle with care to reduce any disruption to its root system.
What Preparations are Needed Before Transplanting Woollypod Milkvetch?
What is the Ideal Time for Transplanting Woollypod Milkvetch?
Move woollypod milkvetch from late winter to early summer for strong development. Relocating woollypod milkvetch during this period optimizes root establishment prior to heat stress. This timing ensures woollypod milkvetch has sufficient time to adapt and thrive in its new spot, fostering a more robust and vibrant plant.
How Much Space Should You Leave Between Woollypod Milkvetch Plants?
When relocating woollypod milkvetch, aim to provide ample room for each plant to grow. Space them approximately 12-18 inches (30-46 cm) apart. This allows for proper development and prevents competition for resources.
What is the Best Soil Mix for Woollypod Milkvetch Transplanting?
Prepare the soil for woollypod milkvetch by ensuring good drainage and incorporating a low-nitrogen base fertilizer. A sandy loam is perfect for maintaining healthy roots. A light application of a balanced, slow-release fertilizer will give woollypod milkvetch an excellent start.
Where Should You Relocate Your Woollypod Milkvetch?
Select a sunny location for woollypod milkvetch as it flourishes in full sun. A spot receiving 6-8 hours of direct sunlight will provide the energy woollypod milkvetch requires for vigorous and healthy growth.
What Equipments Should You Prepare Before Transplantation Woollypod Milkvetch?
Gardening Gloves
To safeguard your hands while handling soil and plants.
Shovel or Spade
For excavating the plant and preparing the new planting site.
Garden Fork
To loosen the soil surrounding the plant's root system.
Pruning Shears
To trim any dead or damaged roots and stems.
Wheelbarrow or Garden Cart
To transport the plant and soil materials.
Watering Can or Hose
To hydrate the plant before and after relocation.
Mulch
To help retain moisture and regulate soil temperature after transplanting.
How Do You Remove Woollypod Milkvetch from the Soil?
How Do You Remove Woollypod Milkvetch from the Soil?
From Ground: First, moisten the woollypod milkvetch's soil with water. Then, dig a wide perimeter around the plant using a shovel or spade, ensuring the root ball remains intact. Carefully work the spade beneath the root ball to lift the plant from the ground.From Pot: Water the woollypod milkvetch in its container to facilitate removal. Gently tap the pot's sides and invert it, supporting the plant with your hand. If it doesn't slide out, use a knife to loosen the soil along the edges.From Seedling Tray: Water the seedling tray to hydrate the roots. Using a spoon or similar tool, carefully lift the woollypod milkvetch from its compartment, ensuring the root ball stays intact and minimally disturbed.
Step-by-Step Guide for Transplanting Woollypod Milkvetch
Digging the Hole
Excavate a hole twice as wide and equal in depth to the woollypod milkvetch's root ball. This will allow for easier root expansion.
Inspecting Roots
Examine the plant's root system. Using pruning shears, remove any damaged or excessively long roots to encourage new growth.
Placing the Plant
Position the woollypod milkvetch in the center of the hole. Ensure the top of the root ball is level with the surrounding soil surface to promote proper root establishment.
Refilling the Hole
Carefully backfill the hole with soil, gently tamping around the root ball to eliminate air pockets. Avoid burying the plant deeper than its original planting depth.
Watering
Thoroughly water the woollypod milkvetch after planting to settle the soil and hydrate the roots. Be careful not to over-water and make the soil soggy.
Adding Mulch
Apply a layer of mulch around the base of the woollypod milkvetch, keeping it away from the plant's stems to prevent rot and maintain moisture levels.
How Do You Care For Woollypod Milkvetch After Transplanting?
Monitoring Growth
Regularly check woollypod milkvetch to ensure it is establishing well and to detect any early signs of stress.
Adjusting Watering
Water as needed to keep the soil moist but not waterlogged. Over time, reduce frequency to encourage deep root development.
Protecting from Pests
Inspect for and address any insect pests or diseases that could impede woollypod milkvetch's recovery and growth after transplanting.
Troubleshooting Common Issues with Woollypod Milkvetch Transplantation.
What is the optimal time to transplant woollypod milkvetch?
For best outcomes, move woollypod milkvetch during the period from early spring to early summer when conditions are mild.
How far apart should I space woollypod milkvetch plants when transplanting?
Ensure woollypod milkvetch plants have ample room, ideally about 12-18 inches (30-45 cm) apart, to foster healthy development.
How deep should the hole be for transplanting woollypod milkvetch?
Dig a hole that's twice the root ball's width but no deeper, allowing woollypod milkvetch to settle comfortably without sinking.
Can woollypod milkvetch be transplanted in partial shade?
Certainly, woollypod milkvetch tolerates various light conditions, including partial shade, but thrives with abundant sunlight.
Should I amend the soil when planting woollypod milkvetch?
Enriching the soil with compost or well-rotted manure can give woollypod milkvetch a strong start and enhance soil structure.
What should I do if woollypod milkvetch wilts after transplanting?
Don't worry! Ensure woollypod milkvetch is adequately watered and protected from intense sunlight. It might just be temporary transplant shock.
Is it necessary to prune woollypod milkvetch when transplanting?
A light trim can help woollypod milkvetch focus on root establishment rather than maintaining excessive foliage.
How often should I water woollypod milkvetch after transplanting?
Keep the soil moist but not saturated, watering deeply and regularly until woollypod milkvetch is established, then reduce frequency.
What if woollypod milkvetch shows signs of disease after transplanting?
Isolate the affected plant, remove any diseased parts, and ensure it has proper air circulation and moisture management.
Can woollypod milkvetch be transplanted during the heat of summer?
It's not ideal; transplant in cooler temperatures to minimize stress on woollypod milkvetch. If unavoidable, provide extra care and hydration.


