How to Transplant Albaida?
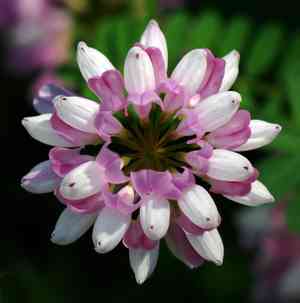
The most favorable period to transplant albaida is after the winter cold recedes but prior to the intense warmth of summer, allowing temperate conditions to aid root development. Select a location that receives ample sunlight and drains effectively, replicating its natural habitat, and bear in mind that careful manipulation facilitates a seamless adjustment!
What Preparations are Needed Before Transplanting Albaida?
What is the Ideal Time for Transplanting Albaida?
The best time to move albaida is during the peak of spring's arrival. Relocating in this season utilizes the energy of longer days and mild temperatures, which are vital for albaida's root development and growth. The refreshing spring weather also lessens transplant shock, allowing albaida to thrive in its new spot. Choose this period for a smooth transition and vigorous growth in your favorite perennial.
How Much Space Should You Leave Between Albaida Plants?
Provide your albaidas with ample room to grow! Aim for a spacing of 15-20 inches (38-50 cm) between them. This ensures they have sufficient space to develop without competing for nutrients and sunlight.
What is the Best Soil Mix for Albaida Transplanting?
For your albaida, well-draining soil is essential. Incorporate some organic compost to enrich the soil before planting. A balanced slow-release fertilizer will supply your albaida with the necessary nutrients to establish itself in its new home.
Where Should You Relocate Your Albaida?
Your albaida loves sunlight! Select a garden location where it can receive full sun for most of the day. This will ensure your albaida gets the energy it needs for beautiful blooms and strong growth.
What Equipments Should You Prepare Before Transplantation Albaida?
Gardening Gloves
To safeguard your hands while handling soil and plants.
Shovel or Spade
For excavating around and beneath the albaida plant to extract it with the root ball intact.
Garden Fork
To loosen the soil surrounding the plant's roots without causing excessive harm.
Hand Trowel
For more precise tasks in lifting the plant and adjusting soil in its new spot.
Watering Can or Hose
To hydrate the albaida plant before and after transplanting to alleviate stress.
Wheelbarrow or Plant Cart
To safely move the albaida plant from its original spot to the new location.
Pruning Shears
For trimming any damaged roots or excessive top growth prior to transplanting.
Burlap or Tarp
To secure the root ball during transport if the root system is large or delicate.
How Do You Remove Albaida from the Soil?
How Do You Remove Albaida from the Soil?
From Ground: First, water the albaida plant to moisten the soil. Then, dig a wide circle around the plant, being careful not to sever the root system. Use the shovel or spade systematically to lift the entire root ball from the ground.From Pot: Check if the albaida plant is root-bound. Gently tap the sides and bottom of the pot to loosen the roots. Carefully slide the root ball out, avoiding rough handling that could harm the roots.From Seedling Tray: Use a hand trowel to gently separate each albaida plant from its compartment. Support the base of the plant, ensuring minimal disturbance to the roots.
Step-by-Step Guide for Transplanting Albaida
Preparation
Gather all necessary tools for the transplanting process and ensure the new ground location has been prepared as per other instructions.
Watering
Thoroughly water the albaida plant a day before moving to reduce transplant shock and make the soil easier to manage.
Root Ball
Carefully expose the entire root ball of the albaida, taking extra care to keep it as intact as possible. This may require digging wider than initially anticipated.
Lifting
Once the root ball is free, gently lift the albaida plant. If it's large, use burlap or a tarp to move it without causing root damage.
Transport
Use the wheelbarrow or plant cart to gently transport the albaida to its new location, ensuring not to jostle the plant excessively during the move.
Planting
Place the albaida in its new hole, making sure the top of the root ball is level with the ground surface, and carefully fill the space around the roots with soil.
Firming
Press down lightly around the base of the albaida to firm the soil and eliminate any large air pockets, which can dry out the roots.
Watering Again
Water the plant well after transplanting to help settle the soil and provide much-needed hydration for the albaida's recovery and regrowth.
How Do You Care For Albaida After Transplanting?
Monitor Moisture
Regularly check the soil's moisture level; it should be damp but not waterlogged to encourage the albaida plant's roots to establish.
Mulching
Apply a layer of mulch around the base of the albaida to help retain moisture, regulate soil temperature, and reduce weed competition.
Pruning
Trim away any broken or dead plant material after transplanting to focus the albaida's energy on root establishment and new growth.
Protection
In the initial weeks, provide some form of protection if there are extreme weather conditions like strong wind or intense heat that could stress the newly transplanted albaida.
Troubleshooting Common Issues with Albaida Transplantation.
What's the best time of year to transplant albaida?
Optimal transplanting occurs in early to mid-spring, when growth is about to begin.
How far apart should I plant albaida for healthy growth?
Space them 15-20 inches (38-50 cm) apart to allow room for growth and air circulation.
What soil preparation is needed before transplanting albaida?
Ensure the soil is well-draining with some organic matter; loosen it to a depth of about 12 inches (30 cm).
How much should I water albaida after transplanting?
Water thoroughly immediately after planting, then maintain moderate moisture until established.
What sunlight conditions does albaida require after transplanting?
Plant albaida in a spot with full to partial sunlight for optimal growth.
How deep should the hole be for transplanting albaida?
Dig a hole that is twice as wide and just as deep as the root ball.
Can albaida be transplanted during the summer months?
It's best to avoid summer transplanting; spring is the ideal time for the plant to establish.
How do I handle the roots of albaida during transplanting?
Gently tease out the roots and spread them in the hole to encourage outward growth.
What's the cure for wilted leaves after transplanting albaida?
Check for proper watering and drainage. Adjust if necessary and provide shade if the sun is too harsh.
Should I fertilize albaida immediately after transplanting?
Wait a few weeks before applying a balanced, slow-release fertilizer to avoid burning the roots.



