How to Transplant Pygmyflower rockjasmine?
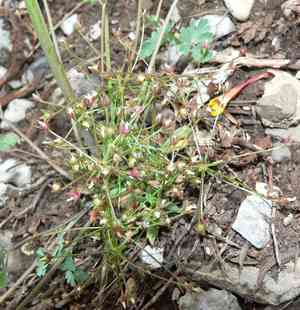
Relocate pygmyflower rockjasmine during the period spanning early spring to its peak flowering, which guarantees effective establishment. Select a bright area featuring soil that drains efficiently. Gentle attention fosters robust growth in its new environment.
Essential Preparations Before Moving Pygmyflower Rockjasmine?
Optimal Period for Relocating Pygmyflower Rockjasmine?
The best time to move pygmyflower rockjasmine is during the full awakening of spring, typically from the last frost's melt until the earth is gently warmed by the sun. Transplanting them then allows their roots to settle in the still-cool ground, ensuring robust growth before summer's intensity. With careful handling and an eye on pygmyflower rockjasmine's blooming potential, this timing is perfect for a smooth transition. This not only nurtures the plant but also promises a vigorous growing season. A move in this budding period provides pygmyflower rockjasmine the gentle encouragement needed to establish roots and flourish, setting the stage for abundant flowers.
Required Spacing Between Pygmyflower Rockjasmine Plants?
When transplanting pygmyflower rockjasmine, aim for a separation of approximately 4-6 inches (10-15 cm). This ensures your pygmyflower rockjasmine have ample room to thrive and breathe, preventing overcrowding and promoting overall health.
Best Soil Mixture for Pygmyflower Rockjasmine Relocation?
For pygmyflower rockjasmine, prepare a well-draining soil rich in organic material. Before transplanting, incorporate a balanced, slow-release fertilizer to provide your pygmyflower rockjasmine with a nutrient boost and an excellent start in their new home.
Ideal Location for Your Pygmyflower Rockjasmine?
Select a sunny to partially shaded spot for your pygmyflower rockjasmine. They prefer bright but indirect light â a location receiving morning sun and afternoon shade is perfect. This will help your pygmyflower rockjasmine grow strong without suffering sunburn.
Tools to Prepare Before Transplanting Pygmyflower Rockjasmine?
Gardening Gloves
To safeguard your hands while working with the soil and plant material.
Trowel
For excavating small holes and refining the area where pygmyflower rockjasmine will be placed.
Spade or Shovel
For shifting soil and digging larger holes if relocating a more substantial specimen.
Watering Can or Hose
For hydrating pygmyflower rockjasmine before and after transplanting to reduce shock and aid root establishment.
Pruners
To trim any damaged roots or foliage during the transplanting process.
Rooting Hormone (optional)
To stimulate root development after transplanting, if desired.
Measuring Tape
To ensure proper spacing between transplants if planting multiple pygmyflower rockjasmine.
How to Extract Pygmyflower Rockjasmine from the Ground?
How to Extract Pygmyflower Rockjasmine from the Ground?
From Ground: Start by watering the area around pygmyflower rockjasmine to facilitate soil removal. Using a trowel or spade, carefully dig around the plant, being cautious not to sever the root system. Gradually deepen the excavation until you can gently lift pygmyflower rockjasmine with a substantial amount of soil still attached to its roots.From Pot: Water the potting medium to minimize stress and ease removal. Turn the pot on its side, hold the plant at its base, and gently tap the pot's bottom and sides to loosen the soil. Carefully pull pygmyflower rockjasmine out while supporting its root ball.From Seedling Tray: Moisten the soil in the tray to simplify the extraction of pygmyflower rockjasmine. Gently loosen the soil around the seedling with a trowel or your fingers. Carefully lift the seedling by its leaves, not the stem, to prevent damage, ensuring you retain the soil attached to the roots.
Step-by-Step Guide for Relocating Pygmyflower Rockjasmine
Preparation
Prepare the new site for pygmyflower rockjasmine by loosening the soil with a trowel or spade to a depth matching the root ball's size. Remove any debris or competing vegetation.
Plant Removal
Follow the plant extraction procedure based on whether pygmyflower rockjasmine is coming from the ground, a pot, or a seedling tray, ensuring the root ball remains intact and undisturbed as much as possible.
Hole Digging
Excavate a hole at the new location that is twice as wide and as deep as the root ball of pygmyflower rockjasmine, allowing space for the roots to spread.
Plant Positioning
Place pygmyflower rockjasmine in the center of the hole at the same depth it was previously growing. Ensure it stands upright, and gently spread out the roots if they are clustered.
Backfilling
Carefully refill the hole with the excavated soil, ensuring you do not bury pygmyflower rockjasmine deeper than its original planting depth. Gently press the soil around the base to eliminate air pockets.
Watering
Thoroughly water pygmyflower rockjasmine immediately after transplanting. This helps settle the soil and provides the roots with essential moisture to recover from transplant shock.
Monitoring
Observe pygmyflower rockjasmine over the subsequent days, checking for signs of wilting or stress and providing care as needed.
Post-Transplant Care for Pygmyflower Rockjasmine
Initial Watering
Maintaining consistent moisture is crucial for pygmyflower rockjasmine to establish in its new spot. Water deeply to encourage root growth, avoiding shallow, frequent irrigation.
Checking Plant Stability
Ensure pygmyflower rockjasmine is firmly planted in its new location and has not become loose. If the plant shifts, gently firm the soil around its base.
Mulching
Apply a layer of organic mulch around the base of pygmyflower rockjasmine to conserve moisture, regulate soil temperature, and suppress weed growth.
Pruning
Trim any damaged or dead leaves or stems to redirect pygmyflower rockjasmine's energy towards developing new roots and growth.
Resolving Common Issues with Pygmyflower Rockjasmine Transplantation.
When is the best time to transplant pygmyflower rockjasmine?
The optimal transplanting period for pygmyflower rockjasmine is from early to late spring, when new growth is just beginning.
How far apart should I space pygmyflower rockjasmine when transplanting?
Aim for a spacing of approximately 4-6 inches (10-15 cm) between each pygmyflower rockjasmine to ensure sufficient growing space.
What kind of soil is best for transplanting pygmyflower rockjasmine?
Pygmyflower rockjasmine thrives in well-draining soil rich in organic matter. Ensure the soil is loose and fertile.
How deep should I plant pygmyflower rockjasmine when transplanting?
The root ball of pygmyflower rockjasmine should be planted level with the soil surface to avoid burying the crown.
Is it necessary to water pygmyflower rockjasmine immediately after transplanting?
Yes, watering pygmyflower rockjasmine right after transplanting helps settle the soil and reduces transplant shock.
How much sunlight is required for transplanted pygmyflower rockjasmine?
Pygmyflower rockjasmine prefers a sunny to partially shaded location to flourish after transplantation.
Can pygmyflower rockjasmine be transplanted on a hot, sunny day?
It's best to transplant pygmyflower rockjasmine on a cloudy day or during the cooler parts of the day to reduce stress.
Should I apply fertilizer when transplanting pygmyflower rockjasmine?
Use a balanced, slow-release fertilizer after transplanting to encourage healthy growth without overwhelming pygmyflower rockjasmine.
Do pygmyflower rockjasmine need any special care after transplanting?
Monitor pygmyflower rockjasmine for signs of stress and maintain consistent moisture while the roots establish in their new location.
How do I protect my transplanted pygmyflower rockjasmine from pests?
Keep an eye out for pests, and consider using organic pest control options if needed while handling pygmyflower rockjasmine delicately.



