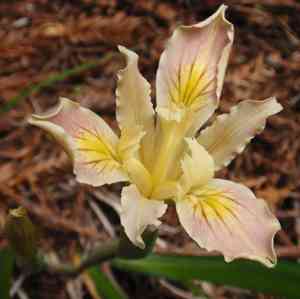
How to Prune Purdy's iris?
Purdy's iris, a notable iris variety recognized for its striking blossoms, thrives with judicious trimming to eliminate faded flowers and preserve its visual appeal. This trimming should occur after the blooming period, generally in late spring or early summer, to stimulate fresh development and improve the subsequent season's flowering. Any withered or compromised foliage ought to be removed as well to avert illness. This regimen guarantees robustness and extended life, keeping purdy's iris flourishing and attractive within a garden environment.
Advantages of Trimming Purdy's Iris
Advantages of Trimming Purdy's Iris
Trimming purdy's iris promotes robust development and helps maintain its form. This practice ensures healthier foliage, reduces disease risk, and results in a more visually appealing shape, fitting garden aesthetics.
Optimal Time for Trimming Purdy's Iris
Optimal Time for Trimming Purdy's Iris
Trimming purdy's iris from late spring to early summer benefits the plant's health and vitality. This period aligns with the post-flowering phase when purdy's iris has already bloomed and can quickly recover from pruning without impacting the next season's flowers. Pruning in late spring allows for the removal of faded blooms and any diseased or damaged leaves before the active growing season, and early summer trimming helps shape the plant and encourages the growth of strong, healthy rhizomes for the subsequent year. Avoid trimming purdy's iris during late autumn or winter as the plant is dormant then, and cutting back may increase susceptibility to cold damage and reduce spring flowering.
Tools Required for Trimming Purdy's Iris
Sharp Bypass Pruners
These are crucial for making clean cuts without harming the foliage or stems of purdy's iris. The bypass design operates like scissors, providing precise trimming. Ensure blades are sharp to prevent crushing the plant's vascular system, which could lead to illness.
Garden Scissors
For more delicate tasks, such as deadheading or trimming smaller stems, garden scissors offer control and accuracy. Using these will minimize the impact on purdy's iris's overall growth and well-being.
Hand-held Shears
When shaping or cutting back clumps of purdy's iris, hand-held shears enable consistent, straight cuts across multiple stems. They are especially useful after flowering to neaten the plant's appearance.
How to Trim Purdy's Iris
Sanitize tools
Before beginning, sanitize your pruning shears or scissors with a bleach or alcohol solution to prevent the spread of disease to purdy's iris.
Remove diseased leaves
Carefully inspect purdy's iris for any diseased leaves. Gently trim these leaves at their base where they connect to the stem, avoiding damage to the healthy surrounding foliage.
Eliminate withered leaves
Identify and cut away withered or yellowing leaves from purdy's iris, which are no longer photosynthetically active. Make cuts at the base of the leaves to maintain a tidy look.
Trimming diseased stems
For any stems of purdy's iris showing signs of disease, such as unusual spots or browning, prune them back to healthy tissue, ensuring you cut just above a leaf joint or bud.
Clean up
After trimming purdy's iris, gather and dispose of all removed material in the trash to reduce the risk of disease spread. Avoid composting diseased plant material.
Common Trimming Errors with Purdy's Iris
Excessive trimming
Cutting back too much of purdy's iris's foliage can stress the plant, as it relies on its leaves to generate energy through photosynthesis. Over-trimming can lead to reduced vigor and fewer blooms.
Incorrect cut locations
Snipping purdy's iris at the wrong spot can create open wounds susceptible to disease. Cuts should be made at the base of spent flower stalks and not into the healthy rhizome bulks or foliage.
Using dull tools
Trimming with dull or dirty tools can harm purdy's iris's delicate stems, leaving jagged cuts that may lead to infections.
Trimming healthy growth
Removing healthy leaves and buds along with faded blooms can limit purdy's iris's potential for future growth and flowering.
Ignoring diseased material
Failing to remove or dispose of diseased foliage during trimming can allow infections to spread throughout purdy's iris and the garden.
General Trimming Advice for Purdy's Iris
Clean tools
Ensure trimming tools are clean and sharp to make neat cuts that heal quickly, minimizing stress on purdy's iris and reducing the risk of disease transmission.
Spent blooms removal
Remove spent blooms by snipping the flower stalks close to the base without harming surrounding leaves, which will encourage purdy's iris to produce more flowers.
Dead or diseased foliage
Identify and cut away any dead or diseased foliage to help maintain purdy's iris's health. Sanitize tools after handling diseased material to prevent spread.
Thin out overgrowth
Thin out dense clumps by carefully removing selected stalks at their base, improving air circulation and sunlight penetration, which can reduce the potential for disease and encourage strong growth in purdy's iris.
Post blooming trim
Focus trimming efforts on tidying up purdy's iris after its blooming period, which helps direct its energy towards robust growth for the following season.
Protective mulching
After trimming, consider a light layer of mulch around the base of purdy's iris to protect the rhizomes and retain soil moisture, which can be beneficial for recovery and overall health.


