How to Prune Purdy's fritillary?
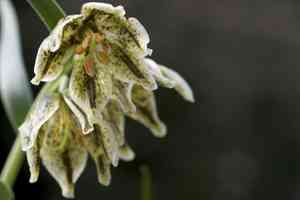
Purdy's fritillary is recognized by its unique campanulate blossoms and wide, lanceolate foliage. The most suitable periods for trimming are early spring and late winter, during the plant's inactive phase. Eliminate any deceased or compromised stalks and foster more robust development by reducing crowded sections. Consistent trimming boosts air movement and lowers the chance of illness, guaranteeing vivid flowers. Always employ disinfected implements to avert contamination. This method elevates the plant's general strength and visual attractiveness.
Advantages of Trimming Purdy's Fritillary
Advantages of Trimming Purdy's Fritillary
Purdy's fritillary benefits from trimming by encouraging robust development and preserving its form. Pruning aids in lowering disease risk, fostering abundant blooms, and managing plant dimensions. Ensuring adequate air circulation and light penetration improves overall plant vitality and look.
Optimal Period for Trimming Purdy's Fritillary
Optimal Period for Trimming Purdy's Fritillary
Trimming purdy's fritillary during early spring or late winter is considered ideal as it aligns with the plant's dormant phase and precedes its active growth period. Pruning during these seasons promotes healthy regeneration and minimizes plant stress. Additionally, it helps shape the plant for improved flowering in the subsequent growing season, enhancing its overall vigor and aesthetic appeal.
Necessary Tools for Trimming Purdy's Fritillary
Small Hand Pruners
Small hand pruners are perfect for precise cutting and trimming. They are suitable for removing spent blossoms and dead stalks without harming the plant's delicate structure.
Sharp Scissors
A pair of sharp scissors can be utilized for more detailed trimming, such as snipping individual leaves or smaller stems, ensuring clean cuts to prevent plant stress.
Disinfectant Wipes
Employing disinfectant wipes to sanitize tools before and after trimming helps prevent disease spread and maintains the health of purdy's fritillary.
How to Trim Purdy's Fritillary
Examination
Carefully examine the plant for any visible indications of diseased or withered foliage. Pay close attention to the base and stems where such leaves are more prone to accumulate.
Tool Sanitation
Before making any cuts, clean your pruning shears or scissors with a disinfectant solution to prevent disease transmission. This is vital for maintaining plant health, especially for purdy's fritillary.
Remove Diseased Foliage
Identify the diseased leaves, which may show signs like discoloration or spots. Cut these leaves off at their base, ensuring proper disposal to prevent contamination of nearby plants.
Remove Wilting Leaves
Trim away any wilting or dying leaves by cutting them close to the main stem. These leaves can drain energy from the plant and should be removed to encourage healthier growth.
Observation
After trimming, regularly monitor the plant to ensure no further disease spread and that the cut areas are healing correctly. This aids in preserving the overall health and appearance of purdy's fritillary.
Common Trimming Errors with Purdy's Fritillary
Excessive Trimming
Over-pruning or cutting back purdy's fritillary too much can stress the plant, hinder growth, and reduce its flowering capacity.
Inferior Trimming Tools
Using dull or unclean tools can damage plant tissue, making it more vulnerable to disease and pest infestations.
Incorrect Trimming Method
Improper techniques, such as making jagged cuts or trimming at incorrect angles, can harm the plant and impede proper recovery.
General Trimming Advice for Purdy's Fritillary
Utilize Sharp and Clean Tools
Always use sharp, sterilized pruning shears to make clean cuts, which helps prevent disease transmission and promotes healthy regrowth.
Trim for Upkeep Rather Than Shaping
Focus on removing dead or damaged stems and leaves instead of drastically altering the plant's form. This encourages the plant's natural growth habit and flowering.
Make Cuts at a 45-Degree Angle
When cutting stems, make your cuts at a 45-degree angle just above a healthy bud or node. This practice helps facilitate proper healing and encourages new growth.


