How to Prune Floating marsh marigold?
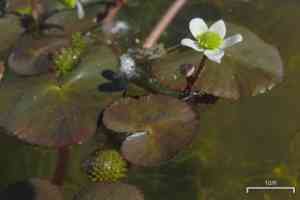
The aquatic plant Caltha natans, recognized for its buoyant growth and vibrant yellow blossoms, thrives with regular trimming to sustain its well-being and stimulate abundant flowering. The most effective periods for pruning are in the early spring or late winter, prior to the emergence of new shoots. Snip off any deceased or deteriorating stalks and foliage to enhance air movement and light exposure. This practice also aids in averting fungal diseases and obstructions in water channels. To achieve superior outcomes, employ sanitized, sharp implements and remove no more than one-third of the plant's mass during each session.
What Are the Benefits of Pruning Floating Marsh Marigold?
What Are the Benefits of Pruning Floating Marsh Marigold?
Trimming floating marsh marigold promotes robust development and helps maintain its form. It improves its overall look and ensures the plant remains healthy, fending off pests and illnesses. Regular trimming encourages better water circulation and lessens congestion, aiding blooming and resilience.
What Is the Best Time for Pruning Floating Marsh Marigold?
What Is the Best Time for Pruning Floating Marsh Marigold?
Trimming or cutting floating marsh marigold in late winter and early spring is optimal as the plant is dormant, minimizing stress and allowing for healthy regeneration. During these periods, floating marsh marigold's energy isn't focused on flowering or fruiting, making it the perfect time to shape the plant and remove any dead or damaged parts. Furthermore, pruning at this time fosters a strong growth cycle as the active season commences.
What Tools Do I Need to Prune Floating Marsh Marigold?
Bypass Pruners
Perfect for clean cuts when trimming the delicate stems of floating marsh marigold. They help prevent crushing plant tissue.
Snips or Scissors
Useful for precise trimming of smaller, thinner stems and leaves of floating marsh marigold. Accuracy is vital due to the plantâs fragile structure.
Sterilized Hobby Knife
Required for detailed work, especially when removing small dead or damaged areas without harming the plant.
Long-Handled Pruners
Helpful for reaching and cutting stems in deeper water, ensuring gardeners can access floating marsh marigold without disrupting its natural aquatic habitat.
Gloves
Crucial for protecting hands from extended exposure to moisture and preventing any potential reactions to the plant's sap.
How to Prune Floating Marsh Marigold
Inspect
Periodically check floating marsh marigold for any diseased or withered leaves, particularly after rain or during humid conditions.
Sanitize
Before beginning, thoroughly disinfect your pruning shears with a 70% isopropyl alcohol solution to prevent disease transmission.
Remove
Carefully remove diseased leaves by cutting them at their base, close to the stem. Avoid tearing or damaging the stem.
Dispose
Immediately discard the pruned leaves in a sealed bag and do not compost them, as diseased material can contaminate soil and other plants.
Review
Re-evaluate the plant after pruning to ensure all diseased or withered leaves have been removed and monitor for signs of further infection.
Common Pruning Mistakes with Floating Marsh Marigold
Over-pruning
A frequent error is cutting back too much of the plant at once, which can weaken its overall structure and reduce its ability to photosynthesize effectively.
Incorrect technique
Using dull or dirty shears can harm the plant's stems and increase the risk of disease. Additionally, improper cuts, such as cutting too close to the main stem, can injure the plant.
Pruning at the wrong time
Pruning when the plant is not ready can impede flowering and new growth. Although the best season is excluded here, it's crucial to understand the right stage in the plant's growth cycle for pruning.
Common Pruning Tips for Floating Marsh Marigold
Use clean, sharp tools
Always ensure your pruning tools are sharp and sterilized to make clean cuts and prevent disease transmission.
Observe the plant's growth
Regularly monitor floating marsh marigold for signs of overcrowded or damaged foliage, and prune selectively to improve airflow and light penetration without over-pruning.
Cut at the right angle
Make your cuts at a 45-degree angle to facilitate better healing and reduce the risk of water logging at the cut site.
Be gentle with new growth
Handle the newer, delicate growth carefully while pruning to avoid causing unnecessary damage that could stunt the plantâs development.


