How to Prune Putty root orchid?
This orchid variety is characterized by a solitary winter leaf and blossoms during the summer. For the putty root orchid, trimming requirements are slight, primarily involving the removal of withered flower stalks once they have faded to stimulate further development. The most suitable times for pruning are late spring or early summer, following the blooming period. Pruning activities should account for the plant's dormant phase in autumn and winter. Prompt trimming prevents the plant from expending energy on seed formation and encourages a more robust resurgence in the subsequent growing season. Ensure tools are disinfected to avoid spreading pathogens.
What Are the Benefits of Pruning Putty Root Orchid?
What Are the Benefits of Pruning Putty Root Orchid?
Trimming putty root orchid encourages robust development and maintains its desired shape. Strategic cuts can foster a denser form and improved vitality, aligning with the plant's natural cycle and visual appeal.
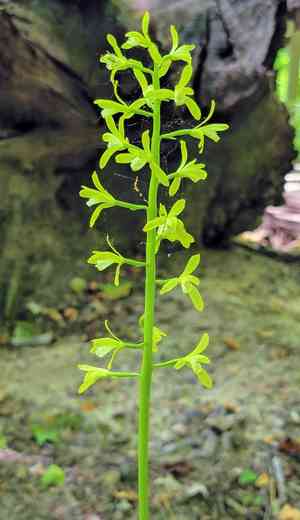
What Is the Best Time for Pruning Putty Root Orchid?
What Is the Best Time for Pruning Putty Root Orchid?
The optimal periods for trimming or cutting putty root orchid are late spring and early summer. This timing coincides with the end of putty root orchid's dormant phase and precedes its active growth period. Pruning during this window minimizes stress on putty root orchid by removing only the foliage that has already contributed to the plant's energy reserves through photosynthesis. Additionally, late spring and early summer pruning supports the plant's cycle of producing new growth, which typically follows the blooming period. Trimming at this time facilitates better light and air penetration to the plant's core, promoting strong health and preventing disease. Ensuring pruning is completed before the onset of peak summer temperatures is also crucial for preventing heat stress and dehydration after the process.
What Tools Do I Need to Prune Putty Root Orchid?
Fine-Pointed Pruning Snips
These are suitable for putty root orchid as they enable precise cutting of small, delicate structures without causing unnecessary harm to the plant's foliage.
Sterilizing Agent (Isopropyl Alcohol or Bleach Solution)
Using a sterilizing agent is vital to prevent the spread of diseases between plants. Before and after pruning putty root orchid, tools should be disinfected to safeguard its delicate health.
Gloves
Wearing gloves helps ensure that the gardener does not transfer any harmful substances or pathogens to putty root orchid when handling the plant.
How to Prune Putty Root Orchid
Identification
Thoroughly inspect putty root orchid to pinpoint diseased leaves, withered leaves, and diseased stems that require removal.
Sanitization
Sterilize pruning shears with rubbing alcohol or a bleach solution to prevent the transmission of disease during pruning.
Pruning diseased leaves
Carefully cut away diseased leaves at their base, avoiding damage to healthy tissue and ensuring clean cuts to promote rapid healing.
Pruning withered leaves
Remove withered leaves from putty root orchid by gently twisting and pulling them off, or by cutting if they don't detach easily to maintain the plant's appearance.
Common Pruning Mistakes with Putty Root Orchid
Over-pruning
Removing too much foliage at once can stress putty root orchid, potentially leading to reduced vigor and fewer blooms. It's crucial to prune sparingly, as this species does not respond well to aggressive cutting back.
Improper tool use
Using dull or dirty pruning tools can damage putty root orchid's delicate tissues, increasing the risk of disease and hindering healthy regrowth. Always use sharp, clean tools for precise cuts.
Pruning at basal level
Putty root orchid's leaves store energy for the next growing season. Cutting leaves all the way to the base can deplete energy reserves, impeding the plant's ability to thrive.
Ignoring plant health
Pruning without assessing the plant's health may remove parts of putty root orchid that are essential for its recovery from any stress or damage. Always evaluate the plant's condition before pruning.
Unnecessary pruning
Putty root orchid typically requires minimal pruning. Unwarranted cutting can do more harm than good, so pruning should only be performed when necessary for the plant's health or aesthetic.
Common Pruning Tips for Putty Root Orchid
Selective pruning
Focus on removing only the damaged or diseased foliage to maintain the health of putty root orchid. This approach helps to conserve the plant's energy for growth and flowering.
Post-flowering cleanup
After putty root orchid has flowered, remove only the spent flowers and yellowing leaves. This cleanup helps to tidy the plant without compromising its energy storage.
Cutting technique
Make clean, angled cuts when pruning to ensure a quick healing process and to reduce the potential for disease to enter putty root orchid. Angled cuts help water to run off the wound, preventing rot.
Timing within lifecycle
Prune putty root orchid in accordance with its natural lifecycle, allowing the leaves to fully die back before removing them, as they contribute to the energy reserves necessary for the next growing season.
Protective mulching
Rather than pruning, sometimes providing a protective layer of mulch can be beneficial in managing putty root orchid's health. Mulching can suppress weeds, reducing the need for pruning them around the plant.


