How to Propagate Hammock velvetseed?
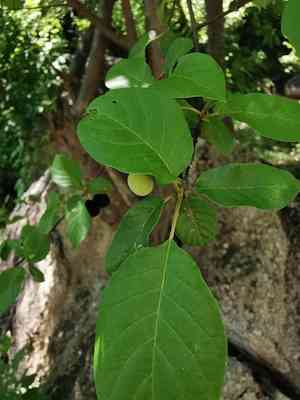
Hammock velvetseed is a bushy flora in Florida characterized by its ovate, plush foliage and diminutive, aromatic blossoms. To propagate, plant newly harvested seeds in a potting blend that drains effectively. Ensure continuous dampness and offer a warm, protected setting for successful sprouting. After the young plants have taken root, relocate them to a sun-drenched spot with soil that drains properly. Consistent irrigation and periodic fertilization encourage robust development.
Optimal Time for Hammock Velvetseed Propagation
Propagation Method
Seeding
Propagation Period
Spring
Essential Tools for Hammock Velvetseed Propagation
Seed Tray
A seed tray provides a controlled setting for planting seeds, ensuring uniform spacing and ideal growing conditions for hammock velvetseed. It aids in managing water and light exposure effectively.
Seed Starting Mix
This sterile, light soil medium offers vital nutrients and excellent drainage for hammock velvetseed's seeds to sprout. It helps prevent fungal issues and promotes seedling health.
Spray Bottle
A fine mist spray bottle is perfect for watering hammock velvetseed seeds, delivering moisture without disturbing the soil or seeds, which is crucial for keeping them adequately hydrated during germination.
Heating Mat
A heating mat helps maintain consistent, warm temperatures, which are beneficial for hammock velvetseed's seed germination. It mimics the warm soil conditions necessary for optimal growth.
Humidity Dome
A humidity dome retains moisture and sustains a consistent, warm environment, fostering an ideal micro-climate for hammock velvetseed's seed germination and early seedling development.
High-quality Seeds
Ensuring the use of viable, high-quality seeds is crucial. Good seeds have high germination rates and robust initial growth, which is essential for successful hammock velvetseed propagation.
Seed Dibber
A seed dibber assists in creating precise holes for planting hammock velvetseed's seeds at the correct depth, which is important for consistent and uniform germination.
Plant Labels
Labeling seed trays or pots helps track different batches of hammock velvetseed seeds, ensuring proper monitoring and care throughout the germination process.
Plastic Wrap or Cling Film
Without a humidity dome, plastic wrap can cover the seed tray to maintain humidity and warmth around hammock velvetseed seeds, essential for successful germination.
Propagating Hammock Velvetseed: A Guide
Propagation Difficulty
Easy
Caring for Your Newly Propagated Hammock Velvetseed
Caring for Your Newly Propagated Hammock Velvetseed
Post-germination, relocate seedlings to a spot with bright, indirect light. Water regularly, ensuring the soil stays moist but not waterlogged. Once seedlings have developed several true leaves and are robust, gradually introduce them to outdoor conditions over a week before transplanting to their permanent spot. Maintain consistent watering and monitor for typical hammock velvetseed pests and diseases. Fertilize sparingly, as excessive nutrients can harm young plants.
Common Errors to Avoid When Propagating Hammock Velvetseed
Overwatering
Excessive moisture can lead to root rot, hindering new growth and potentially killing young plants.
Poor Soil Drainage
Soils that do not drain well can create waterlogged conditions, detrimental to hammock velvetseed's roots.
Ignoring Light Needs
Insufficient light can impede hammock velvetseed's growth and delay or prevent successful propagation.
Incorrect Cutting Methods
Improper cutting techniques can harm hammock velvetseed or result in non-viable propagation material.
Neglecting Pests and Diseases
Failure to monitor and treat pest infestations and diseases can severely impact young hammock velvetseed plants.
Advice for Propagating Hammock Velvetseed
Utilize Well-Draining Soil
Choose a soil mix that allows water to drain efficiently to support healthy root development.
Moderate Watering
Water moderately, ensuring the soil is moist but not waterlogged to prevent root rot.
Provide Ample Light
Position cuttings in a location that receives sufficient indirect sunlight to encourage healthy growth.
Sharp, Clean Tools
Always use sharp and clean tools when taking cuttings to prevent infection and promote successful rooting.
Monitor for Pests
Regularly check for signs of pests or diseases and treat promptly to protect young plants.



