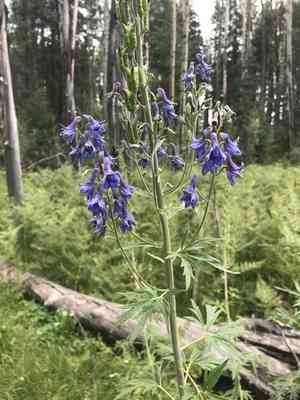
How to Propagate Clark valley larkspur?
Clark valley larkspur flourishes in soil that drains efficiently and needs little irrigation after it has taken root. Reproduction via seeding is successful; confirm that seeds are hydrated and stratified prior to placement. Locate them in a somewhat shaded spot with stable temperatures. Periodically check hydration levels, but prevent excessive saturation. Relocate young plants once they are robust enough to endure the process. Consult authoritative references to preserve the plant's vitality.
Optimal Period for Clark Valley Larkspur Propagation
Propagation Method
Seeding
Propagation Period
Spring
Tools Utilized for Clark Valley Larkspur Propagation
Seed Tray
An essential item for planting clark valley larkspur seeds. It enables organized spacing and easy handling of young seedlings, while also providing a consistent environment for germination.
Seed Starting Mix
A well-aerated, nutrient-rich seed starting medium is vital for successful clark valley larkspur seed germination. It ensures proper drainage and supplies necessary nutrients for emerging seedlings.
Humidity Dome
A humidity dome placed over the seed tray helps maintain ideal moisture levels and temperature, crucial for clark valley larkspur germination. It prevents seeds from drying out and creates a mini-greenhouse effect.
Heat Mat
A heat mat positioned beneath the seed tray can provide warmth from below, which benefits clark valley larkspur seed germination. Consistent warmth accelerates the germination process and promotes uniform growth.
Mister or Spray Bottle
A mister or spray bottle is used to keep the seed starting mix damp without disturbing clark valley larkspur seeds. It helps maintain a delicate moisture balance essential for seedling development.
Seed Labeling Markers
Labels are important for identifying different stages and types of seedlings in the propagation tray. This helps avoid confusion and ensures clark valley larkspur plants are properly tracked throughout the propagation process.
Tweezers
Tweezers can be useful for handling the tiny clark valley larkspur seeds during the sowing process. They allow for precise placement without damaging delicate seeds.
Grow Lights
Supplemental grow lights can provide the necessary light intensity and duration for clark valley larkspur seedlings, especially if natural light is insufficient. This ensures robust growth and prevents leggy seedlings.
Propagation Tray with Inserts
A propagation tray with inserts allows for individual seed handling and minimizes root disturbance when transplanting clark valley larkspur seedlings. It supports better root development and makes the transplanting process smoother.
How to Propagate Clark Valley Larkspur?
Propagation Type
Simple
Caring for Your Newly Propagated Clark Valley Larkspur
Caring for Your Newly Propagated Clark Valley Larkspur
Water regularly to keep the soil consistently moist, especially during dry periods. Apply a balanced, slow-release fertilizer to encourage vigorous growth. Monitor for pests and diseases, and prune any damaged or diseased foliage to maintain plant health. Support tall stems with stakes if needed to prevent damage from wind or heavy blooms.
Common Errors to Avoid When Propagating Clark Valley Larkspur
Overwatering
Excessive moisture can lead to root rot, significantly reducing the likelihood of successful propagation.
Wrong Soil Type
Using poorly draining soil can create conditions favorable for root diseases and impede growth.
Improper Cutting Techniques
Not using sterilized tools or making incorrect cuts can introduce infections or harm the plant.
Incorrect Light Exposure
Providing too much or too little light can stress the plant and hinder its ability to produce healthy roots.
Ignoring Pest Control
Failing to monitor and manage pests can lead to infestations that weaken or kill the propagating plants.
Advice for Propagating Clark Valley Larkspur
Use Well-Draining Soil
Ensure the soil mix used allows excess water to drain away quickly, preventing root rot.
Sterilize Tools
Always use sterilized cutting tools to make clean cuts and prevent the introduction of pathogens.
Optimal Light Conditions
Provide bright, indirect light to encourage healthy growth without stressing the plant.
Regular Monitoring
Check the cuttings frequently for signs of disease or pest infestations and take action promptly.
Use Rooting Hormone
Applying a rooting hormone to the cuttings can facilitate faster and more robust root development.


