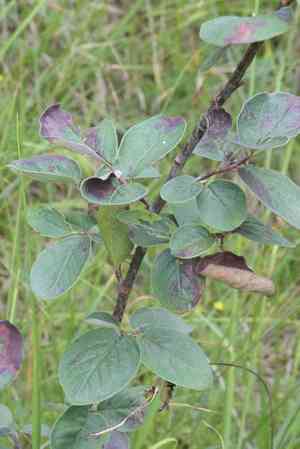
Woolly cotoneaster (Cotoneaster tomentosus)
Also known as: Woolly cotoneaster, Hairy cotoneaster
The Filz-Steinmispel typically grows as an upright shrub, although it can occasionally have a spreading form. It generally attains a height of 1 to 2 meters, with some specimens reaching up to 3 meters. The branches feature dark brown bark, while the leaves are alternately arranged in two rows, consisting of a short petiole and a leaf blade.
In This Article
Attributes of Woolly cotoneaster
Lifespan
Perennial
Plant Type
Shrub
Plant Height
50 cm to 2 m
Spread
1-3 meters
Leaf Color
Green (upper side), White woolly (underside)
Flower Size
6 mm to 7 mm
Flower Color
White
Images of Woolly cotoneaster
Quickly Identify Woolly cotoneaster
1
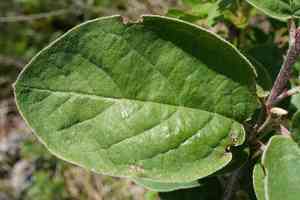
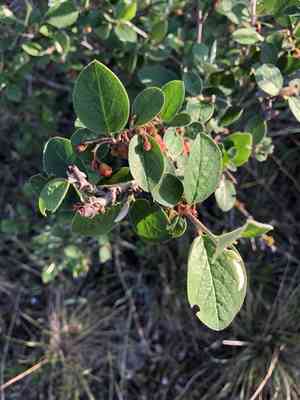
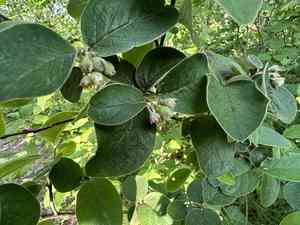
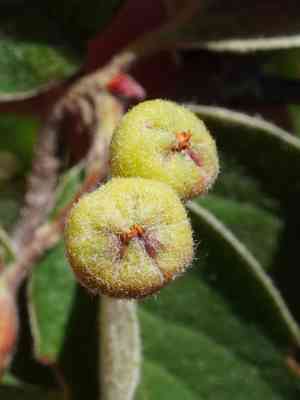
Identify Cotoneaster tomentosus by its dense, woolly hairs on young shoots and leaves. The leaves are elliptical and green on the upper side, with a white, woolly underside. The flowers are small, white or pinkish, and appear in clusters. The red berries are another key identification feature.
Scientific Classification of Woolly cotoneaster
Phylum
Vascular plants
Class
Dicotyledons
Order
Rosales
Family
Rose
Genus
Cotoneaster
Species
Woolly cotoneaster
Planting and Growing of Woolly cotoneaster
Care Difficulty
Easy
Watering Schedule
Every 4 days
Sunlight Requirements
Full sun
Sunshine Duration
6-8 hours
Ideal Temperature
60-75℉
Soil Type
Potting Mix, Peat Mix
Soil pH
6.5-7.5
Fertilizer Type
Balanced
Pruning Season
Spring, Summer
Pruning Area
Branches, Leaves
Pruning Frequency
2 times a year
Repotting Season
Spring
Pot Type
Plastic, Terracotta
 How to Water Woolly cotoneaster?
The Cotoneaster tomentosus requires a mindful balance between moist and dry soil. Water enough to moisten the top 2-3 inches of soil without causing it to become waterlogged. Approximately 500 ml per watering session is usually sufficient, but this can vary based on the size of the plant and soil conditions.
What are the symptoms of an underwatered Woolly cotoneaster?
›
What should I do if my Woolly cotoneaster is not getting enough water?
›
What are the symptoms of an overwatered Woolly cotoneaster?
›
How to save an overwatered Woolly cotoneaster?
›
 What Are the Sunlight Requirements for Woolly cotoneaster?
Providing Cotoneaster tomentosus with full to partial sun, translating to about 6 to 8 hours of light, encourages vibrant berry production and dense, healthy foliage. This light stimulation is key for resistance against pests and diseases.
Ideal Light Duration
›
Optimal Light Positioning
›
Light Diffusion Techniques
›
 What Is the Ideal Temperature Range for Woolly cotoneaster?
The ideal temperature range for Cotoneaster tomentosus is between 60°F and 75°F. This range provides the most conducive environment for growth and healthy foliage, ensuring efficient photosynthesis and nutrient uptake. Too much deviation from this range could lead to growth issues or stress.
 What Soil is Best for Woolly cotoneaster?
Cotoneaster tomentosus thrives best in soils rich in organic matter. A nutrient-dense soil boosts plant health by supporting robust growth and vibrant foliage, making it a crucial component for optimal development. Good drainage is essential to prevent waterlogging, which can lead to root rot. Loamy and sandy loam soils provide excellent drainage, promoting healthy root systems and ensuring the plant remains vigorous. While drainage is crucial, the soil should also retain some moisture to keep the roots hydrated. A balanced sandy loam offers this dual benefit, ensuring consistent growth without water stress.
 How to Fertilize Woolly cotoneaster?
For Cotoneaster tomentosus, use a balanced 10-10-10 fertilizer. For liquid fertilizers, apply a diluted solution at half strength to avoid root burn. Solid or slow-release fertilizers should be used at a rate of 1/2 cup per plant, ensuring even distribution around the root zone. Avoid over-fertilization, as the plant is sensitive to excess nutrients.
 How to Prune Woolly cotoneaster?
Start by sanitizing your pruning tools to prevent the spread of diseases. Identify and remove any dead or damaged branches to encourage healthier growth. Trim overgrown branches to maintain the shrub's shape, making clean cuts at a 45-degree angle above a bud or stem junction. Focus on thinning the plant to improve air circulation, which helps in reducing disease. Be mindful to maintain the natural shape and habit of the plant while pruning.
 How to Propagate Woolly cotoneaster plant?
1
Gather ripe berries from the Cotoneaster tomentosus in late summer or early autumn. Cleaning the seeds from pulp is crucial before storage in a cool, dry place until spring.
2
In late spring or summer, select healthy, non-flowering shoots. Cut them into sections of about 10-15 cm, ensuring you have a node on each cutting for optimal rooting.
3
Bend a low-growing stem to the ground in early autumn. Secure it with a wire or stone, and cover the bent section with soil to encourage the growth of roots from the buried part.
 How to Repot Woolly cotoneaster plant?
1
Cotoneaster tomentosus shows signs of needing repotting when its roots begin to emerge from the drainage holes or when the soil no longer retains moisture. Ideally, repotting should be done in early spring when the plant enters its active growth phase, ensuring it recovers quickly in its new pot.
2
Select a pot that is one size larger than the current one. Ensure the pot has adequate drainage holes to avoid waterlogging, which can lead to root rot. A slightly larger pot helps prevent soil from becoming compacted and offers sufficient space for root expansion, promoting healthy growth.
3
Use a well-draining potting mix that retains sufficient moisture yet allows excess water to escape. A quality mix may contain peat, perlite, and organic matter, which provides essential nutrients while ensuring proper aeration for the roots. This helps to prevent waterlogged conditions and keeps the roots healthy.
Toxicity
Ingestion
WARNING
The judgment on toxicity and danger is for reference only. We DO NOT GUARANTEE any accuracy of such judgment. Therefore, you SHALL NOT rely on such judgment. It is IMPORTANT TO SEEK PROFESSIONAL ADVICE in advance when necessary.



