How to Transplant Hoary mock orange?
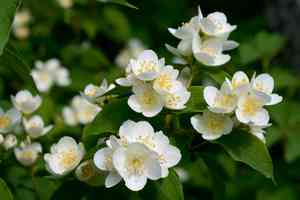
Philadelphus coronarius flourishes when relocated between mid-spring and early summer, leveraging ideal climatic conditions for root development. Choose a site receiving full sun to partial shade, featuring soil that drains effectively. Provide ample water after transplanting to minimize shock.
What Preparations are Needed Before Transplanting Hoary Mock Orange?
What is the Ideal Time for Transplanting Hoary Mock Orange?
The optimal period to relocate hoary mock orange spans from mid-spring to early summer. This timeframe ensures the plant benefits from milder temperatures and increasing daylight, fostering root establishment. Moving hoary mock orange during this window provides natural conditions for acclimatization, improved growth, and a successful transition to its new site.
How Much Space Should You Leave Between Hoary Mock Orange Plants?
Ensure your hoary mock orange plants are spaced 3-4 feet (0.9-1.2 meters) apart. This spacing allows them to develop and thrive without competing for resources.
What is the Best Soil Mix for Hoary Mock Orange Transplanting?
Prepare well-draining soil, incorporating a blend of sand, loam, and organic compost. Include a slow-release, balanced fertilizer to supply essential nutrients for the hoary mock orange plants.
Where Should You Relocate Your Hoary Mock Orange?
Select a site that receives full sun to partial shade. Your hoary mock orange plants will flourish best with at least 6 hours of daily sunlight.
What Equipments Should You Prepare Before Transplantation Hoary Mock Orange?
Gardening Gloves
To safeguard your hands while handling soil and the plant.
Shovel or Spade
For excavating the plant from its original spot and preparing the new planting area.
Garden Fork
To gently loosen the soil surrounding the plant roots to prevent damage.
Watering Can
To hydrate the plant before and after its relocation.
Trowel
For precise digging and moving soil when placing the plant in its new location.
Pruning Shears
To trim any damaged or excess roots and prepare the plant for transplanting.
Compost or Organic Material
For enriching the new planting site with vital nutrients.
How Do You Remove Hoary Mock Orange from the Soil?
How Do You Remove Hoary Mock Orange from the Soil?
From Ground: First, water the hoary mock orange plant to moisten the soil. Next, dig a wide trench around the plant using a shovel or spade, ensuring the plant's root ball remains intact. Carefully work the spade beneath the root ball to lift the plant from its initial position.From Pot: Thoroughly water the hoary mock orange plant. Hold the plant's base and gently tilt the pot sideways. Tap the pot to dislodge the root ball. If the plant is root-bound, carefully separate the roots before transplanting.From Seedling Tray: Water the hoary mock orange seedlings to facilitate removal. Use a small tool like a trowel to gently lift the seedlings with their root balls. Handle the delicate seedlings by their leaves, not stems, to avoid harm.
Step-by-Step Guide for Transplanting Hoary Mock Orange
Hole Preparation
Excavate a hole in the new location that is twice as wide and equally deep as the hoary mock orange plant's root ball.
Soil Enrichment
Incorporate compost or organic material into the soil to provide nutrients and enhance soil structure.
Placing the Plant
Carefully position the hoary mock orange plant in the center of the excavated hole. Ensure the top of the root ball is level with the surrounding ground.
Filling the Hole
Backfill the hole with soil, gently pressing down to eliminate air pockets without overly compacting the soil.
Watering
Water the plant thoroughly immediately after transplanting to settle the soil around its roots.
How Do You Care For Hoary Mock Orange After Transplanting?
Watering
Maintain consistent moisture in the soil around the hoary mock orange, avoiding sogginess, for the initial weeks post-transplant to aid in strong root establishment.
Mulching
Apply a layer of mulch around the plant's base to retain moisture, regulate soil temperature, and suppress weed growth.
Monitoring
Regularly check for signs of stress such as wilting or yellowing leaves, and adjust watering as needed.
Pruning
Trim any dead or damaged growth to direct the plantâs energy towards healthy new development.
Troubleshooting Common Issues with Hoary Mock Orange Transplantation.
When is the best time to transplant hoary mock orange?
The optimal period to transplant hoary mock orange is from mid-spring to early summer for ideal growth.
How far apart should I plant hoary mock orange?
Hoary mock orange should be planted 3-4 feet (0.9-1.2 meters) apart to allow sufficient space.
How do I prepare the soil for hoary mock orange?
Ensure the soil is fertile, well-draining, and slightly acidic to neutral before relocating hoary mock orange.
Should I water hoary mock orange right after transplanting?
Yes, water hoary mock orange thoroughly immediately after transplanting to help roots settle in their new spot.
How deep should I dig the hole for hoary mock orange?
Dig a hole twice the width and the same depth as the root ball for hoary mock orange.
What should I do if the leaves of hoary mock orange wilt after transplanting?
Keep hoary mock orange well-hydrated and shaded during hot periods to aid recovery from transplant shock.
Can hoary mock orange be transplanted in full sun?
Yes, hoary mock orange can be transplanted in full sun but ensure gradual exposure to prevent stress.
How can I reduce transplant shock in hoary mock orange?
To minimize transplant shock in hoary mock orange, water regularly and apply mulch around the base.
Is fertilization necessary when transplanting hoary mock orange?
Avoid fertilizing immediately after transplanting hoary mock orange; wait until the plant is established.
How can I support hoary mock orange after transplanting?
Stake young hoary mock orange plants if necessary to keep them upright and stable as they establish.


