How to Transplant Gearstem cactus?
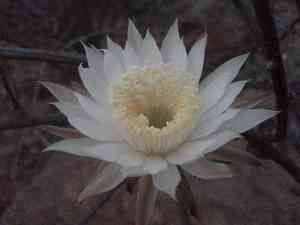
The optimal period for relocating gearstem cactus spans from mid-spring through late spring, as consistent warmth fosters root establishment. Select a location offering abundant light and soil that drains effectively, taking care to minimize root disruption for successful transplantation.
What Preparations are Needed Before Transplanting Gearstem Cactus?
What is the Ideal Time for Transplanting Gearstem Cactus?
The best time to move gearstem cactus is from mid-spring to late spring. The mild temperatures and consistent weather during this season create ideal conditions for gearstem cactus to adapt and establish roots successfully. Transplanting at this time leverages spring's natural growth surge, enhancing the plant's resilience as it settles into its new spot.
How Much Space Should You Leave Between Gearstem Cactus Plants?
When preparing to transplant your gearstem cactus, allow ample room. Position each plant approximately 24-36 inches (61-91 cm) apart. This spacing provides sufficient area for growth and development, ensuring they receive all necessary nutrients without competition.
What is the Best Soil Mix for Gearstem Cactus Transplanting?
Prepare your planting area with soil that drains well; a blend of sand, perlite, and compost works excellently for gearstem cactus. A specialized cactus or succulent potting mix as a foundational fertilizer will also give your plant a proper start.
Where Should You Relocate Your Gearstem Cactus?
Select a sunny location where your gearstem cactus can receive full sunlight for most of the day. They thrive in bright sun, much like we enjoy a warm, sunny day! Ensure the spot provides 6-8 hours of direct sunlight to help your gearstem cactus flourish.
What Equipments Should You Prepare Before Transplantation Gearstem Cactus?
Gardening Gloves
To safeguard your hands while handling soil and the cactus.
Shovel or Spade
To carefully excavate the gearstem cactus.
Pruning Shears
To trim any damaged roots or stems if necessary.
Watering Can
To hydrate the gearstem cactus before and after relocation.
Trowel
For precise soil manipulation and accurate planting.
Wheelbarrow
To move the gearstem cactus and soil if required.
Cactus/Succulent Mix
To supply the appropriate drainage and nutrients.
Measuring Tape
To maintain correct spacing between plants.
How Do You Remove Gearstem Cactus from the Soil?
How Do You Remove Gearstem Cactus from the Soil?
From Ground: Start by watering the gearstem cactus to moisten the surrounding soil, which lessens root stress and simplifies removal. Next, carefully dig a circle around the plant with a shovel or spade, ensuring a wide enough perimeter to avoid root damage. Gently slide the shovel blade beneath the root ball and lift the gearstem cactus from its original spot.From Pot: Begin by watering the gearstem cactus to facilitate extraction. Turn the pot on its side and gently tap the bottom and sides to loosen the plant. Grasp the plant's base and slowly ease it out, using your fingers to encourage root release if they are pot-bound.From Seedling Tray: Dampen the soil in the tray to minimize potential root damage. Use a trowel or your hand to carefully separate individual gearstem cactus plants, ensuring as much soil as possible remains around the roots for protection.
Step-by-Step Guide for Transplanting Gearstem Cactus
Preparation
Thoroughly water the gearstem cactus before removing it from its current location to reduce transplant shock.
Excavate
Dig a hole where you plan to transplant the gearstem cactus, making it twice as wide as the root ball and equally deep.
Transplant
Lower the gearstem cactus into the hole, keeping it at the same depth it was previously growing. Ensure the root ball is level with the surrounding soil surface.
Soil Replacement
Fill the hole with cactus mix, gently pressing the soil around the roots to eliminate air pockets.
Initial Watering
Water the gearstem cactus immediately after transplanting to settle the soil and hydrate the roots.
How Do You Care For Gearstem Cactus After Transplanting?
Watering
In the weeks following transplanting, provide the gearstem cactus with sufficient water to keep the soil slightly moist, promoting proper root development.
Staking
If the gearstem cactus is tall or top-heavy, gently insert a stake beside it and loosely tie the plant for support until it is firmly established.
Observation
Regularly check the gearstem cactus for signs of transplant shock or stress, such as wilting or discolored foliage, and address issues as needed.
Troubleshooting Common Issues with Gearstem Cactus Transplantation.
What's the best time to transplant gearstem cactus?
Transplant gearstem cactus during mid to late spring for optimal root establishment and growth before hot weather.
How much space does gearstem cactus need when transplanting?
Ensure to space gearstem cactus plants 24-36 inches (61-91 cm) apart to allow sufficient room for growth.
Why is my gearstem cactus wilting after transplant?
Wilting could be due to transplant shock. Keep the soil moist and protect from strong sunlight temporarily.
How deep should the hole be for transplanting gearstem cactus?
Dig a hole twice the size of the root ball but no deeper than the plant was originally growing.
What soil type is best for transplanting gearstem cactus?
Use a well-draining soil mix. If necessary, amend with sand or perlite to improve drainage.
How often should I water gearstem cactus after transplanting?
Water gearstem cactus thoroughly after transplanting and then regularly, allowing soil to dry slightly between watering.
Should I fertilize gearstem cactus after transplanting?
Wait 4-6 weeks before fertilizing to avoid burning the roots, then feed lightly.
Can gearstem cactus be transplanted in full sun?
Yes, but provide temporary shade after transplanting to reduce stress and prevent scorching.
What to do if gearstem cactus's leaves turn yellow after transplant?
Yellowing leaves might indicate overwatering or poor drainage. Check soil conditions and adjust watering.
Can gearstem cactus tolerate transplanting during summer?
It's not ideal. If unavoidable, ensure to water more frequently and provide shade to help the plant establish.



