How to Transplant Pineywoods geranium?
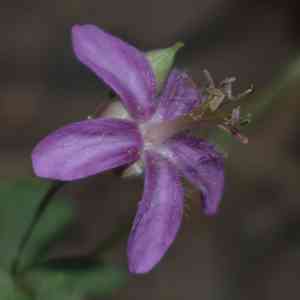
Relocate pineywoods geranium during the milder periods of mid-to-late spring or early summer to ensure vigorous development. Select a location bathed in sunlight with soil that drains effectively. Should the plant be overcrowded, meticulously separate it to foster its health.
Essential Preparations Before Relocating Pineywoods Geranium
Optimal Timing for Moving Pineywoods Geranium?
The ideal period for transplanting pineywoods geranium spans from the gentle warmth of mid-spring to the onset of early summer. This timeframe offers moderate temperatures and ample sunlight, fostering robust root development without the harshness of peak summer heat or the risk of frost. Shifting pineywoods geranium during this season promotes strong root growth, establishing a firm base for its future prosperity. A helpful hint: A smooth transition for pineywoods geranium now ensures its successful adaptation to its new home, enhancing its resilience and setting the stage for a vibrant display.
Recommended Spacing Between Pineywoods Geranium Plants?
When transplanting pineywoods geranium, maintain a distance of approximately 1-2 feet (30-60 cm) between plants. This spacing allows ample room for root expansion and healthy growth, preventing competition for vital nutrients and water.
Best Soil Blend for Pineywoods Geranium Transplanting?
An ideal soil for pineywoods geranium would be a loamy mixture enriched with compost or an organic fertilizer. Remember, it thrives in well-drained conditions, so avoid heavy clay or waterlogged soils.
Where to Replant Your Pineywoods Geranium?
Select a site for pineywoods geranium that receives full to partial sun exposure. A location with morning sun and some afternoon shade would be most beneficial.
Tools Required Before Transplanting Pineywoods Geranium
Gardening Gloves
To protect your hands from sharp objects and soil particles.
Garden Spade
For excavating the plant from its original spot and preparing the new planting hole for the pineywoods geranium.
Trowel
Useful for precise digging when extracting and replanting the specimen.
Gardening Fork
To gently loosen the soil surrounding the root ball during extraction.
Pruning Shears
If necessary, trim the plant before transplanting to lessen stress on the root system.
Watering Can
To hydrate the plant immediately after relocation.
Burlap or Heavy Plastic Bag
If the plant needs to be moved a significant distance, wrap its roots in moist burlap to maintain hydration.
Wheelbarrow
For larger, heavier plants, a wheelbarrow will assist in transportation.
How to Extract Pineywoods Geranium from the Soil?
How to Extract Pineywoods Geranium from the Soil?
From Ground: For an pineywoods geranium already in the ground, water the soil at least a day prior to transplanting to ensure it's moist. This helps roots absorb water and keeps the root ball intact. Dig a wide circle around the plant, going deep enough to preserve most of the roots. Gently pry the plant from below with a spade, aiming to minimize root damage.From Pot: If the pineywoods geranium is potted, water it thoroughly an hour before transplanting. Turn the pot sideways, hold the plant gently by its base, and tap the pot's rim against a hard surface. Then, carefully slide the plant and its root ball out of the pot.Seedling Tray: If the pineywoods geranium is a seedling in a tray, water the tray an hour before transplanting to soften the soil. Carefully lift the seedling from beneath using a flat, narrow tool, such as a butter knife or plant label, being careful not to touch or harm the delicate roots.
Detailed Steps for Transplanting Pineywoods Geranium
Inspect Root Ball
Before planting pineywoods geranium, examine its root ball. If roots are densely packed, gently separate them to encourage proper spreading once planted.
Dig Hole
Excavate a hole twice the width and equal to the depth of the pineywoods geranium's root ball. The top of the root ball should align with the soil surface.
Position pineywoods geranium
Place pineywoods geranium in the center of the hole. Ensure the top of the root ball is level with the surrounding ground. Adjust the hole's depth as needed.
Backfill
Refill the hole with soil, gently firming it around the root ball. Confirm there are no air pockets in the soil, as these can lead to root dehydration.
Water
Water the newly transplanted pineywoods geranium generously immediately after planting. This aids in settling the soil around the roots.
Post-Transplant Care for Pineywoods Geranium
Watering
Consistent watering is vital after transplanting, but ensure the soil is damp, not waterlogged. Excessive watering can harm pineywoods geranium by causing root rot.
Mulching
Applying a layer of mulch will help regulate soil temperature and retain moisture. Spread a 2- to 3-inch layer of mulch around the plant's base, but avoid piling it against the stem.
Pruning
Should you observe any dead or wilting leaves after transplantation, remove them to stimulate new growth and prevent the plant from expending energy unnecessarily.
Disease and Pest Monitoring
Vigilantly check for any signs of disease or pest infestation on the recently transplanted pineywoods geranium. Address any issues promptly using appropriate treatments.
Resolving Common Issues with Pineywoods Geranium Transplantation.
When is the optimal time of year to transplant pineywoods geranium?
The best period to move pineywoods geranium is from late spring to early autumn, allowing ample time for root establishment before winter frosts.
What is the ideal spacing required between pineywoods geranium when transplanting?
When transplanting pineywoods geranium, allow about 1-2 feet (30-60 cm) between each plant, ensuring sufficient room for spreading and growth.
What is the most effective method to propagate pineywoods geranium for transplanting?
Pineywoods geranium can be propagated from seedlings or cuttings. The choice of method depends on what is most readily available to the gardener.
What type of soil should I use when transplanting pineywoods geranium?
Pineywoods geranium thrives in well-drained soil. Enhance the garden soil with compost or other organic matter to boost nutrient content, promoting stronger growth.
How can I prevent transplant shock in pineywoods geranium?
Minimize transplant shock by keeping the root ball intact when moving pineywoods geranium, watering thoroughly after replanting, and providing shade if the weather is hot.
What indicators should I look for if my pineywoods geranium is struggling after transplantation?
Wilting, yellowing foliage, or a slow growth rate can signal that pineywoods geranium is having difficulty adjusting after being moved. Adjust care as needed.
Can I transplant pineywoods geranium indoors?
While pineywoods geranium is a robust outdoor plant, it can certainly be moved indoors provided it receives adequate light, good air circulation, and suitable soil conditions.
Why are the leaves of my transplanted pineywoods geranium turning yellow?
Yellow leaves on your pineywoods geranium might indicate overwatering, insufficient light, or a nutrient deficiency. Adjust your care routine for improved plant health.
What action should I take if my transplanted pineywoods geranium appears wilted?
If your transplanted pineywoods geranium is wilting, it may require more water, especially in sunny conditions. However, avoid overwatering to prevent root damage.
What precautions should be taken when transplanting pineywoods geranium in partially shaded or shaded areas?
When relocating pineywoods geranium to a less sunny spot, ensure it still receives adequate indirect light. It will need more frequent pest checks due to increased dampness.



