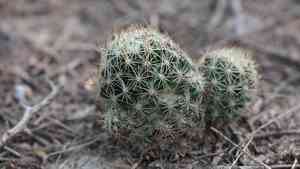
How to Transplant Junior tom thumb cactus?
The Junior tom thumb cactus thrives when relocated in mid to late spring, coinciding with its flowering phase, which guarantees robust development. It flourishes in sunny areas with excellent drainage. Moving it to such a spot encourages a flourishing habitat.
Essential Preparations Before Relocating Junior Tom Thumb Cactus?
Optimal Period for Moving Junior Tom Thumb Cactus?
The best time to move junior tom thumb cactus is from mid to late spring. This timeframe allows junior tom thumb cactus to benefit from mild temperatures and an extended growing season, promoting root development and overall plant vitality. Transplanting during this period reduces stress and maximizes the perennial's growth potential.
Recommended Spacing Between Junior Tom Thumb Cactus Plants?
When transplanting junior tom thumb cactus, ensure each plant is positioned 6-12 inches (15-30 cm) apart. This spacing provides ample room for root expansion and guarantees sufficient sunlight exposure without overcrowding.
Ideal Soil Blend for Junior Tom Thumb Cactus Relocation?
Prepare a well-draining soil mixture for junior tom thumb cactus. A combination of cactus soil and a foundational fertilizer, such as a slow-release balanced type, is perfect. This supports robust growth and prevents root rot.
Optimal New Location for Your Junior Tom Thumb Cactus?
Place junior tom thumb cactus in an area receiving abundant sunlight. They flourish in full sun, so select a spot that gets at least 6 hours of direct sunlight daily.
Equipment Needed Before Transplanting Junior Tom Thumb Cactus?
Gardening Gloves
To safeguard your hands while handling soil and the plant.
Shovel or Spade
For excavating the plant and preparing the new site.
Garden Trowel
For more precise digging and carefully extracting the plant from its original spot.
Watering Can or Hose
To hydrate the plant both before and after the transplanting process.
Protective Eyewear
To shield your eyes from debris, especially if the plant has sharp thorns.
Wheelbarrow or Container
To safely transport the plant to its new location if it is heavy or large.
Method for Extracting Junior Tom Thumb Cactus from the Soil?
Method for Extracting Junior Tom Thumb Cactus from the Soil?
From Ground: First, moisten the soil around junior tom thumb cactus. Then, dig a wide trench around the plant using a shovel or spade, ensuring the root ball remains intact. Carefully work the spade beneath the root ball to lift the plant from its original position.From Pot: Water the soil to facilitate plant removal. Gently tilt the pot, tapping its sides if necessary, and slide junior tom thumb cactus out, making sure to support the root ball.From Seedling Tray: Water the seedlings initially. Use a garden trowel to carefully scoop under each junior tom thumb cactus, lifting them without excessively disturbing the roots.
Detailed Steps for Transplanting Junior Tom Thumb Cactus
Site Preparation
Prepare the new planting site by digging a hole that is twice the width but the same depth as the root ball of junior tom thumb cactus.
Inspection
Examine the root ball for any indications of disease or damage, and remove any dead or decaying roots using clean, sharp scissors.
Planting
Position junior tom thumb cactus into the prepared hole, ensuring the top of the root ball is level with the surrounding soil. Gently backfill the hole with soil, firming it down to eliminate air pockets.
Watering
Thoroughly water the plant after transplanting to help settle the soil around its roots.
Mulching
Apply a thin layer of mulch around the base of the plant to help retain moisture and regulate soil temperature.
Post-Transplant Care for Junior Tom Thumb Cactus?
Watering
Water junior tom thumb cactus lightly but consistently until it establishes itself. Avoid excessive watering to prevent root rot.
Support
If necessary, provide a small stake to support junior tom thumb cactus until it can stand firmly on its own.
Monitoring
Regularly check the plant for any signs of stress, pests, or disease. Early detection can help prevent more significant problems later.
Pruning
Prune any damaged or fallen segments to encourage healthy growth and prevent disease. Use sanitized tools to avoid infection.
Resolving Common Issues with Junior Tom Thumb Cactus Transplantation.
When is the best time to transplant junior tom thumb cactus?
Mid to late spring is ideal for transplanting junior tom thumb cactus, ensuring optimal growth and establishment.
What spacing should I use for junior tom thumb cactus?
Space junior tom thumb cactus plants 6-12 inches (15-30 cm) apart for optimal growth.
How do I prepare the soil for junior tom thumb cactus?
Use well-draining soil and mix in coarse sand or gravel to mimic its natural habitat.
Should I water junior tom thumb cactus immediately after transplanting?
Yes, lightly water junior tom thumb cactus after transplanting to help settle the soil and remove air pockets.
How deep should the hole be for junior tom thumb cactus?
Dig a hole slightly larger than the root ball to accommodate its size.
Should I fertilize junior tom thumb cactus after transplanting?
Avoid fertilizing junior tom thumb cactus immediately after transplanting; wait until it shows new growth.
What type of container is best for junior tom thumb cactus?
Use a container with drainage holes, preferably made of clay or terracotta, for junior tom thumb cactus.
How can I protect junior tom thumb cactus from transplant shock?
Handle junior tom thumb cactus gently and minimize root disturbance to reduce transplant shock.
Is sun exposure important for junior tom thumb cactus after transplanting?
Yes, ensure junior tom thumb cactus has full sun exposure, at least 6 hours a day.
How can I identify rootbound junior tom thumb cactus?
Look for tightly packed roots in the shape of its container; loosen them before transplanting.


