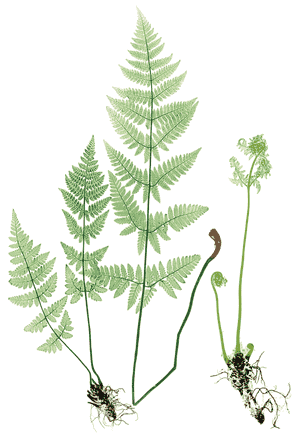
How to Transplant Southern wood fern?
For southern wood fern, the ideal period for transplanting spans from early spring's emergence to the threshold of summer, allowing the root system to establish prior to intense warmth. Select locations that are shaded and damp. Employing a delicate approach rather than aggressive handling during relocation will foster robust root development.
What Preparations are Needed Before Transplanting Southern Wood Fern?
What is the Ideal Time for Transplanting Southern Wood Fern?
The perfect period for relocating southern wood fern spans from early spring's awakening until the start of summer. This timeframe allows southern wood fern to establish its root system before intense heat arrives. Moving southern wood fern during this window leverages mild temperatures and the upcoming active growth phase, ensuring a smooth transition and vigorous development for the plant.
How Much Space Should You Leave Between Southern Wood Fern Plants?
When preparing to rehome southern wood fern, aim for a spacing of approximately 18-24 inches (46-61 cm) between each plant. This provides ample room for each fern to thrive without overcrowding. Consider it giving each one sufficient personal space for optimal growth!
What is the Best Soil Mix for Southern Wood Fern Transplanting?
Southern wood fern prefers a comfortable, well-draining soil rich in organic material. Before planting, incorporate some compost or a balanced, slow-release fertilizer to give your ferns a nourishing start. Loose, humus-rich soil will make southern wood fern most content!
Where Should You Relocate Your Southern Wood Fern?
Select a location for southern wood fern that resembles a shaded sanctuary on a bright day. Filtered sunlight or partial shade will make them feel perfectly at home. Steer clear of full, intense sun to keep your southern wood fern vibrant and green!
What Equipments Should You Prepare Before Transplantation Southern Wood Fern?
Gardening Gloves
To safeguard your hands while handling soil and the plant.
Shovel or Spade
For excavating the plant and preparing the new planting site.
Pruning Shears
To trim any dead or damaged fronds either before or after the relocation.
Watering Can or Hose
To hydrate the southern wood fern both before and after its move.
Wheelbarrow
To transport the southern wood fern and soil, if required.
Garden Fork
To loosen the soil surrounding the plant's root mass.
How Do You Remove Southern Wood Fern from the Soil?
How Do You Remove Southern Wood Fern from the Soil?
From Ground: First, moisten the southern wood fern's soil to facilitate removal. Then, use a shovel or spade to dig a wide circle around the plant, going deep enough to encompass most of the roots. Carefully slide the tool beneath the root ball to lift it from the ground with minimal root disturbance.From Pot: Hydrate the southern wood fern in its container to ease root ball extraction. Turn the pot on its side and gently tap the edges to loosen the root ball. Grasp the plant's base and carefully slide it out, taking care not to pull on the fronds.From Seedling Tray: Water the tray's soil before transplanting. Use a garden fork or hand trowel to gently lift the seedling by its root ball, minimizing damage to roots and fronds.
Step-by-Step Guide for Transplanting Southern Wood Fern
Preparation
Don gardening gloves to protect your hands and gather all necessary tools and equipment for the transplanting process. Ensure the new location is prepared for the southern wood fern. Have your watering can or hose nearby, as well as any needed supports if the plant is large and requires stabilization after transplanting. Also, prepare a wheelbarrow if the southern wood fern needs to be moved a distance to its new spot.
Digging the Hole
At the new planting site, excavate a hole that is twice as wide and the same depth as the root ball. This will provide the southern wood fern's roots ample space to spread and grow. Use the garden fork to loosen the soil at the bottom of the hole.
Plant Removal
Follow the appropriate method from the 'removal process' section to gently extract the southern wood fern from its original spot while preserving as much of the root structure as possible.
Transplanting
Place the southern wood fern into the new hole, ensuring the top of the root ball is level with the surrounding soil surface. Backfill around the root ball with soil, gently firming it down to eliminate air pockets. Do not plant deeper than it was originally growing.
Watering
Once the southern wood fern is in place, water it thoroughly to help settle the soil and provide moisture to the roots. This initial watering is crucial to help the southern wood fern recover from transplant shock.
Support
If the southern wood fern was supported by stakes or other mechanisms at its original location, provide similar support here until the plant is firmly established and can stand independently.
How Do You Care For Southern Wood Fern After Transplanting?
Monitoring
Regularly inspect the southern wood fern for indications of transplant shock, such as wilting or yellowing fronds. Address any issues promptly by adjusting care as needed.
Mulching
Apply a layer of mulch around the base of the southern wood fern, being careful not to pile it against the stems. This will help retain moisture and regulate soil temperature.
Watering
Maintain consistent moisture in the soil surrounding the southern wood fern, taking care to avoid waterlogging. The aim is to keep the soil moist but not saturated as the roots establish themselves.
Pruning
Trim away any fronds that were damaged during the transplanting process, or any that become damaged or diseased afterward, using pruning shears. This will encourage healthy new growth.
Monitoring for Pests
Keep an eye out for common pests that might attack the southern wood fern, and take early action if any are detected to prevent them from causing significant harm.
Avoiding Chemicals
Do not apply chemical fertilizers or pest treatments immediately after transplanting, as these can be harsh on the newly stressed southern wood fern. Allow the plant to establish in its new location before considering the addition of any chemicals.
Troubleshooting Common Issues with Southern Wood Fern Transplantation.
Why is my southern wood fern wilting after transplant?
Wilting may occur if roots were damaged or are drying out. Ensure the soil is moist and provide shade for the first few days after transplant.
How far apart should I space my southern wood fern when transplanting?
For optimal growth, position southern wood fern about 18-24 inches (45-60 cm) apart. This allows room for expansion and air circulation.
What's the best time of year to transplant southern wood fern?
Transplanting during the temperate windows of early to late spring offers the best acclimatization for southern wood fern.
Is it necessary to prune southern wood fern before transplanting?
Pruning isn't usually required, but removing any dead fronds can help reduce stress and encourage healthy growth.
What kind of sunlight does southern wood fern need after transplant?
After transplanting, southern wood fern thrives in partial to full shade. Avoid direct sunlight to prevent leaf scorch.
How do I know if my southern wood fern has enough water post-transplant?
The soil should be consistently moist but not soggy. Check by feeling the soil; it should be cool and damp to the touch.
How deep should I dig to transplant my southern wood fern?
The hole should be as deep as the root ball and twice as wide to give the roots room to spread.
What type of soil is best for transplanting southern wood fern?
Use a rich, well-draining soil with organic matter. A slightly acidic to neutral pH helps southern wood fern flourish.
How do I avoid transplant shock in southern wood fern?
Acclimate southern wood fern by keeping the root ball moist and transplant during cooler parts of the day. Gradually introduce to its new location.
Can I fertilize southern wood fern immediately after transplanting?
It's best to wait a few weeks before fertilizing to avoid burning the roots. Allow the southern wood fern to establish itself first.


