How to Transplant Feay's prairie clover?
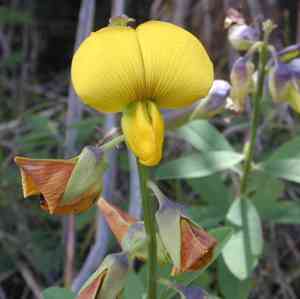
The most suitable time for relocating feay's prairie clover is from early to mid-spring, taking advantage of the moderate warmth and ample hydration. This species flourishes in bright sunlight and soil that drains effectively. Verify that the chosen site fulfills these requirements for peak development.
Necessary Preparations Before Relocating Feay's Prairie Clover?
Optimal Period for Relocating Feay's Prairie Clover?
The best time to move feay's prairie clover, a perennial, is from early to mid-spring. This timing allows the plant to benefit from cool, damp conditions, promoting root establishment before the intense heat of summer. Relocating feay's prairie clover during this season encourages healthier development and improves its chances of flourishing in its new spot.
Required Spacing Between Feay's Prairie Clover Plants?
Ensure feay's prairie clover plants are spaced 6-8 inches (15-20 cm) apart to provide ample root growth area and foster robust development.
Best Soil Blend for Feay's Prairie Clover Relocation?
For feay's prairie clover, select a soil mixture that drains well. Prior to planting, incorporate compost or a balanced base fertilizer to enrich the soil and support growth.
Recommended Location for Your Feay's Prairie Clover?
Position feay's prairie clover in a sunny spot where it will receive at least 6-8 hours of direct sunlight daily. This helps ensure strong and healthy growth.
Equipment to Prepare Before Relocating Feay's Prairie Clover?
Gardening Gloves
To safeguard your hands while handling soil and plants.
Shovel or Spade
For digging and extracting the plant from its initial position.
Garden Trowel
To aid in excavating smaller holes and managing the soil.
Watering Can or Hose
For hydrating the plant before and after removal.
Bucket or Container
To hold the plant if it needs to be moved.
Mulch
To cover the soil around the relocated plant, helping to retain moisture.
How to Extract Feay's Prairie Clover from the Soil?
How to Extract Feay's Prairie Clover from the Soil?
From Ground: First, moisten the feay's prairie clover plant to damp the soil. Next, dig a wide trench around the plant using a shovel or spade, ensuring the plantâs root ball remains intact. Carefully work the spade beneath the root ball to lift the plant from its original spot.From Pot: Thoroughly water the feay's prairie clover plant. Gently tilt the pot on its side and tap the bottom to loosen the plant. If necessary, run a garden trowel around the rim to free the root ball. Carefully lift the plant from the pot.From Seedling Tray: Dampen the soil in the tray before removing the feay's prairie clover plant. Use a garden trowel or your fingers to gently lift the seedlings from the tray, making sure to keep as much of the root structure intact as possible.
Step-by-Step Guide for Relocating Feay's Prairie Clover
Site Preparation
Prepare the new planting site by ensuring it is free of weeds, debris, and rocks. Use a garden trowel to dig a hole slightly larger than the root ball of the feay's prairie clover.
Relocating
Gently place the plant into the hole, making sure the root ball is level with the surrounding ground. Fill in around the root ball with soil, gently firming it with your hands to remove air pockets.
Watering
After relocating, thoroughly water the feay's prairie clover to help settle the soil around the roots. Ensure water penetrates deep into the ground to encourage root development.
Post-Relocation Care for Feay's Prairie Clover?
Watering
Keep the soil around the feay's prairie clover consistently moist, but not waterlogged, for the initial weeks after relocation to aid in establishing strong roots.
Mulching
Apply a layer of mulch around the plant's base to help retain moisture, regulate soil temperature, and inhibit weed growth.
Monitoring
Observe the plant for any indications of stress, such as wilting or yellowing leaves. Provide additional water if needed, and safeguard the plant from pests.
Resolving Common Issues with Feay's Prairie Clover Relocation.
When is the optimal time to relocate feay's prairie clover?
Early to mid-spring is ideal for relocating feay's prairie clover. This allows roots to establish before summer.
What spacing should I use for feay's prairie clover during relocation?
Space feay's prairie clover plants 6-8 inches (15-20 cm) apart to allow room for growth and airflow.
Which soil type is best for relocating feay's prairie clover?
Well-drained soil with a neutral to slightly alkaline pH is best for feay's prairie clover.
How should I prepare the soil before relocating feay's prairie clover?
Enrich the soil with compost and ensure it's loose and well-drained before planting feay's prairie clover.
What depth should I plant feay's prairie clover?
Plant feay's prairie clover at the same depth it was growing in its original container to avoid root stress.
How often should I water feay's prairie clover after relocation?
Water feay's prairie clover thoroughly after relocating, then keep the soil consistently moist but not waterlogged for the first few weeks.
How do I prevent transplant shock in feay's prairie clover?
Disturb roots as little as possible and water immediately after relocating feay's prairie clover to reduce stress.
What if feay's prairie clover wilts after relocation?
Ensure soil is moist and provide shade if the plant is wilting. Avoid overwatering.
Should I fertilize feay's prairie clover after relocation?
Wait a few weeks after relocating before fertilizing feay's prairie clover to avoid burning the young roots.
How can I protect feay's prairie clover from pests after relocation?
Keep the area around feay's prairie clover free from weeds and debris to reduce pest attraction. Inspect regularly.



