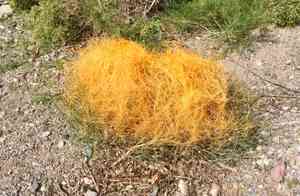
How to Transplant Desert dodder?
Desert dodder flourishes when relocated during its peak cultivation season, which extends from mid to late spring or the beginning of summer. Place it in a bright, adequately drained spot. Ideal circumstances guarantee vigorous development, yet relocation is seldom necessary.
What Preparations are Needed Before Transplanting Desert Dodder?
What is the Ideal Time for Transplanting Desert Dodder?
Desert dodder, an annual, thrives when moved in mid to late spring or early summer. This period provides ideal soil warmth and extended daylight, crucial for root development. Relocating desert dodder during these months maximizes its growth potential and ensures robust establishment, meeting its environmental needs without stressing the plant.
How Much Space Should You Leave Between Desert Dodder Plants?
When transplanting desert dodder, ensure each plant is spaced approximately 12-18 inches (30-45 cm) apart. This provides sufficient room for growth and prevents overcrowding.
What is the Best Soil Mix for Desert Dodder Transplanting?
Prepare well-draining soil, incorporating a balanced base fertilizer, such as 10-10-10. This will supply desert dodder with the necessary nutrients for establishment and vigorous growth.
Where Should You Relocate Your Desert Dodder?
Desert dodder thrives in full sun! Select a transplanting site that receives at least 6-8 hours of direct sunlight daily. This will encourage healthy development and abundant flowering.
What Equipments Should You Prepare Before Transplantation Desert Dodder?
Gardening Gloves
To safeguard your hands while handling soil and plants.
Trowel
For digging and loosening the earth around the plant.
Shovel or Spade
To excavate a wide trench around the plant.
Watering Can or Hose
To hydrate the soil before and after relocation.
Wheelbarrow (optional)
For moving the plant if necessary.
Pruning Shears
To trim any damaged roots or stems.
Stakes or Supports (optional)
To prop up the plant if it requires assistance standing upright post-transplant.
How Do You Remove Desert Dodder from the Soil?
How Do You Remove Desert Dodder from the Soil?
From Ground: First, moisten the soil around desert dodder. Then, dig a wide trench around the plant using a shovel or spade, ensuring the root ball remains intact. Carefully work the spade beneath the root ball to lift the plant from its original spot.From Pot: Gently water the pot to moisten the soil. Then, lightly tap or squeeze the pot's sides to loosen the soil. Carefully invert the pot, supporting the plant with your hand, and slide the plant out, keeping the root ball whole.From Seedling Tray: Water the seedling tray to soften the soil. Use a trowel to gently lift the seedlings, ensuring each seedling's root ball remains intact. Handle seedlings by their leaves to avoid stem damage.
Step-by-Step Guide for Transplanting Desert Dodder
Preparation
Ensure the new planting site is ready before extracting desert dodder from its current location. The hole should be twice as wide and as deep as the root ball.
Removing the Plant
Follow the appropriate removal procedure based on whether desert dodder is in the ground, a pot, or a seedling tray.
Placing the Plant
Position desert dodder in its new spot, ensuring the top of the root ball is level with the surrounding soil. Backfill the hole with soil, gently firming it around the plant.
Watering
Thoroughly water desert dodder immediately after transplanting to help settle the soil around its roots.
Adding Supports (if needed)
If desert dodder is tall or prone to toppling, use stakes or other supports to help it stand upright.
Mulching
Apply a thin layer of mulch around the base of desert dodder to aid in moisture retention and soil temperature regulation.
How Do You Care For Desert Dodder After Transplanting?
Watering
Keep the soil around desert dodder consistently moist, but not waterlogged, for the initial weeks post-transplant to encourage strong root development.
Monitoring
Observe for indications of transplant shock, such as wilting or yellowing foliage, and provide extra care as necessary.
Weeding
Regularly remove weeds surrounding desert dodder to minimize competition for nutrients and water.
Protection
Shield desert dodder from harsh weather conditions, like frost or intense heat, until it becomes established.
Troubleshooting Common Issues with Desert Dodder Transplantation.
When is the best time to transplant desert dodder?
Relocate desert dodder between mid-spring and early summer for optimal outcomes.
What spacing should I use for desert dodder?
Space desert dodder approximately 12-18 inches (30-45 cm) apart to ensure healthy development.
How should I prepare the soil for desert dodder?
Ensure the soil is well-drained and slightly sandy. No fertilizers are required.
Is it okay to transplant desert dodder in the fall?
Transplanting desert dodder in autumn is not recommended. Spring and early summer are ideal.
How do I handle desert dodder roots during transplanting?
Handle desert dodder roots with care to prevent damage. They are delicate and can break easily.
Should I water desert dodder immediately after transplanting?
Lightly water desert dodder right after transplanting to help it settle.
Can desert dodder be transplanted in direct sunlight?
Yes, transplant desert dodder in an area that receives full sunlight for optimal growth.
How deep should I plant desert dodder?
Plant desert dodder at the same depth it was in its original container.
How do I ensure desert dodder stays healthy after transplanting?
Provide adequate water and space, and avoid excessive handling to maintain desert dodder's health.
What should I do if desert dodder starts to wilt after transplanting?
Monitor moisture levels and avoid intense sunlight. Wilting often indicates transplant shock.


