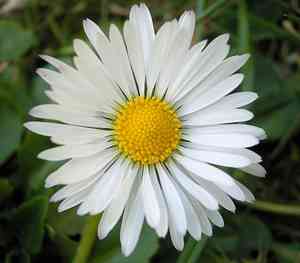
How to Transplant Stiff-leaf scratch-daisy?
Stiff-leaf scratch-daisy flourishes when relocated between the beginning and end of spring, benefiting from moderate temperatures for effortless adaptation. Optimal environments feature bright areas with soil that drains effectively, encouraging vigorous development and rooting.
Essential Preparations Before Relocating Stiff-leaf Scratch-daisy
Optimal Timing for Stiff-leaf Scratch-daisy Relocation?
Stiff-leaf scratch-daisy, a perennial, is best moved from early to late spring. This timeframe ensures the ground is unfrozen, allowing the plant ample opportunity to establish its root system prior to the active growth period. Transplanting then maximizes root development, minimizes stress, and boosts the plant's overall vigor and resilience.
Recommended Spacing Between Stiff-leaf Scratch-daisy Plants?
Ensure your stiff-leaf scratch-daisy plants are spaced 12-18 inches (30-45 cm) apart when transplanting. This provides sufficient room for their growth and comfortable spread.
Ideal Soil Blend for Stiff-leaf Scratch-daisy Transplanting?
Prepare well-draining soil with a pH ranging from neutral to slightly alkaline. Incorporate compost or a balanced base fertilizer, such as 10-10-10, to enrich the soil before planting your stiff-leaf scratch-daisy.
Preferred New Location for Your Stiff-leaf Scratch-daisy?
Select a site with full sun exposure, as your stiff-leaf scratch-daisy thrives in environments where it can absorb abundant sunlight.
Tools Required for Stiff-leaf Scratch-daisy Transplantation
Gardening Gloves
To safeguard your hands while handling soil and the plant.
Shovel or Spade
For excavating a hole for the transplant and for extracting the plant.
Trowel
Useful for digging around the plant and positioning it in the ground.
Watering Can or Hose
To hydrate the plant both before and after its relocation.
Mulch
To cover the soil surrounding the plant and aid in moisture retention.
Method for Extracting Stiff-leaf Scratch-daisy from the Soil?
Method for Extracting Stiff-leaf Scratch-daisy from the Soil?
From Ground: First, moisten the soil around the stiff-leaf scratch-daisy plant. Then, using a shovel or spade, dig a wide trench around the plant, ensuring the root ball remains intact. Carefully work the spade beneath the root ball to lift the plant from its original spot.From Pot: Water the stiff-leaf scratch-daisy plant thoroughly an hour beforehand. Gently tip the pot onto its side and tap the edges to loosen the soil. Carefully slide the plant out, taking care not to harm the roots.From Seedling Tray: Ensure the tray's soil is damp. Using a trowel or your fingers, gently loosen the soil around the roots and lift the seedling by holding its leaves (not the stem) to prevent damage.
Detailed Procedure for Transplanting Stiff-leaf Scratch-daisy
Prepare the New Site
Clear the area of weeds and debris. Dig a hole that is twice as wide and slightly deeper than the stiff-leaf scratch-daisy plant's root ball.
Remove the Plant
Follow the appropriate removal method based on the plant's current location (ground, pot, or seedling tray) as described previously.
Examine the Roots
Gently shake off excess soil from the roots. Trim any damaged or overly long roots using clean scissors or pruning shears.
Relocate the Plant
Position the stiff-leaf scratch-daisy plant in the center of the hole. Ensure the top of the root ball is level with the surrounding soil. Gently backfill the hole with soil, pressing lightly to remove air pockets.
Water Thoroughly
Water the plant deeply immediately after transplanting. This helps settle the soil around the roots.
Apply Mulch
Spread a 2-3 inch layer of mulch around the plant's base, being careful to keep it away from the stem.
Post-Transplantation Care for Stiff-leaf Scratch-daisy
Watering
Maintain consistent moisture in the soil around the stiff-leaf scratch-daisy, avoiding sogginess, for the initial weeks after transplanting to encourage strong root development.
Monitoring
Inspect the plant daily for indications of stress, such as wilting or yellowing leaves, and address any issues promptly.
Protection
Consider implementing protective measures like a simple shade cloth to shield the plant from intense sun or using stakes for support if necessary.
Addressing Common Issues During Stiff-leaf Scratch-daisy Transplantation.
When is the best time to transplant stiff-leaf scratch-daisy?
Early spring to late spring is the optimal period for relocating stiff-leaf scratch-daisy.
How far apart should I space stiff-leaf scratch-daisy?
Space stiff-leaf scratch-daisy plants 12-18 inches (30-45 cm) apart for optimal growth.
What type of soil is best for transplanting stiff-leaf scratch-daisy?
Utilize well-draining, sandy or loamy soil enriched with organic matter for stiff-leaf scratch-daisy transplantation.
How do I prepare the soil for stiff-leaf scratch-daisy?
Loosen the soil and incorporate compost or aged manure to enrich it before transplanting stiff-leaf scratch-daisy.
How deep should I plant stiff-leaf scratch-daisy seedlings?
Plant stiff-leaf scratch-daisy seedlings at the same depth they were growing in their original container.
How much water does stiff-leaf scratch-daisy need after transplanting?
Water stiff-leaf scratch-daisy thoroughly immediately after transplanting and maintain consistent soil moisture thereafter.
How do I ensure stiff-leaf scratch-daisy roots establish well?
Avoid disturbing the root ball during transplanting and water regularly to aid root establishment.
Should I fertilize stiff-leaf scratch-daisy after transplanting?
Apply a balanced, slow-release fertilizer after transplanting to support healthy growth of stiff-leaf scratch-daisy.
What should I do if stiff-leaf scratch-daisy shows signs of transplant shock?
Provide additional water, shield from harsh sunlight, and allow stiff-leaf scratch-daisy time to recover if it exhibits transplant shock.
How can I protect transplanted stiff-leaf scratch-daisy from pests?
Regularly inspect for pests and employ natural predators or organic treatments to safeguard stiff-leaf scratch-daisy from infestations.


