How to Transplant Yellow crown vetch?
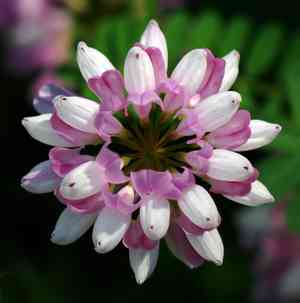
The ideal period for relocating yellow crown vetch is from late spring through early summer, as these warmer conditions facilitate root development. Select a bright spot featuring soil that drains effectively. Careful manipulation is crucial to prevent causing distress to the plant.
What Preparations are Needed Before Transplanting Yellow Crown Vetch?
What is the Ideal Time for Transplanting Yellow Crown Vetch?
The perfect time for moving yellow crown vetch is during the mild conditions of late spring or the beginning of summer. This period, characterized by moderate temperatures and stable growing conditions, provides yellow crown vetch with the optimal environment to establish its root system firmly. By selecting this season, you align with its natural growth cycle, ensuring yellow crown vetch thrives robustly. Not only is the soil temperature favorable, but the consistent, gentle spring rains also aid yellow crown vetch's roots in recovering from the move and expanding easily into their new home.
How Much Space Should You Leave Between Yellow Crown Vetch Plants?
For your lovely yellow crown vetch, ample room is crucial for vigorous development. Aim to plant your seedlings 8â12 inches (20â30 cm) apart. This provides each plant sufficient space to flourish and display its beauty, without competing for vital resources.
What is the Best Soil Mix for Yellow Crown Vetch Transplanting?
Your yellow crown vetch will thrive in well-drained, fertile soil. Before transplanting, incorporate some compost or a balanced slow-release fertilizer to give your plants a strong start. Consider this a warm welcome for your yellow crown vetch's roots!
Where Should You Relocate Your Yellow Crown Vetch?
A location with full sun to partial shade will make your yellow crown vetchâs day! Select a spot where they can absorb at least 6 hours of sunlight daily, but also receive some relief from the intense midday sun, offering a perfect balance for their growth.
What Equipments Should You Prepare Before Transplantation Yellow Crown Vetch?
Gardening Gloves
To safeguard your hands while handling soil and plants.
Spade or Shovel
For excavating yellow crown vetch from its current spot and preparing the new planting site.
Hand Trowel
Useful for smaller or more delicate tasks around the root system.
Watering Can or Hose
To hydrate the plant before and after its relocation.
Pruning Shears
To trim any damaged roots or foliage.
Wheelbarrow or Plant Cart
To move yellow crown vetch from one place to another without causing harm.
Root Pruning Knife (optional)
To make clean cuts through roots if necessary.
How Do You Remove Yellow Crown Vetch from the Soil?
How Do You Remove Yellow Crown Vetch from the Soil?
From Ground: First, gently water yellow crown vetch to moisten the soil, facilitating easier digging. Using a spade or shovel, dig a wide trench around yellow crown vetch, being careful not to harm the root ball. Angle the shovel's blade beneath the root ball to loosen it, then carefully lift the plant from its original position.From Pot: Water yellow crown vetch to make the roots more flexible. Turn the pot on its side and gently tap the bottom to dislodge the plant. If needed, run a knife along the inner edge of the pot. Gently pull the plant out by its base, supporting the root ball to prevent damage.From Seedling Tray: Moisten the soil in the tray to help the roots slide out easily. Using a hand trowel or your fingers, carefully remove yellow crown vetch from its cell, ensuring the root ball remains intact. Handle the seedling gently to avoid damaging the roots or stem.
Step-by-Step Guide for Transplanting Yellow Crown Vetch
Preparation
Gather all necessary tools and prepare a wheelbarrow or plant cart to transport yellow crown vetch. Ensure the new planting site is ready.
Root Pruning
Before extracting yellow crown vetch from its current spot, consider lightly trimming excessively long roots with a clean root pruning knife or shears. This can stimulate new root development after transplanting.
Lifting the Plant
Carefully lift yellow crown vetch from its original location, as detailed in the Removal Process section, making sure to keep the root ball as whole as possible.
Moving to New Location
Transport yellow crown vetch to the new site using a wheelbarrow or cart. Minimize the duration the roots are exposed to air to prevent dehydration.
Planting
Place yellow crown vetch in the prepared hole at the same depth it was previously growing. Backfill the hole with soil, gently firming it around the root ball to eliminate air pockets.
Watering In
Water yellow crown vetch thoroughly after planting to settle the soil. Create a slight depression around the base to help retain water at the root zone.
How Do You Care For Yellow Crown Vetch After Transplanting?
Mulching
Apply a layer of mulch around the base of yellow crown vetch to help maintain soil moisture and suppress weeds.
Staking (if necessary)
Provide support such as a stake if yellow crown vetch is tall or top-heavy to prevent it from bending or breaking.
Regular Watering
Water yellow crown vetch to keep the soil consistently moist, but avoid overwatering. Allow the soil to dry slightly between watering sessions.
Monitoring
Observe yellow crown vetch for signs of transplant shock, such as wilting or leaf discoloration. Adjust care as needed, and be patient as the plant recovers and adapts to its new environment.
Troubleshooting Common Issues with Yellow Crown Vetch Transplantation.
What's the ideal time to move yellow crown vetch to a new spot?
The optimal period for relocating yellow crown vetch is the prime window from mid-spring to early summer when growth is robust.
How far apart should I space yellow crown vetch when transplanting?
Allow a distance of about 8-12 inches (20-30 cm) between yellow crown vetch plants to provide them ample room to thrive.
Why is my transplanted yellow crown vetch wilting?
Wilting may indicate yellow crown vetch is experiencing transplant shock. Ensure consistent watering and provide shade for the initial days post-transplant.
Should I water yellow crown vetch immediately after transplanting?
Absolutely! Give yellow crown vetch a good drink right after transplanting to help settle the soil and reduce transplant stress.
How deep should the hole be for transplanting yellow crown vetch?
Dig a hole that's just deep enough to comfortably accommodate yellow crown vetch's root ball, level with the soil surface.
What sort of light conditions does yellow crown vetch need after transplanting?
Place yellow crown vetch in a well-lit area but avoid intense midday sun for the first couple of days to ease its adjustment.
Can I fertilize yellow crown vetch right after transplanting?
Refrain from fertilizing until yellow crown vetch is well established. Overfeeding can harm delicate, stressed roots.
Why are the leaves of yellow crown vetch turning yellow post-transplant?
Yellow leaves might suggest water stress or a lack of soil nutrients. Check moisture levels and consider a soil test.
How do I prepare the soil before transplanting yellow crown vetch?
Enrich your planting area with compost or well-rotted manure to provide yellow crown vetch with nutrient-rich, well-draining soil.
Is it okay to transplant yellow crown vetch on a hot, sunny day?
For optimal results, transplant yellow crown vetch on an overcast day or in the late afternoon to prevent excessive water loss and stress.



