How to Transplant Striped goosefoot?
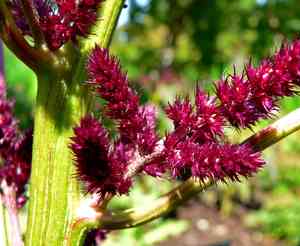
For striped goosefoot, the ideal period for moving is from early spring to its peak. Choose a bright location with soil that drains effectively to encourage vigorous development. In your compelling advice, highlight that relocating at this time allows roots to settle prior to the warmth of summer.
What Preparations are Needed Before Transplanting Striped Goosefoot?
What is the Ideal Time for Transplanting Striped Goosefoot?
The best period for moving striped goosefoot is from the start of spring until early summer. This timing takes advantage of mild temperatures and longer days, which are crucial for root development before intense summer heat. This ensures a smooth transition, promoting strong growth and a successful cycle for your striped goosefoot.
How Much Space Should You Leave Between Striped Goosefoot Plants?
When rehousing your striped goosefoots, remember they appreciate personal space. Aim for a generous 10-12 inches (25-30 cm) between them to allow for ample growth and spreading.
What is the Best Soil Mix for Striped Goosefoot Transplanting?
For striped goosefoots to flourish, they require well-draining soil enriched with organic matter, such as compost. Boost their initial growth by incorporating a balanced, slow-release fertilizer before planting.
Where Should You Relocate Your Striped Goosefoot?
Striped goosefoots thrive in sunlight! Select a location where they will receive full sun for most of the dayâat least 6 hours of direct sunlightâto ensure their happiness and health.
What Equipments Should You Prepare Before Transplantation Striped Goosefoot?
Gardening Gloves
To safeguard your hands while handling soil and plants.
Spade or Shovel
For digging up the plant and creating its new planting site.
Hand Trowel
Useful for smaller digging tasks or refining the planting hole.
Garden Fork
To help loosen the soil around the plant's root system.
Pruning Shears
For trimming any damaged roots or foliage.
Watering Can or Hose
To hydrate the plant both before and after its relocation.
Wheelbarrow or Plant Cart
For moving the plant and soil, if necessary.
How Do You Remove Striped Goosefoot from the Soil?
How Do You Remove Striped Goosefoot from the Soil?
From Ground: Moisten the striped goosefoot's soil to facilitate removal. Use a spade or shovel to dig a wide circle around the plant, being careful not to harm the root ball. Gently lever the tool underneath to lift the plant.From Pot: Start by watering the striped goosefoot to help the root ball slide out. Invert the pot and gently tap or squeeze its sides to loosen the contents. If it doesn't come out, use a hand trowel to carefully assist in its removal.From Seedling Tray: Water the seedling tray for an easier transfer. Use a hand trowel or similar tool to lift individual striped goosefoot seedlings from their cells, ensuring the root ball remains intact.
Step-by-Step Guide for Transplanting Striped Goosefoot
Preparation
Gather all necessary tools and ensure the striped goosefoot is thoroughly watered before beginning the transplanting process.
Root Ball Handling
Carefully extract the striped goosefoot from its current spot, aiming to keep the root ball as intact as possible for transplanting.
Hole Digging
Excavate a hole in the new location that is twice the width of the root ball and of equal depth, providing ample room for the striped goosefoot's roots to spread.
Placing the Plant
Position the striped goosefoot in the center of the new hole, adjusting it so the top of the root ball is level with the surrounding ground.
Filling the Hole
Backfill the hole with the removed soil, gently patting it down to eliminate air pockets and ensure the striped goosefoot is stable.
Watering
Thoroughly water the striped goosefoot after transplanting to settle the soil and provide essential hydration for its roots.
Support
If the striped goosefoot is tall or appears unstable, use stakes or plant supports to secure it in its new position.
How Do You Care For Striped Goosefoot After Transplanting?
Watering
Maintain consistent soil moisture for the initial weeks as the striped goosefoot establishes new roots in its new environment.
Mulching
Apply a layer of mulch around the base of the striped goosefoot to help retain moisture and stabilize soil temperature.
Observation
Regularly inspect the striped goosefoot for indications of transplant shock, such as wilting or discoloration, and address them promptly.
Adjustment
Be patient as the striped goosefoot adapts to its new setting, as some plants require time to exhibit new growth post-transplant.
Troubleshooting Common Issues with Striped Goosefoot Transplantation.
What's the best time to transplant striped goosefoot?
Relocate striped goosefoot during the prime window from early to late spring for optimal growth.
How far apart should striped goosefoot be spaced during transplant?
Space striped goosefoot approximately 10-12 inches (25-30 cm) apart to allow sufficient room for development.
Striped goosefoot looks wilted post-transplant, what went wrong?
Wilting may signal shock. Keep the soil moist and shield it from intense sun until recovery.
The leaves of striped goosefoot are turning yellow after transplanting, why?
Yellowing foliage could indicate overwatering or poor drainage. Confirm the soil isn't waterlogged and adjust care.
How deeply should I plant striped goosefoot when transplanting?
Plant striped goosefoot at the same depth it was in its previous container or bed for best results.
Is it necessary to prune striped goosefoot during transplantation?
Minor pruning to remove damaged parts can help striped goosefoot direct energy towards root establishment.
My striped goosefoot isn't growing after transplant, what should I check?
Ensure striped goosefoot is in well-draining soil with adequate sunlight and is neither over nor under-watered.
What soil type is best for transplanting striped goosefoot?
Utilize loamy, well-draining soil enriched with compost to provide a nutrient-rich foundation for striped goosefoot.
How much should I water striped goosefoot after transplanting?
Water striped goosefoot thoroughly immediately after transplanting, then maintain consistent moisture without waterlogging.
Can striped goosefoot be transplanted on cloudy days?
Transplanting striped goosefoot on overcast days can lessen transplant shock by avoiding immediate strong sunlight.



