How to Transplant Sand dollar cactus?
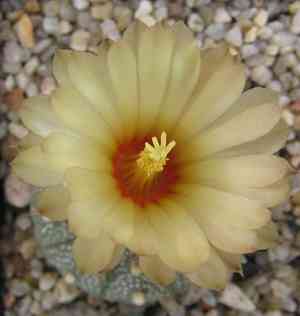
The most favorable period for relocating sand dollar cactus is from the gentle warmth of mid-to-late spring through early summer, providing a moderate environment for root development. Select a sunny spot with good drainage and carefully settle the plant, promoting effortless acclimation.
What Preparations are Needed Before Transplanting Sand Dollar Cactus?
What is the Ideal Time for Transplanting Sand Dollar Cactus?
The optimal period for relocating sand dollar cactus is from late spring to early summer. This timeframe provides moderate temperatures and stable conditions, crucial for sand dollar cactus to establish its root system prior to intense summer heat. Transplanting during this window maximizes the likelihood of sand dollar cactus's successful adaptation to its new spot, with warmth promoting root development while avoiding peak summer stress. By selecting this ideal transplanting time, you give sand dollar cactus a strong start, fostering resilience and vigorous growth.
How Much Space Should You Leave Between Sand Dollar Cactus Plants?
When moving your sand dollar cactus, it's advisable to space each one approximately 1-2 feet (30-60 cm) apart. This will provide ample room for them to grow without becoming overcrowded.
What is the Best Soil Mix for Sand Dollar Cactus Transplanting?
Utilize a well-draining cactus blend or sandy substrate for your sand dollar cactus, fortified with a phosphorus-rich base fertilizer. This will encourage robust and healthy development.
Where Should You Relocate Your Sand Dollar Cactus?
Select a site for your sand dollar cactus that receives abundant sunlight. However, provide partial shade during the most intense midday sun to prevent scorching. Remember, cacti thrive in sun, but not all day long!
What Equipments Should You Prepare Before Transplantation Sand Dollar Cactus?
Gardening Gloves
To safeguard your hands while handling soil and sand dollar cactus.
Trowel
For carefully excavating the sand dollar cactus and its root ball from its original position without damage.
Garden Spade
For digging the new planting hole for sand dollar cactus transplantation.
Pot (Optional)
If transferring your sand dollar cactus from one container to another, you'll need a new pot slightly larger than the previous one.
Watering Can
To irrigate the sand dollar cactus immediately following transplantation.
Organic Compost
To enrich the soil and supply nutrients to sand dollar cactus upon relocation.
How Do You Remove Sand Dollar Cactus from the Soil?
How Do You Remove Sand Dollar Cactus from the Soil?
From the Ground: First, moisten the soil around the sand dollar cactus plant. Then, using a trowel or garden spade, carefully dig around the plant, ensuring the plant's root ball remains intact. Gradually work the trowel or spade beneath the root ball to lift the plant from its initial spot.From a Pot: Begin by watering the sand dollar cactus in its current pot. Next, lay the pot on its side and gently roll it to loosen the root ball. Grasp the base of the sand dollar cactus and gently pull to extract it from the pot. If it resists, you may need to use a knife to cut the pot away.From a Seedling Tray: If your sand dollar cactus is still a seedling in a tray, water it first. Then, using a small tool or your fingers, carefully remove the seedling along with its roots. Handle the seedling by its leaves and avoid touching the stem or roots as much as possible.
Step-by-Step Guide for Transplanting Sand Dollar Cactus
Preparation
Once your sand dollar cactus is ready for transplant, begin by digging a hole in your chosen location. This hole should be deep enough to accommodate the sand dollar cactus's root ball and its existing soil without crowding.
Transplanting
Position the sand dollar cactus in the center of the hole, ensuring it's not planted deeper than its original growing depth. Add some organic compost around the root ball.
Settling In
Backfill the hole with the excavated soil. Gently pat the soil firmly around the base of the sand dollar cactus, but not so tightly as to restrict the plant.
Watering
Water the sand dollar cactus generously immediately after transplanting. The soil around the root ball should be damp, but not waterlogged. You are aiming for a moist environment for sand dollar cactus to begin developing new roots.
How Do You Care For Sand Dollar Cactus After Transplanting?
Watering
During the initial weeks post-transplantation, keep the soil around the sand dollar cactus consistently moist but never saturated. Excessive watering can lead to rot.
Monitoring
Observe for indications of transplant shock such as wilting, yellowing foliage, or stunted growth. If these appear, reduce watering frequency, and if conditions don't improve, consider consulting a local nursery or extension service.
Pest Control
Watch out for snails, slugs, or other pests that might harm sand dollar cactus. If detected, try using natural pest management techniques.
Pruning
If any part of the sand dollar cactus plant appears dead or diseased after transplantation, prune it off to prevent spread to the rest of the plant. Always use a clean, sharp tool for pruning.
Troubleshooting Common Issues with Sand Dollar Cactus Transplantation.
When's the best time to transplant my sand dollar cactus?
The ideal period to move your sand dollar cactus would be from late Spring to Autumn, ensuring the highest success rate for transplantation.
How much space should I leave between each sand dollar cactus?
Allow each sand dollar cactus ample room to grow by placing them approximately 1-2 feet (30-60 cm) apart. This prevents overcrowding and promotes healthier development.
What should I do if the sand dollar cactus's root system is too large or tangled?
A rootbound sand dollar cactus can be detrimental. Carefully loosen the root ball with your fingers or a small garden tool before transplanting. Be gentle to avoid root damage.
What do I do if the leaves on my transplanted sand dollar cactus start yellowing?
Yellowing often signals overwatering. Ensure the plant has good drainage and decrease watering frequency. Remember, sand dollar cactus prefers drier conditions, so allowing the soil to dry between waterings is fine.
I transplanted my sand dollar cactus but it seems to be wilting. What could be the problem?
Wilting can indicate transplant shock. Try to minimize this by maintaining consistent conditions with the plant's previous environment and avoid overwatering. It should recover within a few weeks.
What's the best type of soil for transplanting sand dollar cactus?
Sand dollar cactus thrives in sandy or pebbly soil with excellent drainage. Mix one part potting soil with one part perlite or pumice to create the perfect soil blend.
Do I need to pre-water the sand dollar cactus before transplanting it?
Yes, watering a couple of days before relocation can help hydrate the plant, making it more resilient during the transplanting process. However, ensure it's dry on moving day.
What's the best way to remove sand dollar cactus from its original pot?
Tilt the pot sideways, support the sand dollar cactus from its base, and gently ease it out. If it's stuck, you can carefully tap the pot's edges to loosen the roots.
How deep should I plant the sand dollar cactus in the new pot?
The sand dollar cactus should be positioned at the same depth it was previously growing. Plant it too deep, and the stem could rot; too shallow, and the roots could dry out.
What should I do if there's fungus growth after transplanting sand dollar cactus?
Fungus can indicate overwatering and insufficient ventilation. Reduce your watering, improve air circulation around the plant, and consider applying a fungicide designed for cacti if growth persists.