How to Transplant Green fiddleneck?
Green fiddleneck flourishes when relocated from the beginning of spring until its conclusion, owing to ideal growing circumstances. Select a bright, adequately drained spot to guarantee successful rooting. Moving the plant during this timeframe provides green fiddleneck sufficient opportunity to acclimate and prosper.
What Preparations are Needed Before Transplanting Green Fiddleneck?
What is the Ideal Time for Transplanting Green Fiddleneck?
Green fiddleneck thrives when moved from early spring through its conclusion. The mild temperatures and increased moisture during this period aid root development and vigorous growth. Transplanting at this time ensures the plant benefits from optimal growing conditions, leading to healthier, more robust development.
How Much Space Should You Leave Between Green Fiddleneck Plants?
When transplanting green fiddleneck, aim for a separation of 6-12 inches (15-30 cm) between each specimen. This helps guarantee ample room for growth without resource competition.
What is the Best Soil Mix for Green Fiddleneck Transplanting?
Prepare soil that drains well for green fiddleneck. Incorporate a foundational fertilizer rich in organic matter to encourage healthy development. A general-purpose garden soil would be suitable for this purpose.
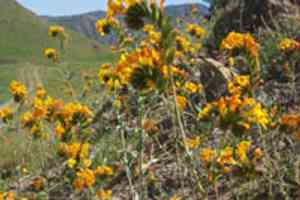
Where Should You Relocate Your Green Fiddleneck?
Select a sunny location for transplanting green fiddleneck. This plant flourishes in full sunlight, so choose a spot that receives at least 6-8 hours of direct sun daily.
What Equipments Should You Prepare Before Transplantation Green Fiddleneck?
Gardening Gloves
To safeguard your hands while handling soil and plants.
Small Trowel or Gardening Spade
For excavating the plant and creating a new hole for relocation.
Watering Can
To maintain soil moisture during and after the transplanting process.
Compost or Organic Material
To enrich the soil within the new planting site.
Mulch
To assist in retaining soil moisture post-transplant.
Pruning Shears
If necessary, to trim any damaged or excess foliage.
Bucket
To transport the plant over short distances if required.
How Do You Remove Green Fiddleneck from the Soil?
How Do You Remove Green Fiddleneck from the Soil?
From Ground: First, hydrate the green fiddleneck plant to moisten the soil. Next, excavate a wide trench around the plant using a shovel or spade, ensuring the plant's root ball remains intact. Carefully maneuver the spade beneath the root ball to lift the plant from its original spot.From Pot: Water the green fiddleneck plant thoroughly. Gently tap the pot's sides to loosen the root ball. Carefully invert the pot, supporting the plant with your hand as you ease it out.From Seedling Tray: Water the seedling tray to facilitate removal. Gently compress the base of each compartment while lifting the seedling by its leaves, not the stem, to prevent damage.
Step-by-Step Guide for Transplanting Green Fiddleneck
Prepare the Planting Hole
Dig a planting hole for your green fiddleneck that is twice the width of the root ball and of equal depth.
Amend the Soil
Incorporate compost or organic material into the soil removed from the hole to enhance fertility and drainage.
Remove the Plant
Utilize the appropriate removal method described above to carefully extract the green fiddleneck from its initial location.
Place the Plant
Position the green fiddleneck in the new hole, ensuring the top of the root ball is level with the surrounding ground. Backfill the hole with the amended soil, gently firming it around the roots to eliminate air pockets.
Water Generously
Thoroughly irrigate the transplanted green fiddleneck to help settle the soil and minimize transplant shock.
Apply Mulch
Spread a 2-3 inch layer of mulch around the base of the green fiddleneck, keeping it a few inches away from the stem to prevent rot.
How Do You Care For Green Fiddleneck After Transplanting?
Watering
Maintain consistent moisture in the soil around the green fiddleneck, avoiding saturation, for the initial weeks post-transplant to aid strong root development.
Monitoring
Regularly inspect the green fiddleneck for indications of stress, such as wilting or yellowing foliage, and implement corrective actions if necessary.
Support
If the green fiddleneck exhibits signs of leaning or instability, consider employing stakes or supports loosely tied to the plant to keep it upright until it establishes itself.
Additional Care
Trim any damaged or dead leaves to help the green fiddleneck direct its energy towards new growth.
Troubleshooting Common Issues with Green Fiddleneck Transplantation.
When is the best time to transplant green fiddleneck?
Relocate green fiddleneck from early spring to late spring for optimal outcomes.
What should the spacing be between green fiddleneck plants?
Position green fiddleneck plants 6-12 inches (15-30 cm) apart to ensure healthy development.
How should I prepare the soil for green fiddleneck before transplanting?
Loosen the soil and incorporate compost to enrich it, ensuring proper drainage.
How deep should I plant the roots of green fiddleneck?
Plant the roots at their previous growing depth to avoid stress.
How do I minimize transplant shock for green fiddleneck?
Water green fiddleneck thoroughly before and after relocation to reduce transplant shock.
What should I do if green fiddleneck appears wilted after transplanting?
Ensure green fiddleneck is well-hydrated and shaded for a few days to recover from wilting.
Why are the leaves of green fiddleneck turning yellow after transplanting?
Yellow foliage may indicate excessive watering or poor drainage. Adjust irrigation practices accordingly.
How much sunlight does green fiddleneck need after transplanting?
Green fiddleneck thrives in full sun; ensure it receives at least 6 hours of direct sunlight daily.
What can I do to improve root establishment for green fiddleneck?
Add a root stimulator or organic fertilizer to encourage robust root growth.
What if the new growth of green fiddleneck seems slow after transplanting?
Ensure adequate spacing, sunlight, and watering. Patience is crucial as plants adapt to their new environment.


