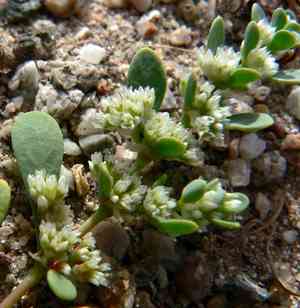
How to Transplant Frost-mat?
The optimal period for relocating frost-mat is in the mild conditions of mid-spring or as autumn transitions into early winter. Choose a bright spot with soil that drains effectively to guarantee a successful beginning. If necessary, amend the soil to provide frost-mat with a nurturing new environment.
What Preparations are Needed Before Transplanting Frost-mat?
What is the Ideal Time for Transplanting Frost-mat?
For frost-mat to flourish, target a prime transplanting window: late spring through early winter. The mild temperatures during this period allow frost-mat to transition smoothly, promoting easy root establishment and avoiding summer's intense heat. This optimal timing aligns growth with natural cycles, boosting frost-mat's chances for a strong season. A smart approach to timing maximizes success and harmonizes with nature's rhythms, giving your frost-mat a great start.
How Much Space Should You Leave Between Frost-mat Plants?
When relocating your lovely frost-mat, allow them ample room to grow by spacing them 4-6 inches (10-15 cm) apart. This comfortable distance ensures sufficient space for development while still creating a lush, full garden display.
What is the Best Soil Mix for Frost-mat Transplanting?
For your frost-mat, well-drained soil is essential. Prior to planting, enrich your soil with a balanced, slow-release fertilizer. A general-purpose mix will work perfectly, establishing a robust base for your young plants!
Where Should You Relocate Your Frost-mat?
Your frost-mat thrives in abundant sunlight! Select a location with plenty of sun exposure, ideally full sun. This will encourage them to grow strong and healthy, providing a stunning display all season long.
What Equipments Should You Prepare Before Transplantation Frost-mat?
Gardening Gloves
To safeguard your hands while handling soil and plants.
Shovel or Spade
For digging and lifting the root ball of frost-mat from its original spot.
Watering Can or Hose
To hydrate frost-mat before removal and after placement in its new location.
Garden Trowel
To manage the plant and excavate small holes if moving smaller individuals or seedlings.
Shears or Pruning Snips
To trim any damaged roots or foliage prior to transplanting.
Wheelbarrow or Garden Cart
To move the plant and soil without straining your back.
Measuring Tape
To accurately determine the spacing between transplants, if multiple plants are being relocated.
How Do You Remove Frost-mat from the Soil?
How Do You Remove Frost-mat from the Soil?
From Ground: First, water the frost-mat plant to moisten the soil. Next, dig a wide trench around the plant using a shovel or spade, ensuring the plant's root ball remains intact. Carefully work the spade beneath the root ball to lift the plant from its initial position.From Pot: Begin by watering the potted frost-mat to dampen the soil. Turn the pot on its side and tap the bottom or sides to loosen the plant. Gently pull the plant out by its base while supporting the root ball with your other hand.From Seedling Tray: Water the frost-mat seedlings to make the soil pliable. Use a garden trowel or your fingers to carefully extract each seedling from its cell, taking care not to harm the roots. Handle the seedling by its leaves rather than the stem to minimize injury.
Step-by-Step Guide for Transplanting Frost-mat
Preparation
Before extracting frost-mat for transplant, thoroughly water the plant. This will help lessen transplant shock and make the soil easier to manage.
Digging
Use your shovel or trowel to dig up the frost-mat with a generous amount of soil around its roots to protect the root system. Be careful not to harm the roots as you dig.
Transport
Gently place frost-mat in a wheelbarrow or garden cart, especially if it's from the ground. If frost-mat is already potted or from a seedling tray, it can be carried to its new location by hand.
Planting Hole
Dig a hole in the new spot that is twice as wide and just as deep as the root ball of frost-mat.
Placement
Carefully position frost-mat in the center of the hole. Ensure it's situated at the same depth it was growing at previously.
Filling In
Backfill the hole with the excavated soil and gently press down around the base of frost-mat to secure it and eliminate any air pockets.
Watering
After frost-mat is firmly in place, give it a good watering to settle the soil and provide the necessary hydration for recovery.
How Do You Care For Frost-mat After Transplanting?
Initial Watering
Once frost-mat is settled in its new spot, water it thoroughly to help the roots recover and establish in their new environment. Continue to keep the soil moist, but be careful not to overwater.
Mulching
Apply a layer of mulch around the base of frost-mat to help retain moisture, regulate soil temperature, and reduce weed competition.
Supports
If frost-mat is a taller variety, you might want to provide stakes or other supports to keep it upright as it becomes established.
Pruning
Trim away any damaged or broken roots or stems during the transplant to encourage new growth and a healthier plant.
Troubleshooting Common Issues with Frost-mat Transplantation.
What's the best time to transplant frost-mat?
The optimal transplanting periods are mid-spring or from late autumn to early winter.
How far apart should I space frost-mat during transplanting?
Space frost-mat approximately 4-6 inches (10-15 cm) apart to ensure proper development.
Why is my frost-mat not thriving after transplant?
Ensure it's transplanted during its ideal seasons and that the soil drains well. Check for adequate watering and the absence of pests.
Can frost-mat handle being transplanted in full-sun locations?
Yes, frost-mat can flourish in full sun. Make sure it's gradually acclimated to prevent shock.
Should I water frost-mat immediately after transplanting?
Yes, water frost-mat gently to help settle the soil around the roots and support initial growth.
How deep should I plant frost-mat's roots when transplanting?
Plant the roots at the same depth they were growing before to prevent stem rot or drying out.
What type of soil is best for transplanting frost-mat?
Utilize a well-draining soil mix, as frost-mat does not tolerate overly moist soil well.
How do I prepare frost-mat for transplanting?
Water frost-mat well a day before transplanting and choose a cloudy day or evening to minimize stress.
What should I do if frost-mat's leaves wilt after transplanting?
Provide shade and consistent moisture. It should recover as it adapts to the new environment.
How can I protect frost-mat after transplanting from cold weather?
After transplanting in late autumn to early winter, mulch around the base to insulate against cold snaps.


