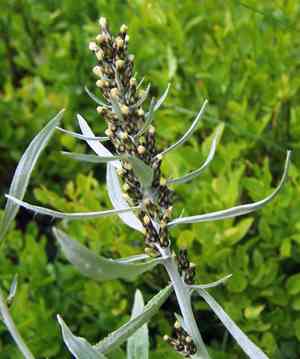
Norwegian arctic cudweed (Omalotheca norvegica)
Also known as: Norwegian cudweed
Gnaphalium norvegicum, which is often compared to Gnaphalium sylvaticum (heath cudweed), stands out by its height of 8 to 30 cm and its leaves, which have three veins and are uniformly woolly on both sides. Additionally, the leaves are all roughly the same length.
In This Article
Attributes of Norwegian arctic cudweed
Lifespan
Perennial
Plant Type
Herb
Plant Height
15 cm to 30 cm
Spread
N/A
Leaf Color
Grayish-green
Flower Size
2-5 mm
Flower Color
Yellowish or brownish
Images of Norwegian arctic cudweed
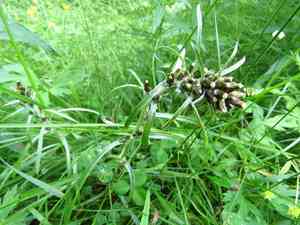
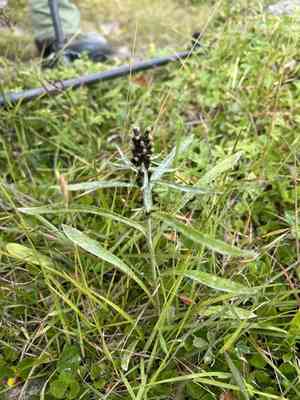
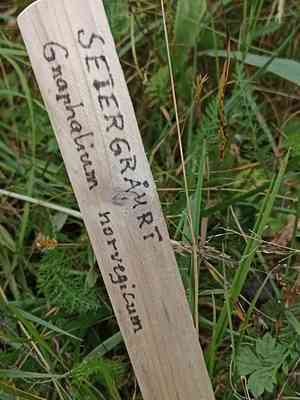
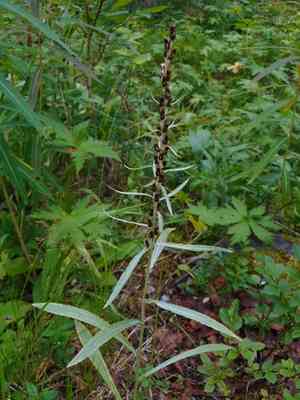
Quickly Identify Norwegian arctic cudweed
1
Omalotheca norvegica can be identified by its woolly, grayish-green leaves, and small, clustered flower heads. The plant has a distinctive hairy texture and blooms from July to September.
Scientific Classification of Norwegian arctic cudweed
Phylum
Vascular plants
Class
Dicotyledons
Order
Asterales
Family
Daisy
Genus
Arctic Weed
Species
Norwegian arctic cudweed
Planting and Growing of Norwegian arctic cudweed
Care Difficulty
Easy
Watering Schedule
Every 2 days
Sunlight Requirements
Full sun
Sunshine Duration
6-10 hours
Ideal Temperature
50-65℉
Soil Type
Potting Mix, Peat Mix
Soil pH
6.5-7.5
Fertilizer Type
Balanced
Pruning Season
Spring, Summer
Pruning Area
Leaves, Branches
Pruning Frequency
2 times a year
Repotting Season
Spring
Pot Type
Plastic, Ceramic
 How to Water Norwegian arctic cudweed?
For Omalotheca norvegica, the watering amount should be about 150 milliliters each time. Ensure that the soil is adequately moist without being waterlogged. The top layer of the soil should be kept slightly dry before the next watering to prevent root rot and promote healthy growth.
What are the symptoms of an underwatered Norwegian arctic cudweed?
›
What should I do if my Norwegian arctic cudweed is not getting enough water?
›
What are the symptoms of an overwatered Norwegian arctic cudweed?
›
How to save an overwatered Norwegian arctic cudweed?
›
 What Are the Sunlight Requirements for Norwegian arctic cudweed?
Omalotheca norvegica thrives best in full to partial sun conditions. Adequate sunlight supports vibrant leaf coloration, flowering, and overall vitality. It ensures optimal metabolic processes, increasing resilience against environmental stressors and pathogens.
What is the best lighting condition for Omalotheca norvegica?
›
What are the benefits of ideal lighting for this plant?
›
How can I ensure my plant gets the light it needs?
›
 What Is the Ideal Temperature Range for Norwegian arctic cudweed?
The optimal temperature for Omalotheca norvegica is between 50°F to 65°F. This range allows for healthy growth and development, ensuring the plant retains its vigor and resilience. Maintaining temperatures within this range is essential for optimal photosynthesis and metabolic functions.
 What Soil is Best for Norwegian arctic cudweed?
Omalotheca norvegica thrives in well-drained soils that prevent waterlogging. Adequate drainage allows roots to access oxygen and nutrients, promoting healthy growth and preventing root diseases. This plant benefits from a nutrient-rich environment, which can be achieved by incorporating organic matter like compost. It ensures the plant receives essential nutrients for robust growth and flowering. The plant prefers soil that retains moderate moisture without being too wet. This balance helps maintain consistent moisture levels, crucial for its stability and resilience during dry spells.
 How to Fertilize Norwegian arctic cudweed?
For Omalotheca norvegica, it is crucial to provide a balanced amount of fertilizer. Use a diluted liquid fertilizer at half strength when applying monthly. For solid fertilizer, apply according to package instructions but reduce the amount to half per application to prevent any nutrient overload.
 How to Prune Norwegian arctic cudweed?
Begin by inspecting the plant and identifying any dead, damaged, or diseased stems. Use sharp, clean pruning shears to cut these back to the base or to a healthy bud. For healthy growth, focus on cutting back leggy stems to encourage a bushier shape. Remove any spent flowers to encourage further blooming. Trim back branches that disrupt the plant's overall symmetry, aiming to achieve an even, rounded appearance. This not only improves the aesthetic but also increases light penetration and air circulation, which are vital for keeping the plant healthy.
More About Pruning Techniques→
 How to Propagate Norwegian arctic cudweed plant?
1
Start by filling the seed tray with the potting mix. Ensure the mix is evenly distributed and lightly moistened before sowing the seeds. Avoid compacting the soil as it should remain loose to facilitate root growth.
2
Scatter the seeds evenly over the surface of the potting mix. Gently press them into the soil without covering them deeply. This ensures the seeds receive enough light, which aids in their germination process.
3
After sowing the seeds, thoroughly water the seed tray to settle the seeds into the soil. Place the tray in a location with bright, indirect sunlight. Maintain consistent moisture by misting the soil surface when it begins to dry.
 How to Repot Norwegian arctic cudweed plant?
1
Notice when your Omalotheca norvegica needs a new pot when its roots start peeking out from the drainage holes or circling the top of the soil. Another sign is stunted growth or wilting despite regular care. Early spring is ideal, as the plant's growth phase begins, ensuring it gets accustomed to the new environment swiftly.
2
Select a pot that is only slightly larger than the current one, around 1-2 inches in diameter. This ensures the roots have enough space to grow without surplus soil that can retain moisture and lead to root rot. Using a pot with drainage holes is crucial to prevent waterlogging, supporting healthy plant development.
3
A light, well-draining soil mix is essential for Omalotheca norvegica, as it mimics its natural rocky, well-aerated habitats. Opting for a mix with sand or perlite will improve drainage and prevent root rot, helping the plant thrive by providing the necessary nutrients without water retention.
Learn More About Norwegian arctic cudweed Diseases
Anthracnose
Bacterial Leaf Spot
Black Spot
Chemical Injury
Damping-off
Downy Mildew
Drought Stress
Fusarium Wilt
Gray Mold
Leaf Curl
Leaf Spot
Mosaic
Nutrient Deficiency
Nutrient Toxicity
Powdery Mildew
Root Rot
Root-knot Nematode
Rusts
Sooty Mold
Spider Mites
Temperature Stress
Thrips Damage
White Mold



