Glandular clarkia (Clarkia arcuata)
Also known as: Clarkia, Farewell to Spring
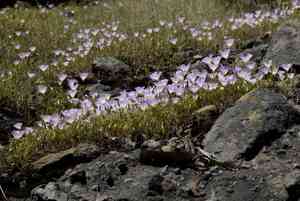
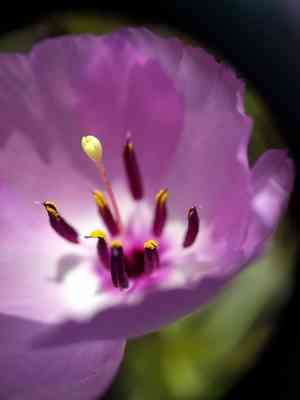
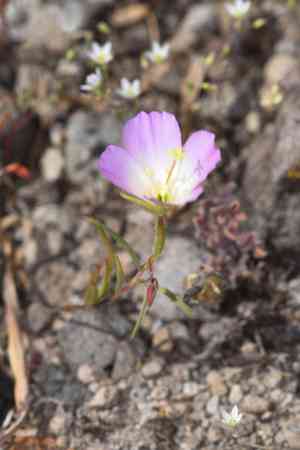
Glandular clarkia (Clarkia affinis) is a captivating wildflower recognized for its erect, slender stems and bright, fan-shaped flowers. Each bloom features four delicate petals in shades of pink to lavender, often adorned with striking red spots or streaks that act as nectar guides. This plant is native to rocky, open regions and flourishes in well-drained, sandy or loamy soils. It thrives best in full sunlight but can tolerate partial shade. Glandular clarkia is drought-tolerant once established, embodying the resilience of its natural habitat.
In This Article
Attributes of Glandular clarkia
Lifespan
Annual
Plant Type
Herb
Plant Height
30-60 cm
Spread
N/A
Leaf Color
Green
Flower Size
2-5 cm
Flower Color
Pink, Purple
Images of Glandular clarkia
Quickly Identify Glandular clarkia
1
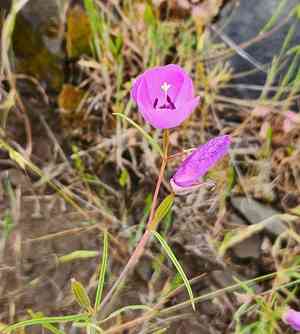
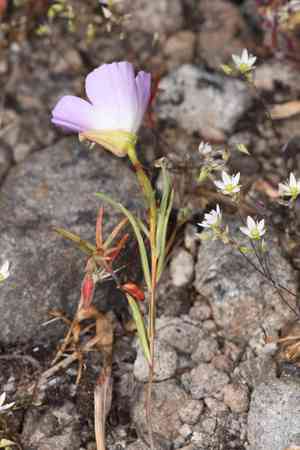
Identifying Clarkia arcuata involves looking for its characteristic goblet-shaped flowers, typically pink or purple, and its slender, elongated stems. The leaves are usually lanceolate and arranged alternately.
Scientific Classification of Glandular clarkia
Phylum
Vascular plants
Class
Dicotyledons
Order
Myrtales
Family
Evening primrose
Genus
Clarkia
Species
Glandular clarkia
Planting and Growing of Glandular clarkia
Care Difficulty
Moderate
Watering Schedule
Every 4 days
Sunlight Requirements
Partial sun
Sunshine Duration
4-8 hours
Ideal Temperature
60-75℉
Soil Type
Potting Mix, Peat Mix
Soil pH
6.5-7.5
Fertilizer Type
Balanced
Pruning Season
Spring, Summer
Pruning Area
Branches, Leaves
Pruning Frequency
2 times a year
Repotting Season
Spring
Pot Type
Plastic, Ceramic
 How to Water Glandular clarkia?
Clarkia arcuata, like many native wildflowers, prefers well-drained soil. Watering until the soil is moist but not soggy is ideal. Aim for thorough hydration, allowing excess water to drain away to mimic natural rainfall patterns.
What are the symptoms of an underwatered Glandular clarkia?
›
What should I do if my Glandular clarkia is not getting enough water?
›
What are the symptoms of an overwatered Glandular clarkia?
›
How to save an overwatered Glandular clarkia?
›
 What Are the Sunlight Requirements for Glandular clarkia?
Clarkia arcuata prefers partial sun conditions meaning around 4-6 hours of filtered sunlight each day. Adequate light promotes robust health, enhances blooming periods, and maintains vibrant foliage.
How does Clarkia arcuata respond to partial sun?
›
What is the best environment for Clarkia arcuata to receive ideal light?
›
Why is ideal lighting important for Clarkia arcuata's growth?
›
 What Is the Ideal Temperature Range for Glandular clarkia?
The ideal temperature range for Clarkia arcuata is between 60°F and 75°F. This range allows for optimal growth as it closely mimics the conditions in its native habitat of western North America, promoting healthy flowering and overall vitality. It is important to maintain this range to ensure that the plant can effectively carry out photosynthesis and other metabolic processes.
 What Soil is Best for Glandular clarkia?
Clarkia arcuata thrives in well-drained soil, which prevents water stagnation and root rot. Ensuring proper drainage also allows the plant's roots to receive adequate oxygen, promoting vigorous growth and vibrant blooms. Having a nutrient-rich soil promotes strong stems and robust flowering in Clarkia arcuata. This ensures the plant receives essential minerals and nutrients, leading to healthier plant development and prolonged blooming periods. Incorporating organic matter into the soil enhances moisture retention and boosts microbial activity. This rich biological ecosystem can improve root health and supports sustainable plant growth, making it an ideal choice for Clarkia arcuata.
 How to Fertilize Glandular clarkia?
Clarkia arcuata requires a light hand when it comes to fertilization. Use a balanced liquid fertilizer at half strength to avoid overfeeding. Apply about 1 tablespoon of liquid fertilizer mixed with a gallon of water per application. Solid fertilizers should be used sparingly to avoid root burn.
 How to Prune Glandular clarkia?
Start by examining your Clarkia arcuata for any dead or diseased stems. These are the first areas to remove. Follow by identifying areas with dense growth and remove excess stems to improve airflow and light penetration. With your clean shears, make cuts at a slight angle above a leaf node. This encourages healthy regrowth and helps prevent water from settling on the cut surface, which can cause rotting. Always take care not to cut more than one-third of the plant at a time.
More About Pruning Techniques→
 How to Propagate Glandular clarkia plant?
1
Choose high-quality, disease-free seeds from a reputable supplier. Inspect them for any signs of damage or mold to ensure they have the best chance of successful germination.
2
Fill trays with seed starting mix and lightly moisten it. Sow the seeds on the surface, gently pressing them into the soil. Cover with a light layer of soil to ensure they receive adequate sunlight and warmth.
3
Place trays in a bright area with indirect sunlight. Maintain consistent moisture and a temperature between 60-70°F (15-20°C) to encourage germination. Seeds generally germinate within 10-20 days under these conditions.
 How to Repot Glandular clarkia plant?
1
Clarkia arcuata shows signs of needing repotting when you observe roots growing through the drainage holes, slower growth, or if the soil dries out faster than usual. These indicators suggest the plant has outgrown its current pot and requires more space or fresh soil.
2
Select a pot that is one size larger than the current one, ensuring it has drainage holes to prevent waterlogging. A pot that is slightly wider and deeper will provide the roots with ample room to spread and promote healthy growth while avoiding root-bound conditions.
3
Opt for a well-draining potting mix, ideally with some sand or perlite to assist with drainage. Such soil prevents water retention that can lead to root rot, and it mimics the plant's natural habitat, promoting healthy growth and vigorous flowering.
Learn More About Glandular clarkia Diseases
Anthracnose
Bacterial Leaf Spot
Bacterial Soft Rot
Bacterial Wilt
Black Spot
Chemical Injury
Cyst Nematode
Damping-off
Downy Mildew
Drought Stress
Fusarium Wilt
Gray Mold
Leaf Spot
Mosaic
Nutrient Deficiency
Nutrient Toxicity
Powdery Mildew
Root Rot
Root-knot Nematode
Rusts
Sooty Mold
Spider Mites
Temperature Stress
Thrips Damage
White Mold


