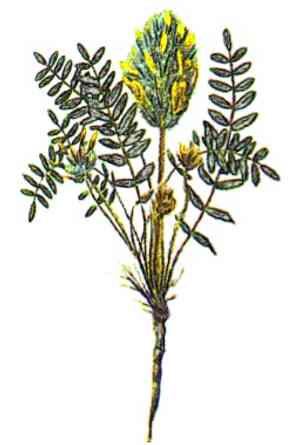
San miguel milk-vetch(Astragalus miguelensis)

San miguel milk-vetch (Astragalus miguelensis)

Also known as: N/A

San Miguel milk-vetch (Astragalus miguelensis) is a resilient perennial herb native to arid regions. It is characterized by clusters of creamy-white to pale yellow flowers and compound leaves with numerous small leaflets. This plant is well-adapted to rocky, well-drained soils, which reduces competition from other vegetation.

Its survival strategies include:
1. **Deep Root System:** Allows it to tap into underground water sources, crucial for surviving drought conditions.
2. **Seed Dormancy:** Produces seeds capable of remaining dormant until environmental conditions are favorable for germination.
3. **Nitrogen Fixation:** Forms symbiotic relationships with nitrogen-fixing bacteria, enhancing its nutrient uptake and improving soil fertility.

Attributes of San miguel milk-vetch

Lifespan
Perennial
Plant Type
Herb
Plant Height
Up to 60 cm
Spread
N/A
Leaf Color
Green
Flower Size
Approximately 1 cm
Flower Color
Varies from white to purple

ForwardPlant - Identify plants with a snap

Identify and diagnose plants, get toxicity alerts, and explore safety guides for all types of fungi.

Try for Free

Images of San miguel milk-vetch

San miguel milk-vetch(Astragalus miguelensis)

Quickly Identify San miguel milk-vetch

1
Look for its characteristic pinnate leaves and small, clustered flowers typical of the Astragalus genus.

Scientific Classification of San miguel milk-vetch

Phylum
Vascular plants
Class
Dicotyledons
Order
Fabales
Family
Legume
Genus
Milkvetch
Species
San miguel milk-vetch

Planting and Growing of San miguel milk-vetch

Care Difficulty
Moderate
Watering Schedule
Every day
Sunlight Requirements
Full sun
Sunshine Duration
10-12 hours
Ideal Temperature
65-75℉
Soil Type
Potting Mix, Peat Mix
Soil pH
6.5-7.5
Fertilizer Type
Balanced
Pruning Season
Spring, Summer
Pruning Area
Branches, Leaves
Pruning Frequency
2 times a year
Repotting Season
Spring
Pot Type
Plastic, Ceramic

water icon How to Water San miguel milk-vetch?

For Astragalus miguelensis, water until the top 2-3 inches of soil are moist but not soggy. The soil should absorb the water without pooling on the surface, ensuring that the roots receive sufficient moisture without becoming waterlogged.
What are the symptoms of an underwatered San miguel milk-vetch?
What should I do if my San miguel milk-vetch is not getting enough water?
What are the symptoms of an overwatered San miguel milk-vetch?
How to save an overwatered San miguel milk-vetch?

sunlight icon What Are the Sunlight Requirements for San miguel milk-vetch?

Sunlight Requirements: Full sun, Partial sun
Duration of light: 6-8 hours per day
Astragalus miguelensis thrives best in partial sun to full sun exposure. This range allows for optimal photosynthesis, leading to robust growth and a stronger structure, supporting the plant's needs efficiently.
How to Achieve Ideal Light
Solutions for Ideal Light
Benefits of Adequate Light

temperature icon What Is the Ideal Temperature Range for San miguel milk-vetch?

Ideal Temperature: 65 ~ 75℉
Astragalus miguelensis thrives best in temperatures ranging from 65°F to 75°F. This range provides the most conducive environment for balanced metabolic processes, optimal growth, and nutrient assimilation. Ensuring the temperature remains within this range minimizes stress and supports robust development of both root and shoot systems.

soil icon What Soil is Best for San miguel milk-vetch?

Soil type: Loam, Sandy loam, Sandy soil
Soil PH: 6.5 ~ 7.5
Astragalus miguelensis thrives in well-draining soil that prevents water from sitting around the roots, which could lead to root rot. Ensuring proper drainage is crucial for healthy plant growth and optimal nutrient absorption. Providing a fertile, nutrient-rich soil helps Astragalus miguelensis grow strong and vibrant. A soil rich in organic matter supports robust root development and efficient nutrient uptake, ensuring the plant flourishes. Astragalus miguelensis prefers a neutral pH balance in the soil. Maintaining a pH between 6.5 and 7.5 ensures the plant can effectively absorb essential nutrients, preventing deficiencies and promoting lush growth.

fertilize icon How to Fertilize San miguel milk-vetch?

Fertilizer type: Balanced
For Astragalus miguelensis, the amount of fertilizer required depends greatly on the soil quality and environmental conditions where it is planted. However, a general recommendation would be to use about 10 grams per square meter for solid fertilizers, and 1 liter of diluted liquid fertilizer per plant monthly. Ensure the liquid fertilizer is diluted at a ratio of 1:10 to prevent root damage.

prune icon How to Prune San miguel milk-vetch?

Pruning Time: Spring, Summer
Start by removing any dead or yellowing leaves, as well as damaged or diseased stems. This helps the plant focus its energy on healthy growth and prevents the spread of disease. Prune to enhance the plant’s natural shape and promote airflow within the branches. This prevents fungal infections and allows sunlight to penetrate, thus boosting overall plant health. More About Pruning Techniques

propagate icon How to Propagate San miguel milk-vetch plant?

Propagate Time: Spring, Early spring
1
Collect ripe seeds of Astragalus miguelensis, ensuring they are fully dry to prevent mold. Scarify the seeds slightly to improve germination by using sandpaper or a knife.
2
Plant the seeds about half an inch deep either in seed trays or directly into the desired garden location. Keep the soil moist but avoid overwatering, as this may lead to rot.
3
Place the seeds in a warm location with indirect sunlight. Maintain consistent temperature and moisture levels to encourage germination, which may take several weeks.
More About Propagating Techniques

repot icon How to Repot San miguel milk-vetch plant?

Repotting frequency: Every 2-3 years
1
Astragalus miguelensis indicates a need for repotting when you notice roots emerging from drainage holes, slow growth, or a decrease in flowering. Spring and autumn are the ideal seasons because the plant is typically more dormant, reducing stress during transition.
2
Select a pot that is one size larger than the current one, with ample drainage holes. This size allows enough space for root growth without overwhelming the plant, preventing waterlogging, and ensuring healthy development.
3
Use well-draining sandy soil, ideally a mix containing perlite or coarse sand, which mimics the plant’s natural habitat. This composition ensures roots don't sit in water, reducing the risk of rot and promoting healthier growth.

ForwardPlant - Identify plants with a snap

Find the best spots for them to optimize their health, simply using your phone.

Try for Free

Toxicity

Ingestion of plant parts

Identify toxic plants for your safety

Learn which plants are harmful to you and your pets, and make informed choices for a safer home!

Try for Free
WARNING
The judgment on toxicity and danger is for reference only. We DO NOT GUARANTEE any accuracy of such judgment. Therefore, you SHALL NOT rely on such judgment. It is IMPORTANT TO SEEK PROFESSIONAL ADVICE in advance when necessary.

