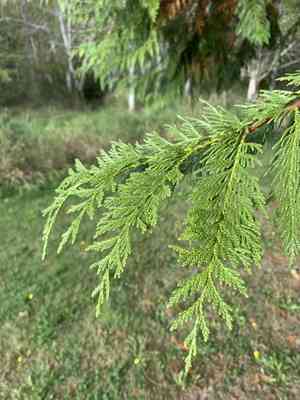
How to Transplant Western red cedar?
For optimal development, the ideal period to relocate western red cedar is from early spring through early summer. Select a site offering excellent drainage and abundant sunlight. Carefully untangle the root ball prior to transplanting, and supply generous watering initially to ensure a flourishing western red cedar presentation.
What Preparations are Needed Before Transplanting Western Red Cedar?
What is the Ideal Time for Transplanting Western Red Cedar?
To maximize the success of your western red cedar, transplant it during the rejuvenating period of early spring through early summer. This aligns perfectly with its natural growth cycle, ensuring strong establishment and vigorous development. Synchronizing with the seasons yields excellent results!
How Much Space Should You Leave Between Western Red Cedar Plants?
When relocating western red cedar, it's crucial to provide ample room for development. Aim for a spacing of approximately 1.5-2 meters (5-6.5 feet) between each plant. This prevents overcrowding and encourages robust growth.
What is the Best Soil Mix for Western Red Cedar Transplanting?
For western red cedar, select a well-draining soil that is slightly acidic to neutral, with a pH between 6.0 and 7.0. Incorporate organic matter, such as compost or aged manure, to enrich the soil with nutrients and enhance its texture. This creates a strong foundation to support your plants' growth.
Where Should You Relocate Your Western Red Cedar?
While western red cedar can endure some shade, they thrive in sunny locations. Choose a site that receives at least 6 hours of direct sunlight daily. However, providing some afternoon shade, especially in hot climates, will also benefit the plants.
What Equipments Should You Prepare Before Transplantation Western Red Cedar?
Gardening Gloves
To safeguard your hands while handling soil and western red cedar.
Shovel or Spade
For excavating holes in the ground suitable for relocating western red cedar.
Gardening Trowel
To carefully remove western red cedar from its container or seedling tray.
Watering Can
For hydrating western red cedar before and after the relocation process.
Wheelbarrow or Gardening Cart
To move the western red cedar from its original spot to its new planting location.
Mulching Material
To help maintain soil moisture after transplantation.
Garden Pruners
To trim any damaged or decaying branches from western red cedar post-transplant.
How Do You Remove Western Red Cedar from the Soil?
How Do You Remove Western Red Cedar from the Soil?
From Ground: First, moisten the area around the western red cedar plant with a gentle spray of water. This will facilitate a smoother and less stressful extraction process for the plant. Dig a wide trench around western red cedar with your shovel or spade, being careful to keep the root ball intact. Slowly, ease the spade beneath the root ball to lift western red cedar from its original position.From Pot: Water the western red cedar in its pot to ensure the roots are hydrated for the transplant. Turn the pot sideways, gently hold the plant by its base, and attempt to slide it out. If it's difficult, tap the sides of the pot to loosen the soil and try again.From Seedling Tray: Water the tray first, then use a garden trowel or similar tool to gently lift the western red cedar seedling from its current space. Make sure to scoop from underneath to include as many roots as possible.
Step-by-Step Guide for Transplanting Western Red Cedar
Preparation
Before extracting the western red cedar from its current spot, prepare the new planting site. Dig a hole twice as wide and the same depth as the root ball of western red cedar.
Inspection
Examine the roots of western red cedar. If they are tightly coiled, gently untangle them to encourage healthy root growth. Prune any damaged or dead roots.
Placement
Position western red cedar in the prepared hole. Ensure that the top of the root ball is level with the ground surface.
Backfill
Fill the hole with soil, press gently to eliminate any air pockets and ensure the plant is stable.
Watering
Water western red cedar generously immediately after transplanting. Ensure the water is slowly absorbed, and not running off.
Mulching
Apply a 2-3 inch layer of mulch around the base of the western red cedar. This will help retain moisture and suppress weeds.
How Do You Care For Western Red Cedar After Transplanting?
Pruning
Avoid extensive pruning right after transplant. Instead, wait until western red cedar is established in its new location, then prune away any damaged or dead branches. Regularly check for signs of disease or pests.
Watering
Continue to water western red cedar regularly, especially during the initial weeks post-transplant. This promotes root development and aids in the plant's establishment. However, prevent overwatering as it could lead to root rot.
Frost Protection
If the transplanting occurred close to winter, it may be necessary to shield western red cedar from frost by using a breathable cloth or plant cover.
Troubleshooting Common Issues with Western Red Cedar Transplantation.
When is the ideal time to transplant western red cedar?
The optimal period to relocate western red cedar is from the early blossoming months of spring to the beginning of summer.
What is the ideal distance between western red cedar when transplanting them?
Provide western red cedar ample room to grow by maintaining a separation of approximately 1.5-2m or 5-6.6 ft between them.
What to do if western red cedar wilts after transplanting?
Wilting may indicate shock. Ensure the root ball remains moist, and avoid direct sunlight for a few days.
What soil type suits western red cedar best when transplanting?
Well-drained, loamy or sandy soil is most suitable for relocating western red cedar. It prefers slightly acidic to neutral pH.
Can I transplant western red cedar in pots?
Yes, western red cedar can be cultivated in large containers. Ensure adequate drainage and sufficient compost for healthy growth.
How deep should the hole be when transplanting western red cedar?
Excavate a hole twice as wide and equally deep as the root ball, approximately 1-2 feet (30-60 cm) should be sufficient.
What should I do if the transplanted western red cedar is not growing well?
Assess soil health, irrigation frequency, and sun exposure. Too much or too little of any can impact growth.
How long does it take for a transplanted western red cedar to establish?
Western red cedar may require an entire growing season to root well and exhibit new growth after transplantation.
Should I fertilize western red cedar immediately after transplanting?
Refrain from fertilizing right after relocating western red cedar. Wait a few weeks, then use a slow-release, balanced fertilizer.
How often should I water a newly transplanted western red cedar?
Avoid waterlogging but keep the soil consistently moist. Water deeply once a week if there is no significant rainfall.


