How to Transplant Selenicereus undatus?
The ideal period for transplanting white-Fleshed Pitahaya is from late spring to early summer, as this provides the most favorable growth environment. Select a luminous, protected location, and if necessary, confirm the soil is fertile and drains effectively to facilitate smooth integration.
What Preparations are Needed Before Transplanting White-fleshed Pitahaya?
What is the Ideal Time for Transplanting White-fleshed Pitahaya?
The perfect time for relocating white-Fleshed Pitahaya is during the vigor of late spring or the onset of early summer. This period capitalizes on mild weather, allowing roots to settle optimally without the harshness of peak summer heat. Introducing white-Fleshed Pitahaya at this time ensures a smooth transition for robust development, utilizing the gentle warmth and extended daylight for successful acclimation.
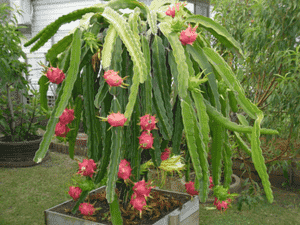
How Much Space Should You Leave Between White-fleshed Pitahaya Plants?
When preparing your area for white-Fleshed Pitahaya, aim for ample room! Position your white-Fleshed Pitahaya approximately 3 to 6 feet apartâwhich is about 0.9 to 1.8 meters. This provides them sufficient space to grow without competing for nutrients.
What is the Best Soil Mix for White-fleshed Pitahaya Transplanting?
Prepare an inviting environment for white-Fleshed Pitahaya with soil that drains well. A combination of sand and compost works excellently. Remember to add a touch of balanced, slow-release fertilizer to give white-Fleshed Pitahaya a strong start in its new location!
Where Should You Relocate Your White-fleshed Pitahaya?
Locate a sunny spot where white-Fleshed Pitahaya can thrive in full to partial sunlight. An area receiving about 6-8 hours of sun daily is ideal, keeping in mind that white-Fleshed Pitahaya appreciates some afternoon shade in hotter climates.
What Equipments Should You Prepare Before Transplantation White-fleshed Pitahaya?
Gardening Gloves
To safeguard your hands while handling soil and plants.
Shovel or Spade
For digging up and moving the white-Fleshed Pitahaya's root ball.
Pruning Shears
To trim any damaged roots or stems.
Watering Can or Hose
To gently hydrate the plant before and after relocation.
Wheelbarrow
To transport the white-Fleshed Pitahaya and soil, especially if it's a larger specimen.
Measuring Tape
To ensure correct spacing from other plants and objects.
Tarp or Burlap
To contain the soil and protect the root ball during transit.
Support Stakes or Trellis
To offer the white-Fleshed Pitahaya a structure to climb as it matures.
How Do You Remove White-fleshed Pitahaya from the Soil?
How Do You Remove White-fleshed Pitahaya from the Soil?
From Ground: Hydrate the white-Fleshed Pitahaya to help loosen the soil around its roots. Using a shovel, carefully excavate around the plant, starting a good distance away to avoid cutting into the root system. Once a circle is formed around the plant, angle your shovel beneath it to gently lift it with the root ball intact.From Pot: First, water the white-Fleshed Pitahaya to facilitate removal. Tilt the container to the side and gently tap it to dislodge the plant. Support the white-Fleshed Pitahaya by its base and carefully guide it out, ensuring the root ball remains whole.From Seedling Tray: Gently water the seedling tray to ease transplanting. Use a small implement, such as a spoon or a dibber, to lift the seedling while carefully preventing damage to the delicate roots. Ensure you retain as much soil around the roots as possible.
Step-by-Step Guide for Transplanting White-fleshed Pitahaya
Preparation
Before starting the transplant, thoroughly water the white-Fleshed Pitahaya to minimize shock and prepare the new planting site by clearing any debris or weeds.
Dig Hole
Excavate a hole slightly larger than the white-Fleshed Pitahaya's root ball, providing ample room for it to spread without being confined.
Inspection
Examine the white-Fleshed Pitahaya's root ball for any damaged or dead roots and use pruning shears to remove them.
Placement
Carefully position the white-Fleshed Pitahaya into the new planting hole, centering it so it stands upright. The base of the white-Fleshed Pitahaya should be level with the surrounding soil surface.
Fill In
Gently backfill the hole with soil, cradling the white-Fleshed Pitahaya's roots, and firm the soil around it to eliminate air pockets.
Support
Install any necessary supports such as stakes or a trellis nearby. Then, secure the white-Fleshed Pitahaya to the supports, being careful not to harm the plant body.
Watering
Provide the white-Fleshed Pitahaya a deep watering at its base to settle the soil and hydrate the roots, which will help alleviate transplant shock.
How Do You Care For White-fleshed Pitahaya After Transplanting?
Observation
Regularly check the white-Fleshed Pitahaya for signs of stress, such as wilting or discolored leaves, which can indicate if the plant is struggling to adapt.
Watering
Water the white-Fleshed Pitahaya as needed to maintain moist soil, especially during the initial weeks after transplanting, while being careful not to overwater.
Staking
Ensure the stakes or trellis are secure and adjust the ties as the white-Fleshed Pitahaya grows. This provides support and encourages vertical growth.
Pruning
Prune any further damaged or unhealthy looking stems to promote healthy growth and air circulation around the white-Fleshed Pitahaya.
Weeding
Keep the area around the white-Fleshed Pitahaya free of weeds that might compete for nutrients and water.
Troubleshooting Common Issues with White-fleshed Pitahaya Transplantation.
What's the ideal period to transplant white-Fleshed Pitahaya?
Relocate white-Fleshed Pitahaya during the warmth of late spring to early summer for optimal results.
How much space does white-Fleshed Pitahaya need when transplanting?
Ensure a spacing range between 3-6 feet (90-180 cm) to give white-Fleshed Pitahaya ample room to flourish.
How deep should I plant white-Fleshed Pitahaya during transplanting?
The root ball of white-Fleshed Pitahaya should be planted at the same depth it was previously growing.
Why is my white-Fleshed Pitahaya wilting after transplant?
White-Fleshed Pitahaya requires time to establish. Ensure soil moisture and protect from intense sunlight initially.
How often should I water white-Fleshed Pitahaya after transplanting?
Water white-Fleshed Pitahaya thoroughly after transplanting, then maintain moderate watering until established.
Can I transplant white-Fleshed Pitahaya in full sun?
White-Fleshed Pitahaya thrives in sunlight but acclimate gradually post-transplant to prevent sunburn.
What soil type is best for transplanting white-Fleshed Pitahaya?
Use a well-draining soil mix, rich in organic matter to transplant white-Fleshed Pitahaya.
Should I fertilize white-Fleshed Pitahaya after transplanting?
Wait a few weeks post-transplant; then apply a balanced, slow-release fertilizer.
How do I avoid damaging white-Fleshed Pitahaya's roots while transplanting?
Carefully loosen the surrounding soil and gently lift white-Fleshed Pitahaya to prevent root damage.
Can I transplant white-Fleshed Pitahaya during a wet season?
It's best to transplant white-Fleshed Pitahaya when soil is not waterlogged to prevent root rot.


