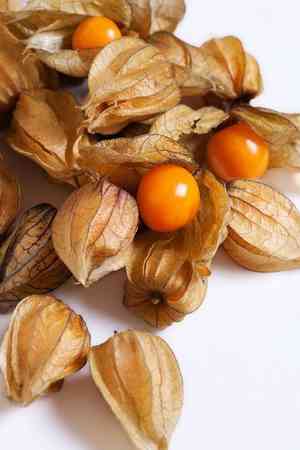
How to Transplant Physalis angulata?
Relocate cutleaf groundcherry during the middle to latter part of spring or the initial phase of summer for optimal outcomes, leveraging mild temperatures and steady humidity. Select a location featuring soil that drains effectively and offers partial shade. During the relocation process, carefully extract cutleaf groundcherry to prevent damage to its root system, ensuring robust development.
What Preparations are Needed Before Transplanting Cutleaf Groundcherry?
What is the Ideal Time for Transplanting Cutleaf Groundcherry?
For cutleaf groundcherry, the prime time for relocation is during the transition from mid to late spring or the start of early summer. This period ensures the soil is warm enough for root establishment, and mild weather minimizes transplant shock. Moving cutleaf groundcherry during these gentler seasons promotes vigorous growth, as the plant benefits from longer days and rising temperatures, vital for root system development before peak summer heat. Selecting these optimal transplanting windows gives cutleaf groundcherry the best start in its new spot, fostering a thriving season ahead.
How Much Space Should You Leave Between Cutleaf Groundcherry Plants?
When moving your cutleaf groundcherry, remember to position your plants approximately 1-2 feet (30-60 cm) apart. This spacing allows your plants to develop robustly without competing for nutrients and sunlight. It's an excellent foundation for a lush, healthy garden!
What is the Best Soil Mix for Cutleaf Groundcherry Transplanting?
To get ready for cutleaf groundcherry transplanting, acquire a fertile, well-draining soil, ideally a loam or sandy loam type. Mix in a balanced starter fertilizer during preparation to provide initial sustenance for your newly transplanted specimens.
Where Should You Relocate Your Cutleaf Groundcherry?
Select a site with ample sunlight for your cutleaf groundcherry. Although it can endure some shade, placing it in full sun will encourage more vigorous growth. Plant them after dawn and before the day becomes too hot to lessen transplant shock.
What Equipments Should You Prepare Before Transplantation Cutleaf Groundcherry?
Gardening Gloves
To protect your hands when handling the plant and soil.
Shovel or Spade
Needed to excavate the transplanting hole and extract the cutleaf groundcherry plant from its current spot.
Garden Trowel
Useful for smaller tasks, such as breaking up soil and making precise measurements.
Pruning Shears
To trim the plant if necessary prior to transplantation.
A Bucket or Wheelbarrow
Perfect for moving the cutleaf groundcherry plant from its original position to the new site.
Watering Can or Hose
Crucial for hydrating the plant before and after transplantation.
Organic Compost
Helps replenish soil nutrients, leading to a healthier transplant.
How Do You Remove Cutleaf Groundcherry from the Soil?
How Do You Remove Cutleaf Groundcherry from the Soil?
From Ground: First, hydrate the cutleaf groundcherry plant to soften the earth. Using a shovel or spade, dig a wide circle around the plant, ensuring you are well clear of the root ball. Push your tool beneath the root ball, gently lift it from the ground, and place it in a pre-prepared container like a bucket or wheelbarrow for transport.From Pot: Thoroughly water your potted cutleaf groundcherry plant. Invert the pot and tap the rim on a firm surface to dislodge the plant and soil. If it doesn't come out easily, slide a knife around the inside of the pot to free the root ball. Mend any damaged roots and remove any dead or diseased plant material.From Seedling Tray: Gently water your cutleaf groundcherry seedlings. Carefully separate individual seedlings if they are not in separate cells. Use a spoon or small implement to lift the roots and soil from the tray, avoiding stem damage.
Step-by-Step Guide for Transplanting Cutleaf Groundcherry
Digging
Excavate a hole twice the diameter of the root ball using your shovel or spade. With your trowel, loosen the soil on the sides and bottom of the hole.
Composting
Place a layer of organic compost at the base of the hole. This can help improve soil fertility and aeration.
Placing the Plant
Position the cutleaf groundcherry plant into the hole, ensuring it is not buried any deeper than its original planting depth. The top of the root ball should be level with the ground surface.
Backfilling
Refill the hole with soil, making sure the root ball is fully covered and the plant is securely supported.
Watering
Water the plant thoroughly after transplanting to help settle the soil around the roots and minimize shock.
How Do You Care For Cutleaf Groundcherry After Transplanting?
Monitoring
Closely observe your cutleaf groundcherry plant during the initial weeks following transplantation. If you notice wilting or yellowing leaves, it may indicate the plant is experiencing stress.
Regular Watering
Maintain consistent soil moisture, especially during dry spells. Water more frequently if needed, but remember cutleaf groundcherry dislikes waterlogged conditions.
Pruning
If certain parts of the plant struggle after transplanting, do not hesitate to trim back weaker or dying stems or leaves to encourage new, healthier growth.
Pest and Disease Control
Watch for pests and diseases, as transplanted plants can be more vulnerable. If you observe any symptoms, diagnose and treat them promptly.
Troubleshooting Common Issues with Cutleaf Groundcherry Transplantation.
When is the ideal time to transplant cutleaf groundcherry?
The most appropriate period to transplant cutleaf groundcherry is during the S2-S4 seasons. These seasons provide the best conditions for growth.
What is the appropriate spacing for cutleaf groundcherry when transplanting?
Cutleaf groundcherry roots require ample room to expand, therefore, when transplanting, ensure the plants are spaced 1-2 feet (30.48-60.96 cm) apart.
Why does my transplanted cutleaf groundcherry look wilted or sick?
Transplant shock could be causing cutleaf groundcherry to appear wilted or unwell. To alleviate this, ensure you water your plant immediately and keep the soil moist, but not saturated.
Should I prune cutleaf groundcherry before transplanting?
Pruning before transplanting is not strictly necessary but can be advantageous. It reduces stress as the shrub doesnât need to support as many leaves, conserving energy and resources.
What conditions are best for transplanting cutleaf groundcherry?
Cutleaf groundcherry thrives in well-drained soil enriched with organic matter. High sunlight exposure is optimal, but partial shade is also well-tolerated.
What should I do if my cutleaf groundcherry does not bloom after transplanting?
Ensure cutleaf groundcherry receives sufficient sunlight exposure, as a lack of sun can slow or stop blooming. Also, excessive nitrogen fertilizer can impede flower development.
Why are the leaves of my transplanted cutleaf groundcherry turning yellow?
Yellow leaves can signal overwatering, underwatering, or a nutrient deficiency. Adjust watering and fertilizing routines accordingly.
My transplanted cutleaf groundcherry is growing slowly. What should I do?
Slow growth of cutleaf groundcherry might be due to poor soil, insufficient sunlight, or improper watering. Ensure these conditions align with cutleaf groundcherry's needs.
Can I transplant cutleaf groundcherry during the hot summer?
Transplanting cutleaf groundcherry in extreme temperatures can stress the plant, causing it to wilt or even perish. If unavoidable, ensure you water it regularly to keep it hydrated.
Should I remove the original soil stuck around the roots before transplanting cutleaf groundcherry?
It's advisable to retain some original soil around the roots when transplanting cutleaf groundcherry. It acts as a buffer, helping the plant better adapt to its new environment.


