How to Transplant Tuberous jerusalem sage?
The ideal period for relocating tuberous jerusalem sage is in the gentle warmth of mid to late spring, facilitating an easy adjustment. Select locations that receive abundant sunlight and possess good drainage. A key tip for successful transplantation: generous watering after relocation fosters vigorous development.
What Preparations are Needed Before Transplanting Tuberous Jerusalem Sage?
What is the Ideal Time for Transplanting Tuberous Jerusalem Sage?
The best time to move tuberous jerusalem sage is from mid to late spring. This period, following the last frost, allows for a smooth transition, promoting root development in warming soil. You'll find that relocating tuberous jerusalem sage as the earth awakens supports their natural growth cycle, ensuring they thrive in their new spot.
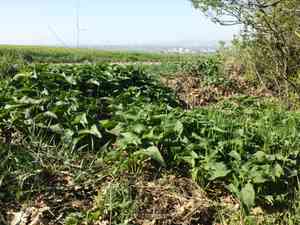
How Much Space Should You Leave Between Tuberous Jerusalem Sage Plants?
When relocating tuberous jerusalem sage, ensure each plant has at least 2-3 feet (60-90 cm) of space between them. This provides ample room for growth and prevents competition for resources. Don't worry if it looks sparse initially; they will quickly fill the area!
What is the Best Soil Mix for Tuberous Jerusalem Sage Transplanting?
For tuberous jerusalem sage, a well-draining soil rich in organic matter works wonders. Incorporating a base layer of slow-release fertilizer will provide a nutrient boost to jumpstart their growth. Remember to blend it thoroughly into the soil before planting!
Where Should You Relocate Your Tuberous Jerusalem Sage?
Choose a location that receives full sun exposure for tuberous jerusalem sage. They love sunlight and require about 6 hours daily to flower beautifully. If sunny spots are limited, don't fret! They can also tolerate some partial shade.
What Equipments Should You Prepare Before Transplantation Tuberous Jerusalem Sage?
Gardening Gloves
To safeguard your hands while handling the plant and soil.
Spade or Shovel
For digging up the plant from its original spot and preparing the new planting hole.
Watering Can
To hydrate the plant before and after its relocation.
Garden Pruners
These will be useful for trimming any damaged roots or stems.
Mulch material
This could be compost, leaves, or straw to help retain soil moisture around the plant.
A Tarp or Wheelbarrow
To move the tuberous jerusalem sage from its initial location to the new site.
How Do You Remove Tuberous Jerusalem Sage from the Soil?
How Do You Remove Tuberous Jerusalem Sage from the Soil?
From Ground: Start by watering the tuberous jerusalem sage plant to moisten the soil. Then, dig around the plant with a spade or shovel, being careful not to damage the root system. Aim for a wide trench that accommodates the plant's root ball. Work your spade beneath the root ball and gently lift the plant from the hole.From Clear Pot: Water the tuberous jerusalem sage thoroughly and allow it to drain. Turn the pot on its side, hold the plant gently by its stem, and tap the pot's rim on a hard surface to loosen the root ball. If it remains stuck, slide a kitchen knife along the pot's interior to free the soil and roots.From Seedling Tray: Water the seedling tray completely. Using a small pot or a spoon, carefully scoop out the seedling with its surrounding soil and roots without harming or disturbing the root systems of other seedlings.
Step-by-Step Guide for Transplanting Tuberous Jerusalem Sage
Preparation
Water the tuberous jerusalem sage at its current location. This will facilitate easier removal and help keep the root ball intact.
Extraction
Using a shovel or spade, carefully dig around the plant to free its roots without causing harm. Gently lift the plant and place it on a tarp or into a wheelbarrow for convenient transport.
Planting Hole
Dig a hole at the new site that is twice as wide and the same depth as the plant's root system. Position the tuberous jerusalem sage in the center of the hole, ensuring the top of the root ball is level with or slightly below the ground surface.
Planting
Backfill soil around the root system, gently firming it to eliminate air pockets. Avoid compacting the soil too tightly, as this could hinder water absorption.
Watering
Water the tuberous jerusalem sage immediately after transplanting to help it settle into its new environment.
Mulching
Apply a layer of mulch around the plant to help conserve moisture and reduce weed growth.
How Do You Care For Tuberous Jerusalem Sage After Transplanting?
Regular Watering
Water the tuberous jerusalem sage consistently but avoid overwatering. A thorough soaking every few days is preferable to light watering daily.
Pruning
Trim any dead or damaged branches, but otherwise, allow the tuberous jerusalem sage some time to adjust before making significant cuts.
Monitoring
Look out for signs of transplant shock, such as wilting, yellowing, or dropped leaves. If these symptoms appear, ensure you are not over or under-watering and that the tuberous jerusalem sage is not exposed to harsh weather conditions.
Patience
Remember, it takes time for the roots to establish in their new home. Be supportive and patient with your plant, and it will soon recover in its new location.
Troubleshooting Common Issues with Tuberous Jerusalem Sage Transplantation.
When is the perfect season to transplant tuberous jerusalem sage?
The ideal season for relocating tuberous jerusalem sage is late spring to early summer (S2-S3). This timing allows the plant to establish itself before winter arrives.
How do I prepare the ground for transplanting tuberous jerusalem sage?
To prepare the ground, remove all weeds and dig a hole that is twice the size of the tuberous jerusalem sage's root ball. Mix fresh compost into the soil to enhance nutrients.
What is the ideal spacing between tuberous jerusalem sage plants?
When transplanting, ensure a gap of 2-3 feet (60-90 cm) between each tuberous jerusalem sage. This provides adequate room for growth and minimizes competition for nutrients.
What should I consider when removing tuberous jerusalem sage from its previous location?
Be gentle when extracting tuberous jerusalem sage from its original spot. Try to keep as much soil around the roots as possible to reduce shock and promote faster growth after transplanting.
What's the best way to handle tuberous jerusalem sage roots during transplantation?
Handle tuberous jerusalem sage's roots with care. Place it gently into the hole, spread the roots out, and ensure they are not crushed or tangled. This promotes proper growth post-transplant.
How should I water tuberous jerusalem sage just after transplantation?
Immediately after transplanting, water tuberous jerusalem sage generously. Provide enough water to saturate the soil around the roots, helping them establish quickly in their new environment.
Should I protect tuberous jerusalem sage from the sun just after transplanting?
Yes, it's important to shield tuberous jerusalem sage from direct sunlight for a week after transplanting. Create temporary shade using an outdoor umbrella or other means to prevent wilting.
Can I use a fertilizer during the transplantation of tuberous jerusalem sage?
Yes, a slow-release fertilizer can be beneficial for transplanting tuberous jerusalem sage. Mix it into the soil of the planting hole. This supplies nutrients, encouraging growth and recovery after the move.
What care does tuberous jerusalem sage require post-transplant?
Tuberous jerusalem sage needs regular watering, especially during dry periods. Monitor for signs of pests or diseases. Adequate care will help the plant establish and thrive in its new location.
What if my transplanted tuberous jerusalem sage shows signs of wilting or yellow leaves?
If transplanted tuberous jerusalem sage exhibits wilting or yellow leaves, it might be experiencing transplant shock. Continue regular watering and protect it from harsh weather or excessive sun exposure.


