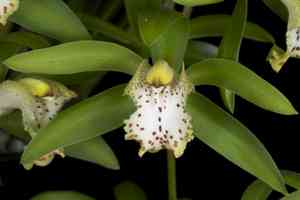
How to Transplant Hooker's cymbidium?
The ideal period for transplanting hooker's cymbidium is at the onset of active growth phases, usually from late spring through early summer, to encourage robust root establishment. Select a location offering filtered sunlight and good air circulation. Should it be necessary, amend the substrate to facilitate better adaptation.
What Preparations are Needed Before Transplanting Hooker's Cymbidium?
What is the Ideal Time for Transplanting Hooker's Cymbidium?
The most favorable period for relocating hooker's cymbidium is during the emergence of spring or the initial mild days of early summer. Moving hooker's cymbidium at this time aligns with its natural growth cycle and allows ample opportunity for root establishment prior to autumn. This approach grants a full growing season for hooker's cymbidium to strengthen and flower, ensuring a robust beginning due to moderate temperatures and soil that is sufficiently warm for root development, yet moist enough to prevent stress.
How Much Space Should You Leave Between Hooker's Cymbidium Plants?
When relocating hooker's cymbidium, ensure each plant has ample room to expand. Position each plant approximately 2-4 feet (60-120 cm) apart. This spacing enables their roots to spread and absorb nutrients effectively, fostering vigorous development!
What is the Best Soil Mix for Hooker's Cymbidium Transplanting?
The optimal soil type for hooker's cymbidium is well-draining and rich in organic matter. Consider a blend of compost, garden soil, and coarse sand. Before planting, incorporate a granular slow-release base fertilizer into the soil. This will provide the initial nutrient boost necessary for hooker's cymbidium's growth.
Where Should You Relocate Your Hooker's Cymbidium?
Select a spot with bright, indirect sunlight for transplanting hooker's cymbidium. They thrive in sun, but do not tolerate intense midday rays. Therefore, a location receiving morning sun and afternoon shade would be most suitable. Remember, adequate sunlight is vital for hooker's cymbidium's well-being.
What Equipments Should You Prepare Before Transplantation Hooker's Cymbidium?
Trowel
This is a small, hand-held implement featuring a pointed, scoop-shaped metal blade and a handle. You will use it to excavate holes for the new planting area.
Gardening Gloves
To protect your hands from abrasions and keep them clean while handling soil and plants.
Watering Can
For moistening the soil before plant removal and after replanting.
Garden Shears
To trim any dead or yellowed foliage prior to transplanting.
Wheelbarrow or Container
To safely transport the plant from its current spot to the new location.
Shovel or Spade
To assist in lifting larger plants with their entire root ball intact.
Garden Knife
For precise tasks such as cutting through roots.
How Do You Remove Hooker's Cymbidium from the Soil?
How Do You Remove Hooker's Cymbidium from the Soil?
From Ground: Start by irrigating the hooker's cymbidium plant to moisten the soil. This will facilitate the digging process and reduce stress on the plant. Carefully use a spade to cut a trench around the plant, ensuring a substantial portion of roots remains undamaged. The aim is to retrieve as much of the plant's root ball as possible. Gradually work the spade beneath the root ball to lift the plant from its original position.From Pot: If the hooker's cymbidium plant is not excessively large, invert the pot while supporting the plant with your other hand. Exercise gentleness to prevent damage to the plant. If it is large, lay the pot on its side and lightly tap the sides to loosen the soil and roots. Slowly slide the plant out, supporting the root ball.From Seedling Tray: Water the seedling tray first to soften the soil, which will make removing the plant easier. With a small trowel or an old spoon, carefully excavate the seedling, taking care not to harm the roots. Handle the seedling by its leaves to avoid any root damage.
Step-by-Step Guide for Transplanting Hooker's Cymbidium
Prep Work
Clean and sanitize your tools to prevent disease transmission. Trim any damaged or yellowing leaves using garden shears.
Digging
Using your trowel, excavate a hole in the new location that is approximately twice the width and equal in depth to the hooker's cymbidium's root ball. Ensure the hole is spacious enough to accommodate new roots.
Transplanting
Gently place the hooker's cymbidium plant into the freshly dug hole. Confirm that the top of the root ball is level with the surrounding soil. If necessary, add or remove soil beneath the root ball until it reaches the correct height.
Backfilling
Refill the hole with the previously removed soil, gently pressing it around the base of the hooker's cymbidium plant to eliminate any air pockets.
Watering
After completing the backfilling of the hole, thoroughly water the plant, allowing the moisture to penetrate deeply into the soil.
How Do You Care For Hooker's Cymbidium After Transplanting?
Monitor
For the initial couple of weeks, regularly observe your hooker's cymbidium plant to ensure it is adapting well to its new environment. Look for indicators of stress such as wilting or discolored leaves.
Maintain Humidity
Preserve a consistent level of humidity around the hooker's cymbidium to help it manage the stress of relocation.
Temperature
Avoid immediate drastic temperature shifts as this can lead to transplant shock. Initially, keep the plant in a moderately cool and shaded spot, gradually exposing it to its usual conditions.
Pruning
Refrain from any significant pruning for several months post-transplantation to allow the hooker's cymbidium plant to prioritize energy on root development rather than leaf or flower production.
Troubleshooting Common Issues with Hooker's Cymbidium Transplantation.
When is the ideal time for transplanting hooker's cymbidium?
The optimal seasons for relocating hooker's cymbidium span from the first to the fourth seasons (Winter, Spring, Summer, Autumn). This can maximize its growth potential.
How much space should I leave between each hooker's cymbidium during transplanting?
Each hooker's cymbidium should be spaced 2-4 feet (0.6-1.2 meters) apart. This distance ensures healthy growth and promotes air circulation around the plant.
Why are the leaves of my transplanted hooker's cymbidium turning yellow?
Yellowing leaves might indicate overwatering or a nutrient deficiency. Ensure your hooker's cymbidium receives appropriate watering and the correct amount of nutrients.
What is the appropriate depth to plant hooker's cymbidium during transplantation?
The hooker's cymbidium should be planted so that the top of its root ball is level with or slightly above the soil surface for optimal growth.
Can I transplant hooker's cymbidium into a container?
Yes, hooker's cymbidium can be relocated into a pot. Ensure the container is sufficiently large and provides good drainage to maintain healthy roots.
How should I prepare the soil when transplanting hooker's cymbidium?
Ensure the soil is well-draining yet rich in nutrients. Incorporating compost or well-rotted manure can improve soil fertility and structure, boosting hooker's cymbidium's overall growth.
How do I water hooker's cymbidium after transplanting?
Water hooker's cymbidium thoroughly immediately after transplanting. Subsequently, keep the soil consistently moist but not excessively wet. This can help the plant establish more quickly.
Can I use fertilizer immediately after transplanting hooker's cymbidium?
It is generally advisable to wait a few weeks after transplanting before applying fertilizer. This will allow hooker's cymbidium time to adjust to its new environment.
How do I handle hooker's cymbidium roots during transplanting?
Handle hooker's cymbidium roots gently to prevent damage. Spread them out in the planting hole and ensure they are properly covered with soil for healthy development.
What should I do if my transplanted hooker's cymbidium isn't growing?
If your hooker's cymbidium shows no signs of growth after transplantation, examine the light, water, soil, and temperature conditions. Minor adjustments can yield significant improvements.


