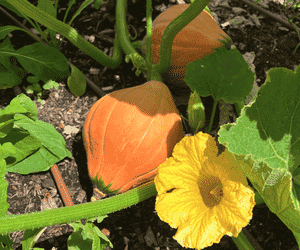
How to Transplant Winter squash?
The optimal period for relocating winter squash is from mid to late spring, as environmental factors are most favorable for its development. Select a site with abundant sunlight and ensure sufficient distance between each transplanted specimen. Should it be required, offer some assistance for the transplant to guarantee successful rooting.
What Preparations are Needed Before Transplanting Winter Squash?
What is the Ideal Time for Transplanting Winter Squash?
The optimal period to move winter squash is from mid to late spring, as this offers prime growing conditions. Relocating them then ensures robust development, abundant yields, and a thriving plant.
How Much Space Should You Leave Between Winter Squash Plants?
When relocating winter squash, ensure they are spaced 5-6 feet (1.5-1.8 meters) apart. This provides ample room for their extensive vines to spread without encroaching on nearby plants.
What is the Best Soil Mix for Winter Squash Transplanting?
For successful winter squash growth, prepare soil that drains well and is rich in organic matter. Incorporating a foundational fertilizer like compost or aged manure will supply essential nutrients for vigorous development.
Where Should You Relocate Your Winter Squash?
Select a transplanting site for winter squash that receives full sun exposure, meaning at least 6-8 hours of direct sunlight daily. Be sure to choose a garden spot that meets this requirement for optimal outcomes.
What Equipments Should You Prepare Before Transplantation Winter Squash?
Gardening Gloves
To safeguard your hands while handling soil and plants.
Shovel or Spade
To excavate holes and lift plants with their root systems intact.
Hand Trowel
For digging smaller holes and precise plant positioning.
Watering Can or Hose
To hydrate the plant before and after relocation.
Compost or Organic Fertilizer
To enrich the planting hole with nutrients for plant development.
Stakes or Supports (optional)
For propping up larger or vining types of winter squash.
How Do You Remove Winter Squash from the Soil?
How Do You Remove Winter Squash from the Soil?
- From Ground:First, moisten the soil around the winter squash plant. Then, use a shovel or spade to dig a wide trench around the plant, ensuring the root ball remains undisturbed. Carefully work the spade beneath the root ball to lift the plant from its original spot.- From Pot:Water the winter squash plant in its container to dampen the soil. Gently tap the pot's sides to loosen the soil, or use a small trowel if necessary. Tilt the pot sideways and carefully slide out the plant, keeping the root ball intact.- From Seedling Tray:Thoroughly water the winter squash seedlings in the tray. Use a small hand trowel or spoon to carefully scoop out each seedling, taking care to preserve the root ball and surrounding soil. If needed, use your fingers to gently separate tangled roots.
Step-by-Step Guide for Transplanting Winter Squash
Prepare the Planting Hole
Dig a hole that is slightly wider and deeper than the winter squash's root ball. Enrich the hole with compost or organic fertilizer, following product directions.
Root Ball Care
Examine the winter squash's root ball, and if required, gently untangle any tightly bound roots to encourage growth.
Plant Placement
Carefully position the winter squash in the prepared hole, ensuring the top of the root ball is level with the ground. Adjust the soil beneath the plant as needed.
Filling the Hole
Backfill the hole with the excavated soil and any remaining compost or organic fertilizer, being careful not to bury the winter squash's stem.
Compress Soil
Gently press down on the soil around the winter squash to eliminate air pockets and provide stability for the plant.
Watering
Use a watering can or hose to thoroughly water the winter squash, allowing the water to penetrate deeply around the roots.
(Optional)_Supporting
Stake or provide supports for larger or vining varieties of winter squash to encourage proper growth and prevent damage.
How Do You Care For Winter Squash After Transplanting?
Watering
Keep the soil around the winter squash consistently moist, but not waterlogged, for the initial weeks post-transplant to aid in root establishment.
Mulching
Apply a layer of mulch around the winter squash to help retain moisture, suppress weeds, and stabilize soil temperature.
Fertilizing
After 3-4 weeks, apply a suitable organic fertilizer to promote healthy growth, following package instructions.
Pest and Disease Control
Monitor the winter squash for any indications of pests or diseases, and address them promptly with appropriate methods.
Pruning and Training
Depending on the winter squash variety, some trimming or training of vines may be necessary to encourage healthy growth and boost fruit production.
Troubleshooting Common Issues with Winter Squash Transplantation.
What is the best time to transplant winter squash?
Ideally, move winter squash from mid to late spring when the soil has warmed and there's no risk of frost.
What spacing should I use for winter squash?
Allow for an optimal spacing of 5-6 feet (1.5-1.8 meters) between each winter squash to encourage healthy growth.
How much sunlight do winter squash transplants need?
Winter squash transplants require full sun exposure, approximately 6-8 hours of direct sunlight daily, to flourish.
What kind of soil is best for transplanting winter squash?
Choose well-draining, fertile soil with a pH of 6.0-7.0 for successful transplanting and robust winter squash growth.
How deep should I plant winter squash transplants?
Plant winter squash seedlings at the same depth as they were in their original container, about 1-2 inches (2.5-5 cm) deep.
How can I help winter squash survive after transplanting?
To help winter squash establish well, water thoroughly after transplanting, and provide consistent moisture during growth.
How can I ensure the health of the winter squash transplant?
Monitor the transplant for pests and diseases, use organic or chemical treatments, and maintain good plant spacing.
How should I prepare my winter squash seedlings for transplanting?
Harden off winter squash seedlings by gradually exposing them to outdoor conditions for 7-10 days before transplanting.
How do I know if my winter squash are ready for transplanting?
When winter squash have 2-3 true leaves and a well-developed root system, they are ready for transplanting outdoors.
When should I start to fertilize my winter squash transplants?
Begin fertilizing winter squash with a balanced fertilizer 2-4 weeks after transplanting to promote optimal health and growth.


