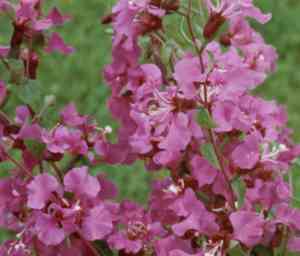
How to Transplant Elegant clarkia?
The ideal time to transplant elegant clarkia is during the mild transition from spring to summer, utilizing the temperate weather for superior root development. Select a location bathed in sunlight with soil that drains effectively. Incorporating some organic material will aid elegant clarkia in flourishing within its new environment.
What Preparations are Needed Before Transplanting Elegant Clarkia?
What is the Ideal Time for Transplanting Elegant Clarkia?
The best time to move elegant clarkia is at the transition from late spring to early summer. This period offers mild to warm weather, encouraging strong development. Relocating elegant clarkia to your garden during this season allows for maximum root establishment before hotter conditions arrive, ensuring a robust beginning. Friendly tip: early birds catch the worm, but gardeners who transplant elegant clarkia now catch blooms all season long!
How Much Space Should You Leave Between Elegant Clarkia Plants?
When preparing to transplant your elegant clarkia, remember, spacing is crucial! Aim to leave approximately 1-2 feet (about 30-60 cm) between each plant. This provides your elegant clarkia ample room to grow and flourish.
What is the Best Soil Mix for Elegant Clarkia Transplanting?
For a thriving elegant clarkia, supportive soil is essential. A well-draining soil, rich in organic material, would be perfect. Incorporate some balanced slow-release fertilizer to establish a strong foundation for your plant's growth!
Where Should You Relocate Your Elegant Clarkia?
Donât forget, elegant clarkia loves sunlight! Select a sunny location in your garden that receives full sun to partial shade. This will ensure your elegant clarkia gets the light it needs for optimal growth.
What Equipments Should You Prepare Before Transplantation Elegant Clarkia?
Gardening Gloves
To safeguard your hands while handling soil and elegant clarkia.
Shovel or Spade
Required for digging holes and extracting the elegant clarkia from its original spot.
Garden Trowel
Useful for excavating small holes, especially when moving elegant clarkia from pots or seedling trays.
Watering Can
Used to hydrate the elegant clarkia both prior to and following its transplantation.
Organic Mulch
Helps maintain soil moisture after the elegant clarkia has been relocated.
Garden Pruners
To trim roots of elegant clarkia if necessary before transplanting.
Garden Fork
Beneficial for loosening the soil around the elegant clarkia in the case of ground transplantation.
How Do You Remove Elegant Clarkia from the Soil?
How Do You Remove Elegant Clarkia from the Soil?
From Ground: Start by watering the elegant clarkia to make the soil easier to manage. Use a shovel or spade to dig a wide trench around the elegant clarkia, being careful to keep the root ball intact. Gently work the shovel beneath the root ball to lift the elegant clarkia from the ground. Ensure you protect the roots and avoid damaging them during this process.From Pot: Water the elegant clarkia thoroughly a few hours before transplanting. Carefully invert the pot and tap it to release the elegant clarkia and its root system. Be careful not to pull or tug at the plant as this can cause harm.From Seedling Tray: Moisten the soil of the seedling tray before attempting to remove the elegant clarkia to facilitate a smoother process. Use a garden trowel to gently lift the seedling from its cell, ensuring minimal damage to the root system.
Step-by-Step Guide for Transplanting Elegant Clarkia
Preparation
It's best to transplant the elegant clarkia on an overcast day or during the early morning or late evening to prevent it from drying out. Prepare the new site by digging a hole that is twice as wide and the same depth as the elegant clarkia's root ball.
Planting
Place the elegant clarkia in the prepared hole, ensuring it sits at the same depth it was growing in its original location. Fill the hole with the excavated soil, gently firming it around the elegant clarkia.
Watering
Immediately after transplanting, water the elegant clarkia generously to moisten the surrounding soil and eliminate any air pockets. Continue watering the plant regularly depending on weather and soil conditions.
Mulching
Once the elegant clarkia is securely planted in its new location, apply a layer of organic mulch around the base to retain moisture.
How Do You Care For Elegant Clarkia After Transplanting?
Watering
Ensure the elegant clarkia receives sufficient water for several weeks following transplantation. This aids the plant in establishing a strong root system in its new spot.
Pruning
If the elegant clarkia appears wilted after transplanting, you might need to trim it back slightly to reduce stress.
Pest Control
Monitor for pests and diseases as your plant adjusts to its new environment. Employ an appropriate pest control method if necessary.
Observation
Regularly inspect the elegant clarkia for any indications of transplant shock or illness, such as yellowing leaves or stunted growth.
Troubleshooting Common Issues with Elegant Clarkia Transplantation.
When is the best time to transplant elegant clarkia?
The optimal period to relocate your elegant clarkia is during the third to fourth season (S3-S4). This helps ensure the plant establishes itself well.
What's the correct spacing for elegant clarkia?
Ensure each plant has ample room to grow by maintaining a distance of approximately 1-2 feet (30-60 cm). This prevents overcrowding.
What should I do if elegant clarkia wilts after transplanting?
Do not be alarmed if elegant clarkia wilts post-transplant. Ensure adequate watering, and the plant should gradually recover. If wilting persists, seek expert advice.
Can elegant clarkia be transplanted as a mature plant?
Yes, but doing so requires careful handling. Mature elegant clarkia are susceptible to damage, so extra caution is vital during the process.
Why isn't my transplanted elegant clarkia flowering?
Poor blooming can be attributed to insufficient sunlight or incorrect soil pH levels. Ensure elegant clarkia receives plenty of light and monitor soil conditions.
How do I deal with root damage during elegant clarkia transplantation?
In the event of root damage, trim off the injured sections using a sterilized tool before transplanting. This encourages healthy root development.
What sort of soil should I use when transplanting elegant clarkia?
Elegant clarkia thrives in well-draining soil. Soils rich in organic matter help retain moisture, providing an ideal environment for root development.
How should I water elegant clarkia post-transplant?
Water your elegant clarkia sufficiently immediately after transplanting. Then adjust to moderate watering as excessive moisture can cause root rot.
Is it normal for elegant clarkia to lose leaves after transplanting?
Yes, some leaf shedding is normal as the plant adapts to its new surroundings. If excessive, check for overwatering or a pest infestation.
How deep should the hole be for transplanting elegant clarkia?
Dig a hole twice as wide and deep as the root ball. This ensures the plant's roots are not constricted and can spread properly.


