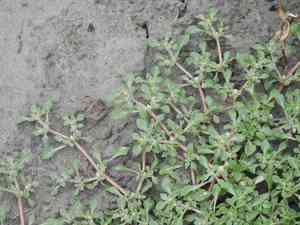
How to Transplant Smooth joyweed?
For smooth joyweed, the period spanning early spring to the onset of summer rains is ideal for relocation. Selecting a sunny location with sufficient hydration fosters vigorous development. Bear in mind, careful manipulation facilitates a smooth adaptation.
What Preparations are Needed Before Transplanting Smooth Joyweed?
What is the Ideal Time for Transplanting Smooth Joyweed?
The optimal period for relocating smooth joyweed extends from early spring's onset to the brink of summer's warmth. This timeframe enables smooth joyweed to establish roots in the mild temperatures and favorable ground conditions of spring, ensuring a strong beginning. Moving smooth joyweed during this season leverages spring's gentle rains and increasing daylight, fostering vigorous growth and vibrant beauty in your garden.
How Much Space Should You Leave Between Smooth Joyweed Plants?
Before you move your smooth joyweed, ensure they have adequate room to thrive. Position them approximately 8-12 inches (20-30 cm) apart. This spacing will provide sufficient area for development and prevent competition for nutrients.
What is the Best Soil Mix for Smooth Joyweed Transplanting?
For your smooth joyweed, prepare the soil by selecting a rich, loamy base. Incorporate some well-decomposed compost or a balanced slow-release fertilizer to give your plants a robust start. This will aid your smooth joyweed in developing healthy root systems.
Where Should You Relocate Your Smooth Joyweed?
Locate a sunny spot for your smooth joyweed as they flourish in full sunlight. Ensure the chosen site receives at least 6 hours of direct sun daily. Morning sun is an excellent stimulant for smooth joyweed, helping them grow strong and vibrant.
What Equipments Should You Prepare Before Transplantation Smooth Joyweed?
Gardening Gloves
To safeguard your hands while handling soil and plants.
Trowel or Shovel
For excavating the smooth joyweed plant and preparing the new planting site.
Watering Can or Hose with Sprinkler Attachment
To hydrate the plant before and after its relocation.
Pruning Shears
To trim any damaged roots or foliage.
Wheelbarrow or Garden Cart
For transporting the smooth joyweed plant if it's large or moving multiple plants simultaneously.
Garden Fork
To loosen the soil around the plant's original position.
How Do You Remove Smooth Joyweed from the Soil?
How Do You Remove Smooth Joyweed from the Soil?
From Ground: First, water the smooth joyweed plant to moisten the soil. This facilitates easier removal without root damage. Use a garden fork to loosen the soil around the plant, working it in a circle to encompass the root system. Gently lift the plant, preserving the root ball as much as possible.From Pot: Similarly, begin by watering the smooth joyweed plant to dampen the soil. Then, turn the pot on its side and gently tap to dislodge the root ball. Carefully ease the plant out by pulling the base of the main stem, ensuring the root ball remains intact.From Seedling Tray: Water the tray to ensure the soil is moist. Use a trowel to scoop out each individual smooth joyweed seedling. Handle the seedling by its leaves to avoid harming the stem or roots.
Step-by-Step Guide for Transplanting Smooth Joyweed
Prepare the Plant
Water your smooth joyweed thoroughly before beginning the transplanting process to minimize stress and facilitate root transfer.
Dig Up smooth joyweed
Use the garden fork or shovel to carefully dig around the plant, ensuring you maintain enough distance to avoid damaging the root system.
Prepare the New Location
Dig a hole in the ground that is twice the width of the root ball and equal in depth, ensuring the smooth joyweed will be planted at its original growing level.
Inspect Roots
Once the smooth joyweed is removed from its initial spot, examine the roots. Use pruning shears to snip away any dead or damaged ones.
Placement
Carefully position the smooth joyweed in the center of the new hole. Adjust the plant so it stands upright and at the correct depth.
Backfill the Hole
Fill in around the root ball with soil, gently compacting it to eliminate air pockets. Avoid adding extra soil on top of the root ball.
Water Deeply
After transplanting, water the smooth joyweed thoroughly to settle the soil and hydrate the plant. Ensure the water reaches the root zone.
How Do You Care For Smooth Joyweed After Transplanting?
Mulching
Apply a layer of organic mulch around the base of smooth joyweed to retain moisture and stabilize soil temperature.
Watering
Maintain consistent moisture during the initial weeks post-transplant. Water deeply to encourage new root growth without over-saturating the soil.
Pruning
Trim any foliage that appears stressed or damaged after transplanting to help the smooth joyweed focus its energy on re-establishing its root system.
Checking
Monitor your smooth joyweed for signs of transplant shock, which may include wilting, yellowing, or dropped leaves, and respond accordingly.
Troubleshooting Common Issues with Smooth Joyweed Transplantation.
What's the best time of year to transplant smooth joyweed?
Relocate smooth joyweed during the pleasant period of early to late spring, when the weather promotes growth.
How far apart should smooth joyweed be spaced when transplanting?
For a lush display, space smooth joyweed 8-12 inches (20-30 cm) apart, allowing ample room for expansion.
What soil conditions favor smooth joyweed after transplanting?
Aim for well-draining soil rich in organic matter; smooth joyweed thrives with a good soil foundation.
How much should I water smooth joyweed after transplanting?
Provide smooth joyweed with steady moisture, but avoid waterlogging. Keep the soil damp, not drenched.
Can smooth joyweed be transplanted on sunny days?
Transplant smooth joyweed on a cloudy day or in subdued light to minimize transplant shock and sun stress.
What is transplant shock in smooth joyweed and how to reduce it?
Transplant shock occurs when smooth joyweed experiences stress. Minimize it by transplanting quickly and keeping roots moist.
How deep should the planting hole be for smooth joyweed?
The hole should be as deep as the root ball and twice as wide to encourage root growth.
Should I apply fertilizer immediately after transplanting smooth joyweed?
Wait 4-6 weeks before fertilizing to let smooth joyweed settle. Apply a balanced, slow-release fertilizer thereafter.
How to handle root-bound smooth joyweed during transplanting?
Gently untangle the roots of smooth joyweed if they're pot-bound, promoting better root spread and growth.
Is mulching beneficial for smooth joyweed after transplanting?
Yes, applying a layer of organic mulch helps retain moisture, regulate soil temperature, and suppress weeds.


